Home / Ceiling Panels
Armstrong Easy Elegance Ceiling Panel Installation Manual
Comprehensive installation guide for Armstrong Easy Elegance ceiling panels. Includes planning, grid installation, wall molding, panel placement, and safety precautions.
Table of contents
Manual images
Click an image to enlargeQuick Guide from the Manual
The Armstrong Easy Elegance ceiling system is designed for drop/suspended ceiling applications using a 15/16-in grid. Before starting, ensure you have the required clearance above the grid face: 6-in for deep coffer panels, 3-in for shallow coffer panels, and 2.5-in for flat panels. Do not install in areas exceeding 130°F. Always remove the protective film from PVC tiles before installation.
Materials and Tools
Materials Needed: 12-gauge hanger wires and fasteners (or QuickHang hooks/brackets), Prelude main beams and coordinating tees, UHDC universal clear hold down clips, Easy Elegance panels, wall moldings (7800R), and MBAC/DWAC clips for drywall perimeters.
Tools Needed: Safety glasses, cut-resistant gloves, chalk line, measuring tape, hammer, pencil, utility knife, metal snips, carpenter's or laser level, drill with driver bit, ball of string, and clamps.
Step 1: Plan Layout
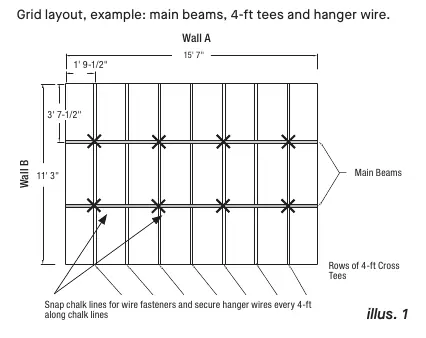
Determine border panel sizes by measuring room dimensions. Armstrong recommends border panels be 1-ft or larger. Calculate by sectioning wall length into 2-ft increments until a remainder is found, then add 2-ft and divide by 2 to find the border size for opposite sides. Mains should run opposite to the joists.
Step 2: Install Wall Molding
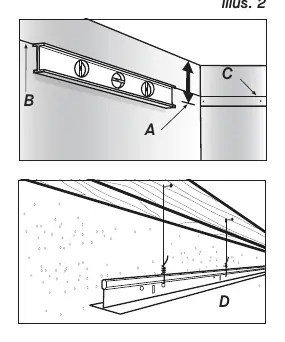
Mark the desired ceiling height on the walls. Add the height of the wall molding and mark a level line around the room. Nail the molding to wall studs. If the wall is solid concrete or stone, hang a section of the main beam next to the wall as a substitute.
Step 3: Install Suspension Grid
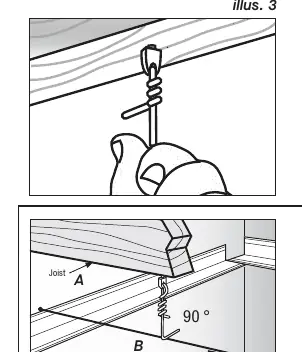
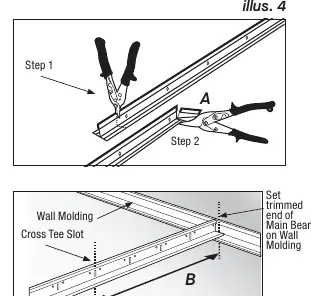
Snap chalk lines for main beams 4-ft apart. Install wire fasteners and hanger wires. Pre-bend hanger wires by stretching a string from nail to nail along a row of wires, then bending each wire at 90° where it touches the string. Trim the first main beam so a cross tee slot aligns with the border panel distance. Hang the main beam, ensuring it is plumb. Cut border cross tees to length and insert them. Square the grid by measuring diagonals of the 2-ft x 4-ft openings; adjust mains until diagonals are equal.
Step 4: Install Panels
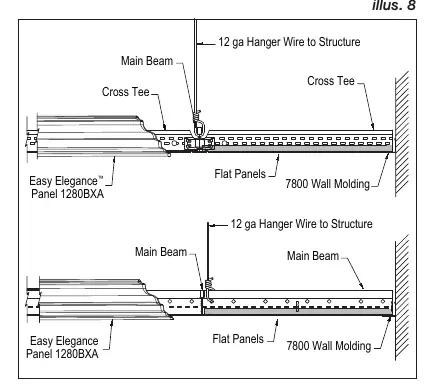
Cut panels to integrate with lighting, leaving a 1/8-in gap between the panel and recessed lighting. Use a sharp mat knife for cutting flat panels. Install lights, ensuring height extensions are used for deep coffer panels (2.5-in above grid line) and shallow coffer panels (7/16-in above grid line). Install UHDC hold down clips if panels shift, particularly near doors or windows.
QuickHang Hardware
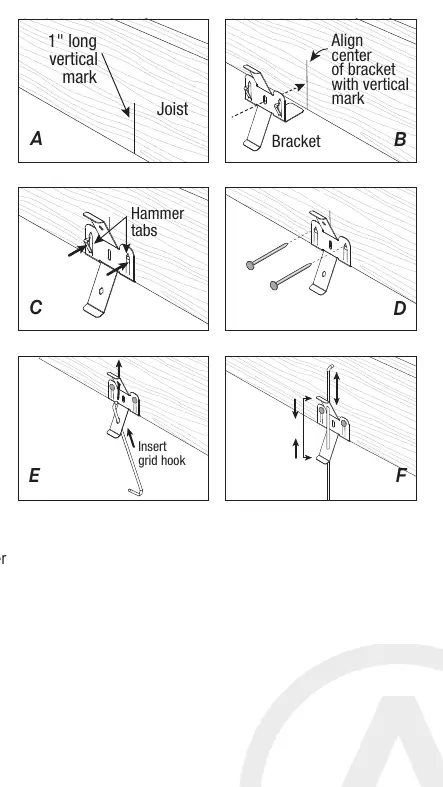
QuickHang hardware is for residential use with solid wood or engineered wood joists. It allows for ceiling drops from 2.5-in to 12-in. Do not cut QuickHang hooks; bend the top portion if shortening is required. Align brackets with marks on joists, hammer in tabs, and nail securely. Insert grid hooks through the diamond-shaped holes in the brackets.
Maintenance and Safety
Wipe panels clean with a damp cloth. The product contains titanium dioxide and carbon black; ensure the work site is well-ventilated during installation. Wear protective gear and avoid breathing dust when cutting or machining. For additional information, visit ceilings.com/easyelegance or call 1 877 ARMSTRONG.
Official resources from the manual
Practical help
Common problems
Tiles lifting out of the ceiling grid
Install UHDC Universal Hold Down Clips to secure panels, especially near doors or windows where air pressure changes occur.
Grid is not square
Measure across the diagonals of the 2-ft x 4-ft opening. If measurements differ, shorten one of the main beams until the diagonals are equal.
QuickHang hook is too long due to obstruction
Do not cut the hook. The top portion can be bent by hand or with pliers to accommodate the obstruction.
Before use
- Verify clearance: 6-in for deep coffer, 3-in for shallow coffer, 2.5-in for flat panels.
- Ensure heat sources do not exceed 130°F.
- Remove protective film from PVC tiles.
- Gather tools: Safety glasses, cut-resistant gloves, chalk line, level, utility knife, metal snips, drill, hammer.
- Ensure room layout is planned with border panels 1-ft or larger.
Specs in practice
- Clearance (Deep Coffer)
- 6-in above grid face required.
- Clearance (Shallow Coffer)
- 3-in above grid face required.
- Clearance (Flat Panels)
- 2.5-in above grid face required.
- Max Temperature
- 130°F (54°C); do not install near heat sources exceeding this.
Images and diagrams
- Illustration 1 & 6: Grid layout, main beam placement, and cross tee rows.
- Illustration 2: Wall molding installation and height marking.
- Illustration 3: Hanger wire installation, pre-bending, and leveling.
- Illustration 4 & 5: Trimming main beams and cutting border cross tees.
- Illustration 8: Final panel installation and lighting integration.
Model compatibility
- Designed for Armstrong Prelude 15/16-in Grid.
- Not for use on finished drywall ceilings (QuickHang hardware).
- Compatible with most modern light fixtures (CFL/LED).
- Requires height extension components for deep coffer panels.

Manual page author
Michael Turner
Technical manual editor
Reviews PDF manuals for structure, safety notes, and practical product details so readers can find the right information quickly.