User Manual for Beurer HK 123 XXL Heat Pad
Quick guide for the Beurer HK 123 XXL heat pad. Learn how to safely operate, clean, and maintain your heating pad, including temperature settings and troubleshooting.
Table of contents
Manual images
Click an image to enlargeQuick guide from the manual
This document provides instructions for the Beurer HK 123 XXL heat pad. Before use, ensure the packaging is intact and the device shows no visible damage. The device is intended for warming the human body only and is not for commercial or hospital use.
Safety instructions
- Do not use on persons insensitive to heat or vulnerable individuals who cannot react to overheating (e.g., diabetics, people with skin alterations or scarring in the application area, or after taking pain relief medication or alcohol).
- Not for use by children under 3 years old.
- Children aged 3 to 8 may use the device only under supervision, with the control set to the minimum temperature.
- Do not insert pins, use folded/rucked, or use when wet.
- The device must only be used with the control unit specified on the label.
- Electrical and magnetic fields emitted by the device may interfere with pacemakers. Consult your doctor and pacemaker manufacturer before use.
- Do not pull, twist, or sharply bend the cables.
- If the device is switched on, do not place sharp objects or other heat sources (like hot water bottles) on it.
- The control unit heats up during use; do not cover it or place it on the heat pad.
Operation
To operate the device:

- Connect the control unit to the heat pad by plugging in the connector.
- Plug the power plug into the mains outlet.
- Set the slider for ON/OFF and temperature settings to level 1, 2, or 3.
- The temperature settings will illuminate when switched on.
Temperature settings
- Level 0: OFF
- Level 1: Minimum heat
- Level 2: Medium heat
- Level 3: Maximum heat
The device features a fast heating function for the first 10 minutes. If used for several hours, it is recommended to set the lowest temperature level to avoid overheating.
Automatic switch-off
The heat pad is equipped with an automatic switch-off function that stops heat supply approximately 90 minutes after initial use. The temperature display will flash. To restart, set the slider to '0' (OFF), wait about 5 seconds, and switch it on again.
Cleaning and maintenance
- Always remove the power plug from the socket before cleaning. Disconnect the control unit from the heat pad.
- The control unit must never come into contact with water or other liquids. Clean it with a dry, lint-free cloth.
- Small marks on the heat pad can be removed with a damp cloth and, if necessary, a little liquid detergent for delicate laundry.
- The heat pad is machine-washable. Use a gentle wash cycle at 30 °C (wool cycle) with a delicate detergent.
- Do not wash more than 10 times during the product's life.
- After washing, reshape the pad while damp and dry flat on a clothes horse. Do not use pegs to attach it.
- Do not reconnect the control until the plug-in connection and pad are completely dry. Never switch the pad on to dry it.
Storage
If not in use for a long period, store in the original packaging. Disconnect the control unit. Allow the pad to cool down before storing and do not place objects on top of it to avoid sharp folds.
Troubleshooting
If the temperature settings are not illuminated while the control is connected, the power plug is in a working socket, and the slider is set to 1, 2, or 3, the safety system has switched the heat pad off permanently. In this case, send the heat pad and the control unit to the service address.
Practical help
Common problems
The safety system has switched the heat pad off permanently. Send the heat pad and the control unit to the service address.
Before use
- Check that the cardboard packaging is intact.
- Ensure the device and accessories are present.
- Verify there is no visible damage to the device or accessories.
- Remove all packaging material.
- Connect the control unit to the heat pad via the plug-in coupling.
- Plug the power plug into the mains outlet.
Specs in practice
- Automatic switch-off
- Stops heat supply after approximately 90 minutes.
Images and diagrams
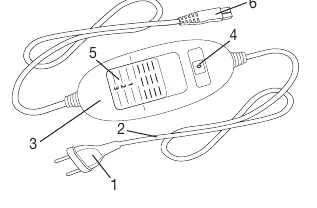
- 1: Power plug
- 2: Power cord
- 3: Control unit
- 4: Illuminated temperature settings
- 5: Slider for ON/OFF and temperature settings
Model compatibility
- Only use with the control unit specified on the label.
- Not designed for use in hospitals.
- Not for use by children under 3 years old.
- Consult a doctor if you have a pacemaker.

Manual page author
David Miller
Documentation analyst
Organizes user manual content into clear summaries, with attention to model details, product context, and everyday usability.