Installation Instructions for Brandmotion AHD Dash Camera FLTW-1101
Quick installation guide for the Brandmotion AHD Dash Camera FLTW-1101. Includes kit contents, mounting steps, and wiring instructions for a universal vehicle setup.
Table of contents
Manual images
Click an image to enlargeQuick guide from the manual
This document provides installation instructions for the Brandmotion AHD Dash Camera FLTW-1101. The installation is rated at a difficulty level of 2 out of 5 and typically takes between 1 hour 30 minutes and 2 hours to complete.
Recommended Tools:
- Screw Driver
- Electrical Tape
Kit Contents
Ensure all the following components are present before beginning the installation:
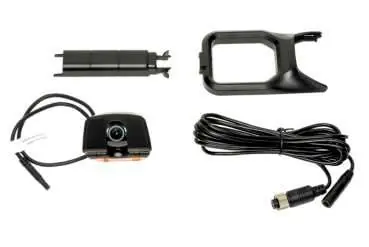
- 1x AHD Dash Camera
- 1x Camera trim piece
- 1x Cable cover
- 1x 4-pin to aviator 4-pin converter cable
Camera Mounting
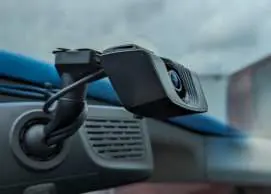
- Identify the desired mounting location on the front windshield.
- Clean the area thoroughly with isopropyl alcohol.
- (Optional) If mounting under a mirror mount, remove the red 3M tape cover from the camera trim piece and press it firmly into place.
- Remove the red 3M tape cover from the camera.
- Press the camera firmly against the windshield to adhere.
Powering the Camera
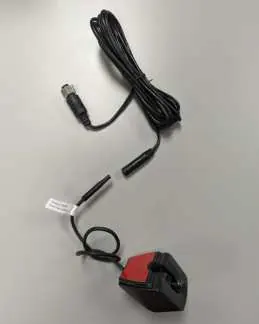
- Connect the 4-pin to 4-pin aviator cable to the camera. Tape the connection for security.
- Make the 4-pin connection to the display and tighten the screw connector.
- Tuck any excess wire into the headliner.
- (Optional) Remove the red 3M tape cover from the wire cover and place it over the exposed camera wire.
Practical help
Before use
- Clean the windshield area with isopropyl alcohol before mounting
- Ensure you have a screwdriver and electrical tape
- Tape the 4-pin connection for added security
- Tighten the screw connector on the display connection
Images and diagrams
- The kit includes a camera, trim piece, cable cover, and a 4-pin to aviator 4-pin converter cable.
- Mounting involves cleaning the windshield and using the pre-applied 3M tape.
- Wiring requires connecting the 4-pin cable to the camera and the display unit.

Manual page author
David Miller
Documentation analyst
Organizes user manual content into clear summaries, with attention to model details, product context, and everyday usability.