D'Addario XPND Pedalboard Assembly Guide
Quick assembly guide for the D'Addario XPND Pedalboard. Learn how to assemble the frame and install cable management clips for your pedal setup.
Table of contents
Manual images
Click an image to enlargeQuick guide from the manual
This document provides assembly instructions for the D'Addario XPND Pedalboard. The process involves assembling the expanding frame and installing the included cable management clips to organize your pedal setup.
Assembly instructions
The XPND Pedalboard features an expanding design. To assemble the frame:
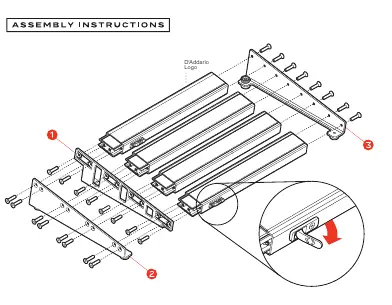
- Align the side rails with the main frame sections as shown in the exploded view diagram.
- Secure the components using the provided screws. Ensure all screws are tightened firmly to maintain the structural integrity of the pedalboard.
- The expanding mechanism allows you to adjust the width of the board to fit your specific pedal collection.
Cable management installation
To keep your setup clean and organized, install the cable management clips:
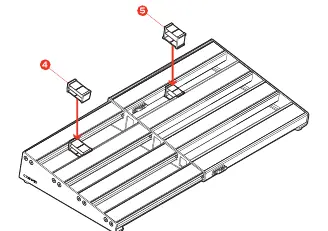
- Identify the cable management blocks (items 4 and 5 in the diagram).
- Snap these blocks onto the designated slots on the pedalboard frame.
- Route your power and patch cables through these clips to secure them in place.
For a visual demonstration of the assembly process, please visit D'Addario.com to view the official instructional video.
Official resources from the manual
Practical help
Common problems
Ensure all screws used during the initial assembly are fully tightened.
Ensure the cable management clips are snapped securely into the frame slots.
Before use
- Verify all parts are present according to the assembly diagram.
- Ensure you have a compatible screwdriver for the assembly screws.
- Clear a workspace to assemble the pedalboard.
- Watch the instructional video at D'Addario.com for visual guidance.

Manual page author
Michael Turner
Technical manual editor
Reviews PDF manuals for structure, safety notes, and practical product details so readers can find the right information quickly.