User Manual for Dreame G10 Pro Wet and Dry Vacuum
Comprehensive user guide for the Dreame G10 Pro Wet and Dry Vacuum. Includes instructions for assembly, charging, cleaning modes, maintenance, troubleshooting, and technical specifications.
Table of contents
Manual images
Click an image to enlargeQuick Guide
The Dreame G10 Pro is a wet and dry vacuum designed for hard floors. Before first use, ensure the device is fully charged. To assemble, insert the handle vertically into the main body until it clicks. To start cleaning, fill the clean water tank, place the device on the floor, recline it, and press the power button. Use the mode switch to toggle between cleaning modes.
Installation and Charging
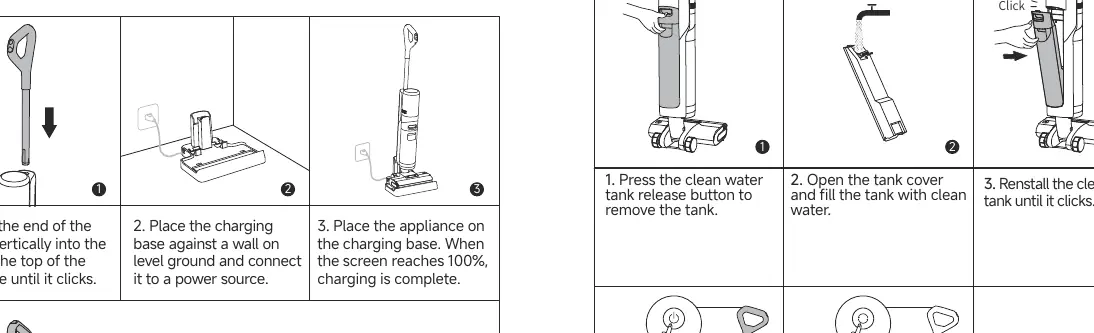
- Insert the handle into the top of the main body until it clicks.
- Place the charging base against a wall on level ground and connect it to a power source.
- Place the appliance on the charging base. Charging is complete when the screen reaches 100%.
Note: If the appliance is not used for 10 minutes after being fully charged, it will enter sleep mode. Restart the appliance to use it.
Starting Cleaning
- Press the clean water tank release button to remove the tank.
- Open the tank cover and fill with clean water.
- Reinstall the tank until it clicks.
- Step on the floor brush and recline the appliance backwards.
- Briefly press the power switch to start or stop operating.
- Press the mode switch to cycle through cleaning modes.
Important: Do not vacuum foamy liquids. Do not recline the appliance more than 140 degrees to prevent water leakage. Do not lift or tilt the appliance while it is in operation.
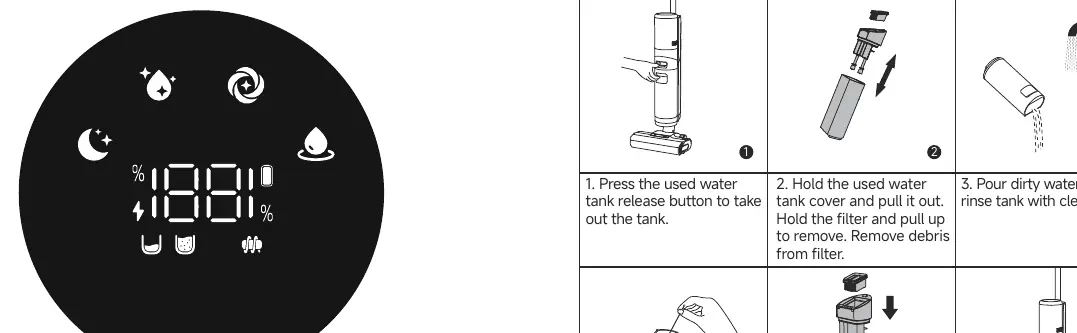
Display Screen and Modes
- Quiet Mode: Moderate suction power at a low noise level.
- Standard Mode: Medium suction power and water flow for routine cleaning.
- Turbo Mode: Maximum suction power and increased water flow for stubborn stains.
- Suction Mode: Sucks up a large amount of water from the floor.
Emptying the Used Water Tank
- Press the used water tank release button to remove the tank.
- Hold the tank cover and pull it out. Remove the filter and clear debris.
- Pour out dirty water and rinse the tank with clean water.
- Use the provided cleaning brush to clean the inner walls.
- Reassemble the filter and tank cover, then insert the tank back into the main body until it clicks.
One-Press Self-Cleaning
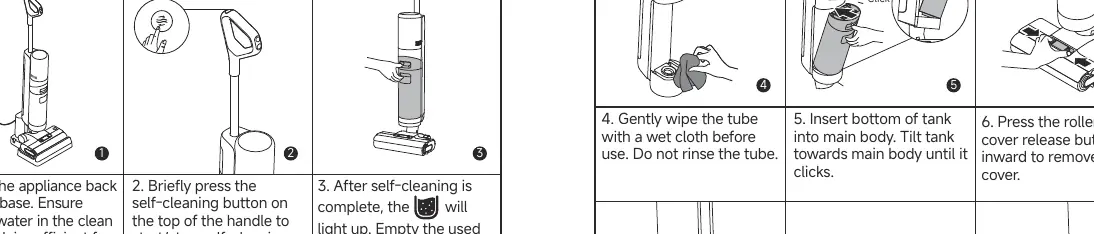
- Place the appliance on the charging base. Ensure there is sufficient water in the clean water tank.
- Press the self-cleaning button on the top of the handle (battery level must be at least 20%).
- Once complete, empty the used water tank promptly.
Care and Maintenance
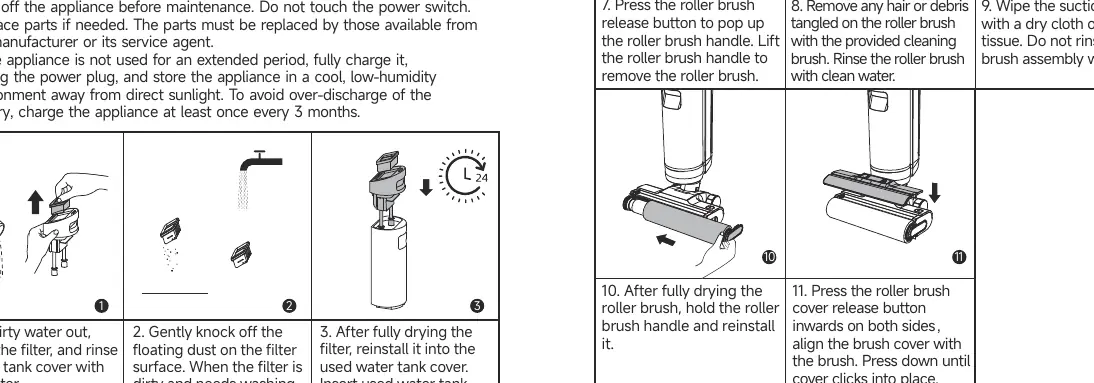
- Filter: Replace every 3 to 6 months. Clean as needed by rinsing with water and drying completely before reinstallation.
- Roller Brush: Replace every 3 to 6 months. Remove hair or debris using the cleaning brush. Rinse with clean water and dry completely before reinstalling.
- Storage: If not used for an extended period, fully charge, unplug, and store in a cool, low-humidity environment. Charge at least once every 3 months to prevent battery over-discharge.
Troubleshooting
If the appliance stops working, check the following:
- Appliance does not work: Check battery level, ensure it is reclined, clear blockages, or empty the used water tank.
- Suction is weak: Clean the filter or clear the suction inlet/tube.
- Self-cleaning fails: Ensure battery is above 20%, the device is on the charging base, and the used water tank is not full.
- No water output: Fill the clean water tank or re-install it properly.
Practical help
Common problems
Check if the battery is low, ensure the appliance is reclined (not upright), clear any blockages, or empty the used water tank.
Clean the filter or clear the suction inlet and tube of any foreign objects.
Ensure the battery level is at least 20%, the appliance is correctly placed on the charging base, and the used water tank is not full.
Re-install or fill the clean water tank. If new, wait 30 seconds for the roller brush to dampen.
Before use
- Fully charge the appliance before first use.
- Ensure the clean water tank is filled with water.
- Check that the handle is properly clicked into the main body.
- Ensure the used water tank is empty and correctly installed.
- Verify the roller brush is clean and properly installed.
Specs in practice
- Rated Voltage
- 21.6 V
- Clean Water Tank Capacity
- 900 mL
- Used Water Tank Capacity
- 700 mL
- Charging Time
- Approximately 4.5 hours
Images and diagrams
- Assembly: Insert the handle vertically into the main body until it clicks.
- Charging: Place the charging base against a wall and connect to power.
- Cleaning: Fill the clean water tank, recline the unit, and press the power button.
- Maintenance: Empty the used water tank and clean the filter/roller brush regularly.
Model compatibility
- Use only the provided charging base and adapter (YLS0251B-E260090).
- Suitable for cleaning floors, marble, tiles, and other hard surfaces.
- Do not vacuum foamy liquids.

Manual page author
David Miller
Documentation analyst
Organizes user manual content into clear summaries, with attention to model details, product context, and everyday usability.