Electronics / Monitors
DYMO LetraTag 100-H User Guide
Comprehensive user guide for the DYMO LetraTag 100-H label maker, covering setup, operation, formatting, maintenance, and troubleshooting.
Table of contents
Manual images
Jump to the sectionAbout Your New Labelmaker
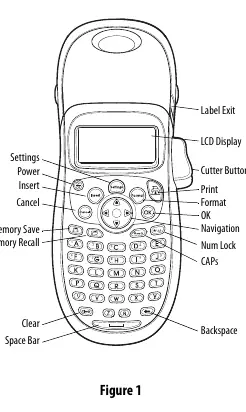
The DYMO LetraTag 100-H is a portable, handheld label maker designed to create high-quality, self-adhesive labels. It supports 12 mm DYMO LetraTag (LT) cassettes, available in various plastic colors and iron-on tape. The device features an intuitive graphical display that allows you to preview formatting changes instantly.
Getting Started
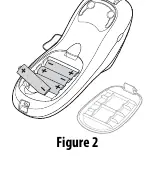
To begin using your label maker, insert four high-capacity AA alkaline batteries into the compartment, ensuring correct polarity. The device will automatically power off after two minutes of inactivity to conserve energy. Upon first use, you will be prompted to select your preferred language, which determines the character set and date format.
Printing and Formatting
Creating labels is straightforward: type your text, press the print button, and use the integrated cutter button to trim the label. The device offers extensive formatting options, including five font sizes and six font styles such as bold, italic, and vertical. You can also add borders, underlines, or symbols to enhance your labels. The label maker supports two-line printing and allows you to insert the current date automatically.
Advanced Features
The LetraTag 100-H includes a memory function that stores up to nine frequently used labels for quick recall. You can also adjust the print contrast to optimize print quality. For international characters, the device uses RACE technology, similar to mobile phone keypads, allowing you to cycle through character variations by holding down a key.
Maintenance and Troubleshooting
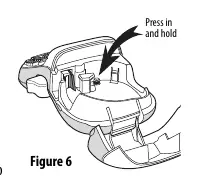
To ensure long-term performance, clean the cutter blade and print head periodically. If the cutter blade becomes stuck, follow the cleaning procedure outlined in the manual. If you encounter issues such as poor print quality or a tape jam, ensure the batteries are fresh, the cassette is installed correctly, and the print head is clean. The device is designed to meet international safety and EMC standards.
Manufacturer information
DYMO
Practical help
Common problems
No display
Ensure the device is powered on and replace discharged batteries.
Poor print quality
Replace batteries, ensure the cassette is installed correctly, clean the print head, or replace the label cassette.
Poor cutter performance
Clean the cutter blade.
Too many characters
Delete some or all of the buffer text.
Tape Jam
Remove the jammed label, replace the cassette, and clean the cutter blade.
Before use
- Insert four AA alkaline batteries
- Install a 12 mm LT label cassette
- Power on the device
- Select your preferred language
- Set the current date and time
Specs in practice
- Battery Type
- Requires four high-capacity AA alkaline batteries.
- Tape Compatibility
- Uses 12 mm DYMO LetraTag (LT) cassettes.
Images and diagrams
- Figure 1: Overview of all buttons and features on the device.
- Figure 2: Battery compartment access and polarity orientation.
- Figure 3: Opening the label cassette compartment.
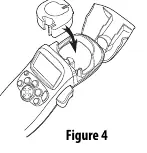
- Figure 4: Correct positioning of the label tape between the print head and pinch roller.
- Figure 6: Procedure for cleaning the cutter blade using the black post.
Model compatibility
- Compatible with 12 mm DYMO LetraTag (LT) cassettes.
- Supports US and European date formats based on selected language.
- Meets US FCC Class B and EU EMC standards.

Manual page author
Emily Carter
User documentation editor
Prepares concise manual descriptions and highlights the most useful setup, operation, and maintenance information for readers.