User Manual for E-flite Twin Otter 1.4m
Comprehensive user manual for the E-flite Twin Otter 1.4m RC airplane. Includes assembly instructions, transmitter setup, binding procedures, flight tips, and troubleshooting.
Table of contents
Manual images
Jump to the sectionQuick Guide
The E-flite Twin Otter 1.4m is a high-performance RC airplane. Before your first flight, ensure the transmitter is configured correctly, the battery is charged, and the Center of Gravity (CG) is balanced. Always perform a control surface direction test and an AS3X/SAFE test before takeoff.
Safety Warnings
- This is not a toy. Not suitable for children under 14 years.
- Always operate in open areas away from people, vehicles, and obstacles.
- Keep hands away from the propeller when the battery is connected.
- Always turn on the transmitter before the receiver.
- Do not touch the motor, ESC, or battery immediately after flight as they may be hot.
Assembly
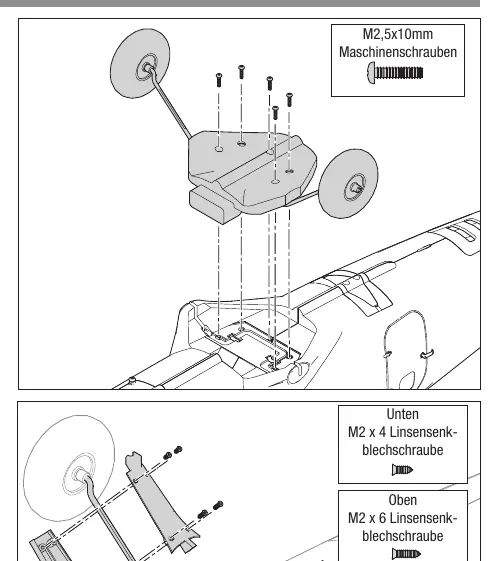
Landing Gear: Attach the landing gear assembly to the fuselage using the provided M2.5x10mm machine screws. Install the fairings using the specified M2x6mm and M2x4mm screws, ensuring the 'L' and 'R' markings are respected.
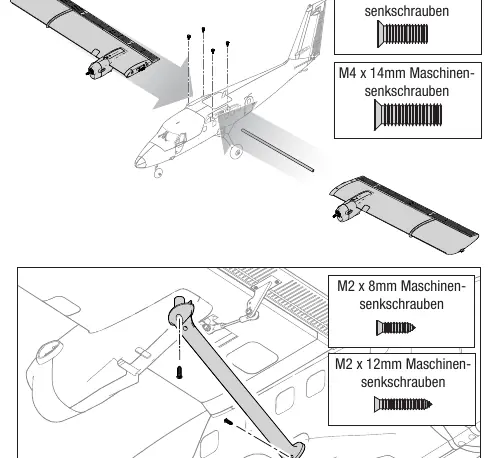
Wings and Tail: Slide the wing halves onto the wing tube and secure them with M4x14mm (front) and M4x10mm (rear) screws. Install the wing struts with the rounded edge facing forward. For the tail, insert the stabilizer tube, attach the stabilizers, and secure with M3x8mm screws.
Propeller: Ensure the correct propeller and rotation direction are used. Secure the spinner with the M3x10mm machine screw.
Transmitter Setup
The BNF version includes a Smart Transmitter file (STF) that can be loaded during the binding process. This automatically configures flight modes, dual rates, and expo. If not using the STF, manually configure your transmitter according to the provided tables for DX, NX, and iX series radios, ensuring 1 AIL 1 FLAP wing type is selected.
Binding and SAFE Select
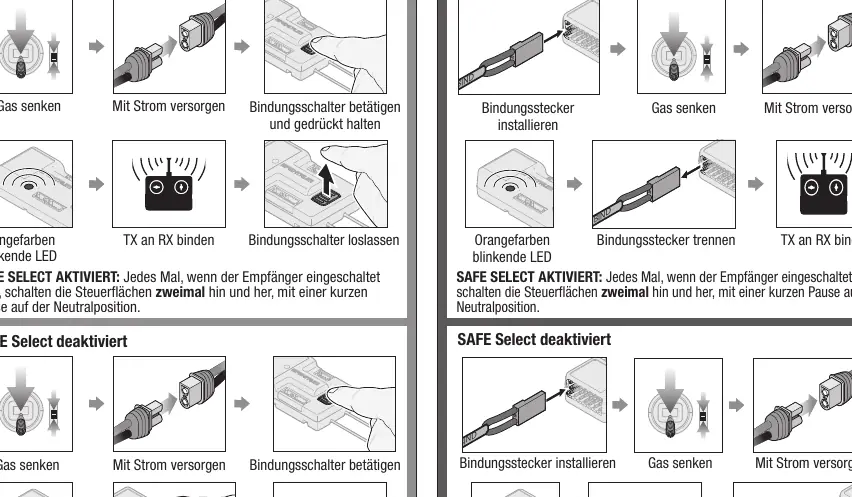
SAFE Select allows for flight envelope protection and self-leveling. It can be activated or deactivated during the binding process. Use the bind button on the receiver or a bind plug. Once bound, you can assign a switch to toggle between SAFE Select and AS3X modes using the transmitter's channel assignment menu.
Battery and ESC
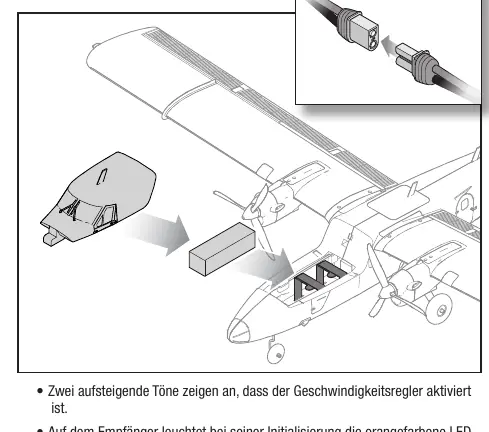
Recommended battery: 4S 2200mAh 30C LiPo with IC3 connector. Ensure the battery is secured with the hook-and-loop strap. The ESC features an LVC (Low Voltage Cutoff) to protect the battery. Always disconnect the battery after flight to prevent over-discharge.
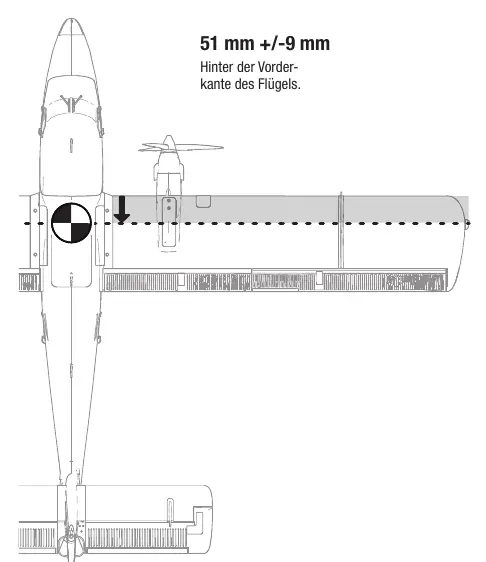
Center of Gravity (CG)
The CG is critical for stable flight. Measure 51mm (+/- 9mm) behind the leading edge of the wing. Ensure the model is balanced in this range before flying.
Flying Tips
Takeoff: Point the aircraft into the wind. Use small control inputs and gradually increase throttle to 3/4 or full. Use the rudder to maintain direction.
Landing: Approach into the wind. Use flaps as needed. Keep the wings level and flare just before touchdown. Avoid landing in high grass if possible to protect the landing gear.
Troubleshooting
If the aircraft vibrates, check the propeller balance and ensure all components are secure. If the motor does not start, check the throttle trim and ensure the battery is charged. If binding fails, move the transmitter further away from the receiver and ensure no large metal objects are nearby.
Practical help
Common problems
Check propeller balance, ensure spinner is tight, and verify all motor mount screws are secure.
Ensure throttle is at the lowest position, throttle trim is not too high, and the battery is fully charged.
Move the transmitter further away from the receiver (at least 1-2 meters) and ensure no large metal objects are nearby.
Ensure you did not touch the control sticks for 3 seconds after trimming, allowing the AS3X system to learn the new settings.
Before use
- Charge the flight battery fully.
- Verify the Center of Gravity (CG) is at 51mm +/- 9mm behind the wing leading edge.
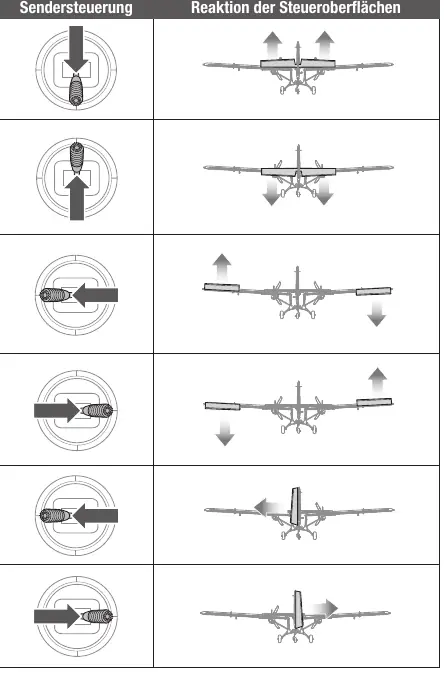
- Perform a control surface direction test.
- Ensure the propeller is balanced and securely fastened.
- Verify transmitter settings and flight mode assignments.
- Check that all screws and linkages are tight.
Specs in practice
- Recommended Battery
- 4S 2200mAh 30C LiPo with IC3 connector
Images and diagrams
- Landing gear assembly: Shows screw locations for main and nose gear.
- Propeller installation: Illustrates correct orientation and nut tightening.
- CG location: Shows the 51mm measurement point behind the wing leading edge.
- Control surface test: Shows correct movement directions for elevator, aileron, and rudder.
Model compatibility
- BNF Basic version includes AS3X+ and SAFE Select technology.
- PNP version requires a 6+ channel receiver.
- Compatible with Spektrum Smart Technology for telemetry.

Manual page author
Michael Turner
Technical manual editor
Reviews PDF manuals for structure, safety notes, and practical product details so readers can find the right information quickly.