User Manual for Englaon LED24X70, LED32X70, and LED40X70 Smart TV
Comprehensive user guide for Englaon LED24X70, LED32X70, and LED40X70 Smart TVs. Includes setup instructions, base and wall mounting, remote control pairing, network configuration, and troubleshooting steps.
Table of contents
Manual images
Click an image to enlargeQuick Guide from the Manual
This manual covers the operation and installation of the Englaon LED24X70, LED32X70, and LED40X70 Smart TVs. Before first use, ensure the TV is placed on a stable surface or mounted securely. Connect your antenna and power supply (12V or 100-240V). Upon first power-on, follow the on-screen Initialization Settings. Use the remote control for navigation and the rocker switch on the TV for basic control if the remote is unavailable.
Safety Warnings
- Do not place the TV in environments with direct sunlight, moisture, or heavy dust.
- Ensure the power supply is stable (12V/3A or 100-240V).
- Do not cover ventilation holes; the TV requires proper airflow.
- If the screen is broken and liquid splashes on the skin, wash with clean water for 15 minutes and seek medical attention.
- Unplug the TV during thunderstorms or if it will not be used for a long time.
Mounting and Installation
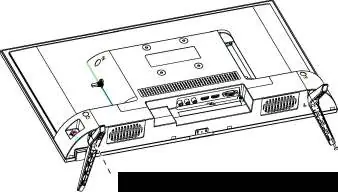
Base Installation: Place the TV flat on a soft surface. Distinguish between the left and right base stands. Align the base with the screw holes on the bottom of the back cover and fasten the screws securely.
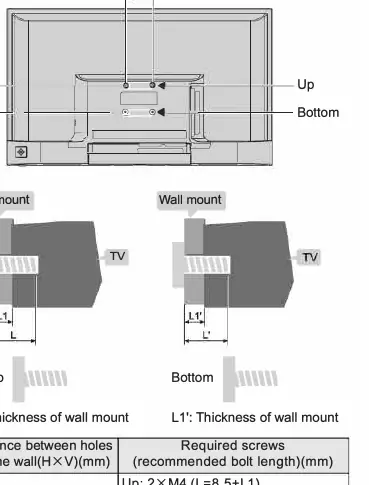
Wall Mounting: Ensure the wall can support at least 4 times the weight of the TV. Use a professional technician for installation. The TV uses M4 screws for wall mounting. Refer to the specific distance between holes (75x75mm) and ensure the screw length is appropriate for your wall mount thickness.
Connecting Peripheral Equipment
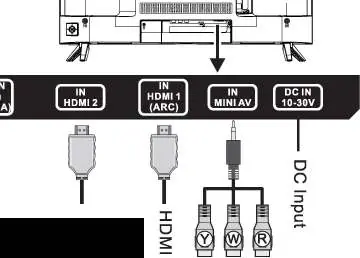
The TV features multiple input ports, including HDMI (with ARC support on HDMI-1), USB, AV, and Antenna inputs. Always turn off the power before connecting or disconnecting cables. When connecting an outdoor antenna, ensure it is isolated from protective grounding to prevent fire or electric shock.
Panel Control Keys
The TV includes an 'OK' rocker switch on the back/side panel. Pressing it allows you to power on/off, switch to standby, select channels, adjust volume, and navigate menus. Long press to switch to standby mode.
Remote Control and Pairing
The remote control requires two AAA batteries. To pair the Bluetooth voice remote: press the Google Assistant key, then long-press [VOL-] and [Left] keys simultaneously. When the TV displays the device, select it and press [OK] to finish.
Basic Operations and Settings
Use the [Source] button to select input signals. The main menu allows access to Channels, TV options, and Record settings. In Smart Mode, you can manage apps, network settings (Wi-Fi/Ethernet), and system preferences like date and time.
Channel Scanning
Before watching, scan for channels. Select the input source (Antenna, Cable, or ATV), navigate to Channel > Channels, and select 'Channel Scan'. For manual tuning, you can set specific frequencies or RF channels.
Smart Applications and Network
The TV supports Android TV features. Connect to the internet via Settings > Network & Internet. You can install or uninstall apps via the Apps menu. Use the MultiMediaPlayer app to play video, photo, music, and text files from a USB drive (FAT32 format recommended).
Troubleshooting
- No display/sound: Check power connection and ensure the TV is not in standby mode.
- Snowflake spots/noise: Check antenna connection and cable condition.
- Double images: Use a high-oriented antenna and adjust its direction.
- Remote control issues: Replace batteries or re-pair the Bluetooth connection.
- Slow online video: Upgrade network bandwidth or try different resources.
Technical Specifications
The TV supports resolutions up to 1920x1080 (depending on model). Power consumption varies by model, with standby power ≤0.5W. Operating temperature is 5°C to 40°C.
Practical help
Common problems
Check if the antenna plug is loose, verify antenna type (VHF/UHF), adjust antenna direction, or use a signal enhancer.
Check if the power line is securely connected to the electrical socket.
Use a high-oriented antenna and adjust the direction of the antenna.
Replace the batteries with new ones. Ensure the remote is pointed at the sensor and not obstructed.
Disconnect the power supply, wait 1-2 minutes, reconnect, and turn the TV on again.
Before use
- Ensure the power supply is 12V/3A or 100-240V~50/60Hz.
- Check that the antenna is properly connected.
- Install two AAA batteries in the remote control.
- Ensure the TV is placed on a stable surface or mounted securely.
- Verify that the area around the TV is well-ventilated.
Images and diagrams
- Base installation: Align the base stands with the screw holes on the bottom of the TV back cover.
- Wall mounting: Use M4 screws with a length of 8.5mm + wall mount thickness (or 8mm + thickness depending on model).
- Port layout: Includes HDMI, USB, AV, and Antenna inputs.
Model compatibility
- Recording function requires a USB storage device formatted in FAT32.
- Android TV features and Google Assistant availability vary by country and language settings.
- Some models may not support all voice recognition functions.

Manual page author
Michael Turner
Technical manual editor
Reviews PDF manuals for structure, safety notes, and practical product details so readers can find the right information quickly.