User Manual for Fonestar ASB-12150U and ASB-15180U Active Loudspeakers
Quick guide for the Fonestar ASB-12150U and ASB-15180U active loudspeakers. Learn how to connect inputs, use the USB/SD/FM player, pair two speakers wirelessly, and adjust audio settings.
Table of contents
Manual images
Click an image to enlargeQuick Guide and Important Information
This manual provides instructions for the Fonestar ASB-12150U and ASB-15180U active loudspeakers. Before connecting the power, ensure all volume controls are set to their minimum and the power switch is in the OFF position. Always verify that the AC voltage selector matches your local power supply.
Description
These active loudspeakers feature an extra-resistant injection box, a built-in USB/SD/FM player with remote control, and a woofer protected by a front metal grill. They include carrying handles, suspension points, floor legs, and a 35 mm tube hole in the base for mounting.
Controls and Functions
The rear panel houses the primary controls for the system:
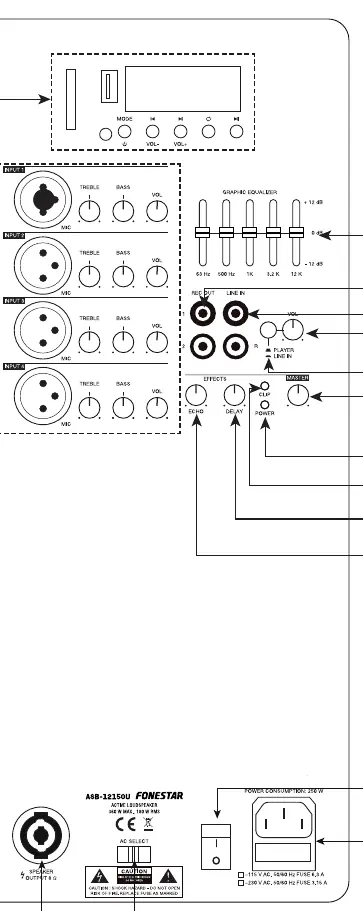
- Inputs: Four microphone inputs (Input 1 is a combo XLR/6.3mm jack; Inputs 2-4 are XLR).
- Equalizer: A 5-band graphic equalizer allows for precise sound shaping.
- Effects: Dedicated controls for Echo and Delay time.
- Indicators: The CLIP indicator lights up red if there is signal overload or excessive power peaks. If this occurs, reduce the input signal or volume immediately.
- Outputs: Includes a REC OUT (RCA) for recording or connecting to other equipment, and a SPEAKER OUTPUT (8 Ω) for connecting a passive loudspeaker.
Remote Control
The remote control allows for playback management, including:
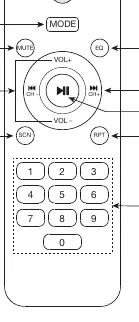
- Mode Selection: Switch between audio sources.
- Playback Control: Play/pause, skip tracks, and select playback modes (ONE track or ALL tracks).
- FM Radio: Automatically memorize detected frequencies with sufficient signal quality.
- EQ: Select between different preset equalizations.
Connection
To set up the system:
- Ensure volume controls are at minimum and power is off.
- Connect the power cable to the mains.
- Connect your audio source (mixer, CD player, etc.) to the LINE IN input.
- Connect microphones to the designated inputs if required.
- Switch the loudspeaker on using the POWER switch.
- Adjust input volumes to the desired levels.
Wireless Connection of 2 Speakers
You can connect two speakers from the same series wirelessly:
- Turn on both speakers and select wireless mode.
- Perform a long press on the loop button or RPT on the remote control until you hear an audible signal. This speaker becomes the MASTER (Left channel).
- The other speaker becomes the SLAVE (Right channel).
- Connect your wireless audio device to the MASTER speaker.
Manufacturer information
Fonestar
Practical help
Common problems
The system is overloaded. Reduce the input signal level or the volume until the indicator light switches off.
Check that volume controls are turned up, the POWER switch is on, and the correct input source is selected.
Ensure both speakers are in wireless mode and perform a long press on the loop/RPT button until the audible signal is heard.
Before use
- Ensure all volume controls are set to minimum.
- Verify the POWER switch is in the OFF position.
- Check that the AC voltage selector matches your local power supply.
- Ensure all input cables are securely connected.
- Verify the speaker is placed on a stable surface or mounted correctly.
Specs in practice
- SPEAKER OUTPUT 8 Ω
- Amplified output for connecting a passive loudspeaker.
Images and diagrams
- Rear Panel: Shows all inputs (MIC 1-4, LINE IN), EQ, volume controls, and power connections.
- Remote Control: Layout of playback, volume, and EQ buttons.
Model compatibility
- Supports USB storage devices and SD memory cards.
- Compatible with dynamic microphones via XLR or 6.3mm jack.
- Wireless pairing is only possible between speakers of the same series.

Manual page author
David Miller
Documentation analyst
Organizes user manual content into clear summaries, with attention to model details, product context, and everyday usability.