Installation Guide for Geberit Sigma40 Flush Plate
Step-by-step installation guide for the Geberit Sigma40 flush plate. This manual covers the removal of the protection cover, water connection, frame installation, depth adjustment, and final assembly.
Table of contents
Manual images
Click an image to enlargeQuick Guide
This document provides visual installation instructions for the Geberit Sigma40 flush plate. The process involves removing the protection cover, connecting the water supply, installing the mounting frame, adjusting the depth, and attaching the final flush plate. Ensure the water supply is turned off before beginning the installation.
Installation Steps
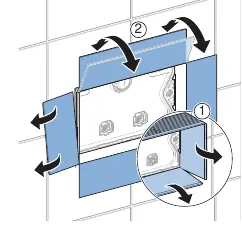
- Removing Protection: Remove the protection cover from the concealed cistern (Steps 1-2).
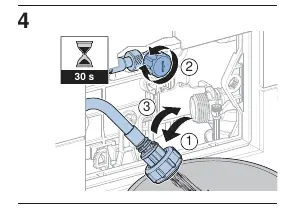
- Water Connection: Connect the water supply hose to the valve inside the cistern (Steps 3-4).
- Frame Installation: Install the mounting frame onto the cistern and ensure it is properly aligned (Steps 5-6).
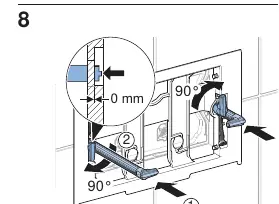
- Depth Adjustment: Adjust the frame depth to match the wall surface (Steps 7-8).
- Actuator Installation: Install the actuator rods and secure them in place (Steps 9-10).
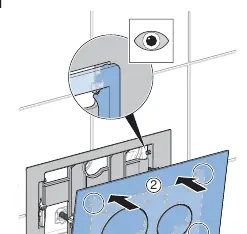
- Final Assembly: Attach the flush plate to the frame and test the flush function (Steps 11-13).
Maintenance and Troubleshooting
If the flush plate does not fit correctly, re-check the frame depth adjustment in steps 7-8. Ensure all connections are secure and the water supply is fully operational before finalizing the installation.
Manufacturer information
Geberit Group
Practical help
Common problems
Adjust the frame depth settings (Steps 7-8) to ensure the frame is perfectly aligned with the wall surface.
Verify that the water supply hose is correctly connected and the valve is fully open (Step 4).
Before use
- Ensure the rough-in box is clean and free of debris
- Verify the water supply is turned off
- Check that the mounting frame is level
- Confirm all components from the kit are present

Manual page author
Emily Carter
User documentation editor
Prepares concise manual descriptions and highlights the most useful setup, operation, and maintenance information for readers.