Harman 109CL64CTPClub Club 64CTP Component Speaker System User Guide
Quick guide for the Harman Club 64CTP component speaker system, covering installation steps, wiring diagrams, mounting options, and technical specifications.
Table of contents
Manual images
Jump to the sectionQuick guide from the manual
This document provides installation and setup instructions for the JBL Club 64CTP 6-1/2 inch (160mm) two-way component speaker system. It includes wiring diagrams, mounting procedures for the woofer and tweeter, and detailed technical specifications.
System components
The kit includes the following main parts: 2x woofers, 2x tweeters, 2x crossovers, and various mounting hardware including brackets, screws, and clips. Ensure all parts listed in the inventory section are present before starting the installation.
Wiring and connection
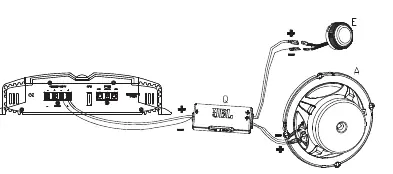
Connect the amplifier output to the input of the crossover (Q). The crossover features dedicated outputs for the tweeter (TW) and the woofer (WF). Ensure correct polarity (+/-) is maintained throughout the connection to prevent phase issues.
Installation and mounting
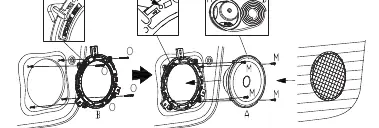
Woofer installation: Mount the woofer (A) into the vehicle door or panel using the provided bracket (B) and screws (O). Ensure the speaker is securely fastened to the mounting surface.
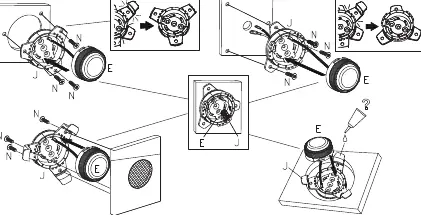
Tweeter installation: The tweeter (E) can be mounted in multiple configurations:
- Flush mount: Use the housing (I) and secure with screws (N).
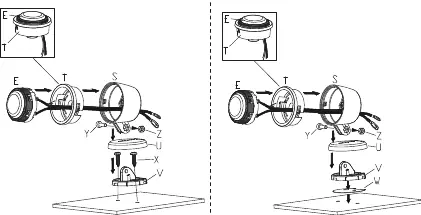
- Surface mount: Use the provided base (T) and mounting hardware (S, U, V, W, X, Y, Z).
- Angle adjustment: The tweeter housing allows for directional adjustment to optimize sound staging.
Technical specifications
- Type: 6-1/2 inch (160mm) Two-Way Component Speaker System
- Power Handling: 70W RMS, 210W peak
- Sensitivity (@ 2.83V): 92dB
- Frequency Response: 55Hz – 20kHz
- Nominal Impedance: 3.0 ohms
- Crossover Point: 5.5kHz
Practical help
Common problems
Verify that all positive (+) and negative (-) connections are correctly matched from the amplifier through the crossover to the individual drivers.
Ensure the correct mounting adapter (I or T) is selected based on the desired installation method (flush vs. surface mount).
Before use
- Verify all components (A-Z) are present as listed in the inventory.
- Check the mounting depth and diameter of the vehicle speaker locations.
- Ensure the amplifier is compatible with a 3.0-ohm nominal impedance load.
- Confirm the crossover is mounted in a dry, secure location away from moving parts.
Specs in practice
- Power Handling (70W RMS)
- The continuous power the speaker can handle without damage.
- Nominal Impedance (3.0 ohms)
- The electrical resistance of the speaker; ensure your amplifier is stable at this impedance.
- Sensitivity (92dB)
- Indicates how loud the speaker will play with a given amount of power.
Images and diagrams
- Page 1: Wiring diagram showing amplifier to crossover to speaker/tweeter connections.
- Page 2: Inventory list of all included hardware components.
- Page 3: Woofer mounting steps and tweeter angle adjustment.
- Page 4: Flush mount installation procedure for the tweeter.
- Page 5: Surface mount installation options for the tweeter.
Model compatibility
- Designed for 6-1/2 inch (160mm) speaker openings.
- System impedance is 3.0 ohms; verify amplifier compatibility.

Manual page author
David Miller
Documentation analyst
Organizes user manual content into clear summaries, with attention to model details, product context, and everyday usability.