Home Appliances / Cookers & Ranges
User Manual for Hoover 10L Wet & Dry Vacuum HWD10
Quick guide for the Hoover 10L Wet & Dry Vacuum (Model HWD10). Includes assembly instructions, maintenance tips, safety warnings, and troubleshooting steps.
Table of contents
Manual images
Click an image to enlargeQuick guide from the manual
The Hoover 10L Wet & Dry Vacuum is designed for household use. To ensure longevity, the motor must be switched off for 1 minute after every 15 minutes of consecutive use. Do not operate the unit for more than 4 hours in a single day. Always ensure the filter bag is installed for dry vacuuming; remove it when cleaning up water.
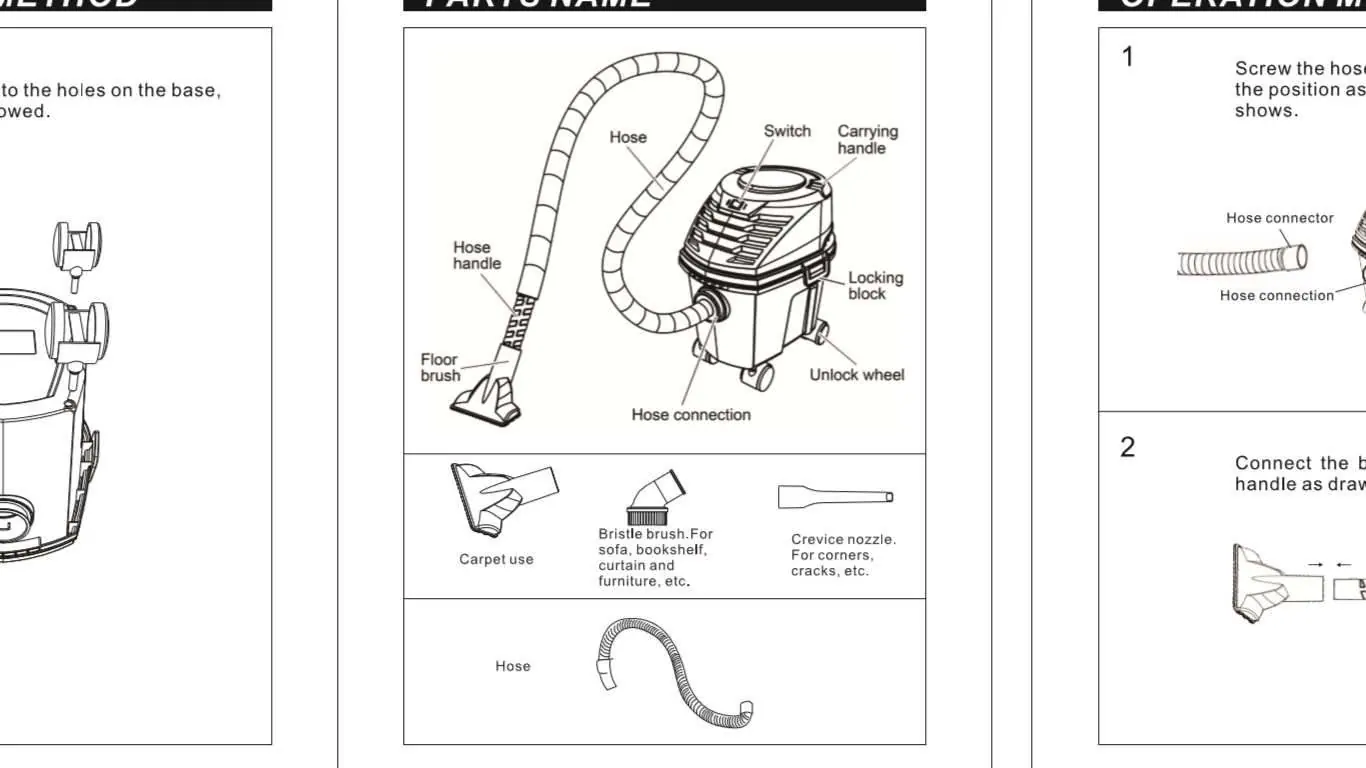
Product description
The vacuum features a 10L drum capacity, 1000W motor, and a 5m power cord. It is designed for both wet and dry cleaning. Accessories included are two plastic tubes, a floor brush, a 2-in-1 crevice nozzle, and a washable filter bag.
Safety warnings
- Do not use the appliance outdoors or for anything other than its intended household use.
- Do not pick up burning objects (cigarettes, matches, hot ash) or flammable liquids (gasoline).
- Do not operate the unit with wet hands or without shoes.
- Ensure the voltage on the rating label matches your home mains voltage.
- Do not immerse the motor assembly, plug, or power cord in water.
- Keep hair, loose clothing, and body parts away from openings and moving parts.
- Do not use the appliance if the cord or plug is damaged; contact an authorized service agent.
Assembly
Ensure the unit is unplugged before assembly:
- Insert the wheels into the holes on the base of the unit.
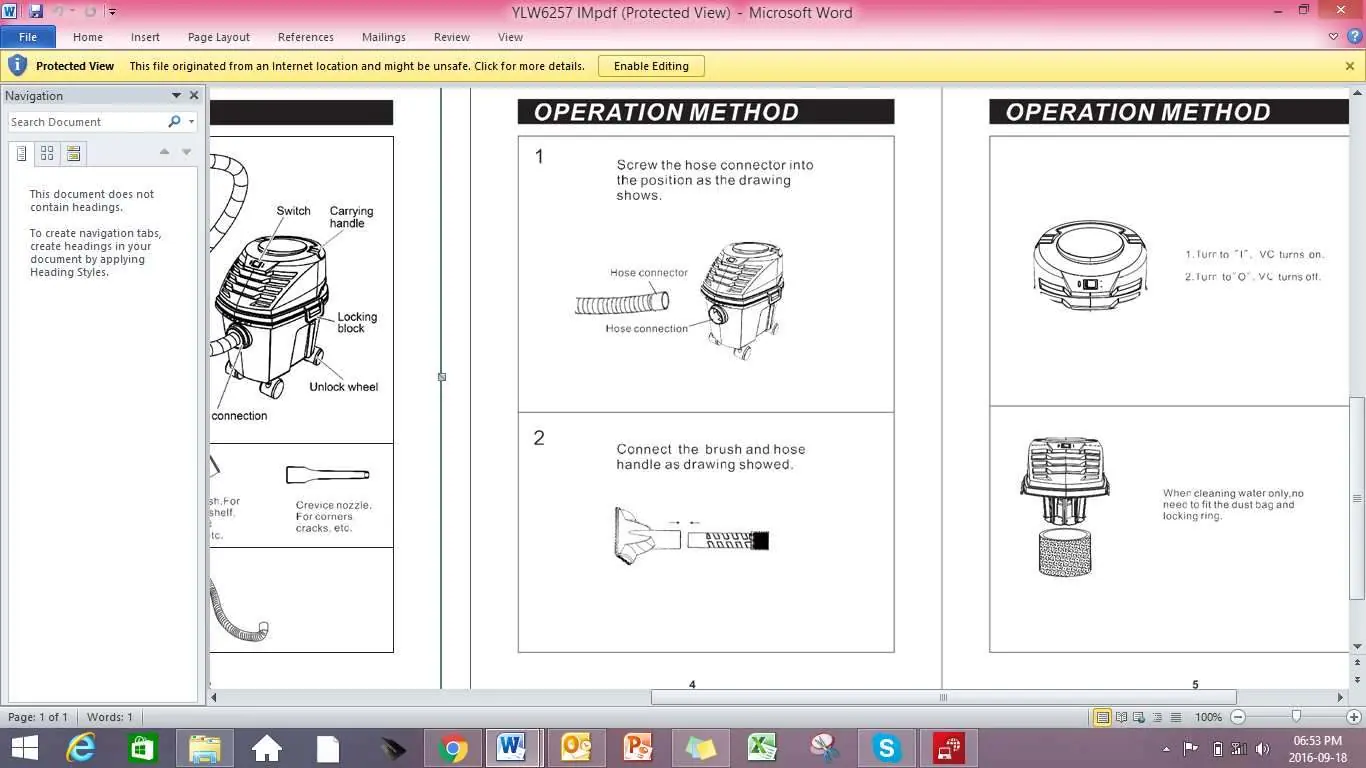
- Screw the hose into the hose connector.
- Connect the desired attachment (floor brush or crevice nozzle) to the hose handle.
Operation
Plug the unit into a socket and turn the switch to the 'I' position to turn on, or 'O' to turn off. When cleaning up water, remove the washable filter bag and lock ring.
Cleaning and maintenance
Always switch off and unplug the unit before cleaning.
Emptying the drum
Pull out the latches to separate the drum from the motor housing. Empty the dirt into a trash bin. The drum should be emptied regularly to prevent motor damage.
Cleaning the filtering assembly
Remove the lock ring by sliding it up, then remove the filter bag and sponge. Shake the filter bag to remove excess dust. Wash the filter bag, sponge, and lock ring under running water and allow them to dry completely before re-assembling.
Troubleshooting
If the unit is not operating correctly, check the following:
- Ensure you have followed the instructions correctly.
- Check that the unit is wired correctly and the wall socket is switched on.
- Verify the mains power supply is ON.
- Ensure the plug is firmly inserted into the socket.
If the unit still does not work, contact the retailer or an authorized service agent. For service inquiries, you can contact Home of Living Brands at www.homeoflivingbrands.com.
Wiring instructions
If you need to change the fitted plug, ensure the wires are connected to the correct pins:
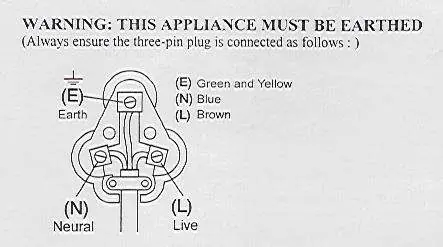
- Green/Yellow: Earth
- Blue: Neutral
- Brown: Live
Official resources from the manual
Manufacturer information
Hoover
Practical help
Common problems
Unit not working
Check power supply, ensure the wall socket is on, and verify the plug is firmly connected.
Loss of suction
Check for blockages in openings and clean the filter assembly.
Motor failure
Ensure the motor is switched off for 1 minute after every 15 minutes of use to allow cooling.
Before use
- Ensure voltage matches the rating label.
- Check power cord and plug for damage.
- Ensure filter bag is installed for dry use.
- Ensure all openings are free of blockages.
- Place on a smooth, stable surface.
Images and diagrams
- Parts Diagram: Identifies the hose, handle, floor brush, crevice nozzle, and latch locations.
- Wiring Diagram: Illustrates the correct connection for Earth (Green/Yellow), Neutral (Blue), and Live (Brown) wires.
Model compatibility
- Not suitable for outdoor use.
- Do not use to pick up flammable liquids or burning objects.
- Do not use without the dust cap or filter in place.

Manual page author
Michael Turner
Technical manual editor
Reviews PDF manuals for structure, safety notes, and practical product details so readers can find the right information quickly.