IKEA JÄRNSPARV Handle Installation Guide
Quick installation guide for the IKEA JÄRNSPARV handle. Learn how to properly mark, drill, and mount the handle using the included screws and required tools.
Table of contents
Manual images
Click an image to enlargeQuick guide from the manual
This guide provides instructions for installing the IKEA JÄRNSPARV handle. Ensure you have the correct tools before starting the installation to ensure a secure fit.
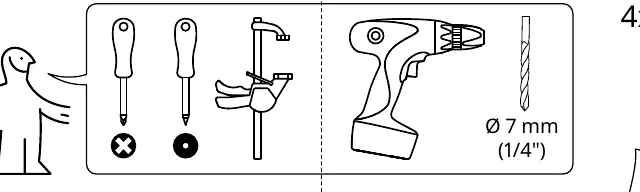
Required tools
- Screwdriver (Phillips/Cross head)
- Drill
- Clamp
- 7mm (1/4") drill bit
Installation steps
The installation process involves marking the position, drilling the holes, and securing the handle with the provided screws.
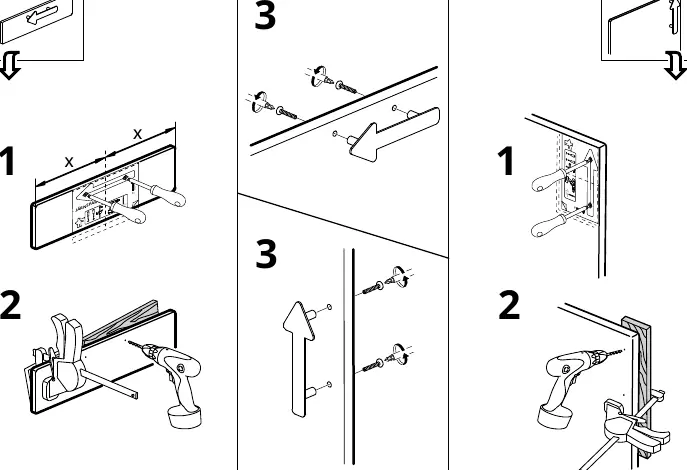
- Positioning: Mark the desired location for the handle on your furniture front or door.
- Drilling: Use a clamp to secure the material if necessary. Drill the holes using a 7mm (1/4") drill bit.
- Mounting: Align the handle with the drilled holes and secure it using the 4 provided screws (part number 119976).
Manufacturer information
IKEA
Practical help
Common problems
Drilling through the material
Use a clamp to secure the material while drilling to prevent slipping and ensure clean, accurate holes.
Before use
- Ensure you have a 7mm (1/4") drill bit.
- Have a screwdriver and a clamp ready.
- Verify the position of the handle before drilling.

Manual page author
Michael Turner
Technical manual editor
Reviews PDF manuals for structure, safety notes, and practical product details so readers can find the right information quickly.