IKEA LAPPMES Handle Installation Guide
Step-by-step installation instructions for the IKEA LAPPMES handle. Learn the required tools, hole spacing measurements, and mounting procedure.
Table of contents
Manual images
Click an image to enlargeQuick guide from the manual
This document provides instructions for installing the IKEA LAPPMES handle. Ensure you have the correct tools before starting the installation. The handle requires precise hole spacing for correct mounting.
Required tools
- Screwdriver
- Power drill
- 5 mm (3/16") drill bit
Installation
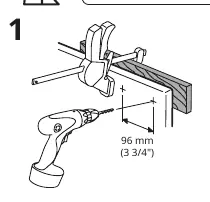
Step 1: Drilling
Measure and mark the position for the handle on your furniture panel. Drill two holes using a 5 mm (3/16") drill bit. The distance between the centers of the two holes must be exactly 96 mm (3 3/4").
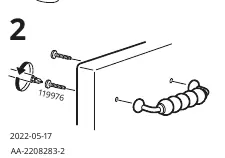
Step 2: Mounting
Align the handle with the drilled holes. Insert the provided screws (part 119976) through the back of the furniture panel and tighten them into the handle to secure it in place.
Manufacturer information
IKEA
Practical help
Common problems
Ensure the screws (part 119976) are fully tightened into the handle threads.
Verify that the distance between the centers of the two drilled holes is exactly 96 mm.
Before use
- Check that you have a power drill
- Ensure you have a 5 mm (3/16") drill bit
- Verify you have a screwdriver
- Measure the mounting surface to ensure 96 mm spacing is available

Manual page author
David Miller
Documentation analyst
Organizes user manual content into clear summaries, with attention to model details, product context, and everyday usability.