Home / Windows & Doors
Installation Guide for Johnson 1500HD Series Pocket Door Frame
Comprehensive installation guide for the Johnson 1500HD Series Pocket Door Frame. Includes detailed instructions for constructing the rough opening, installing the header and split steel studs, hanging the door, and cutting the frame for...
Table of contents
Manual images
Click an image to enlargeQuick Guide from the Manual
The Johnson 1500HD Series Pocket Door Frame is designed for 2x4 stud walls and supports doors weighing up to 200 lbs (90 kg). Before starting, ensure your rough opening height is at least 84 1/2 inches (2.14m) and the width is 2x the door width plus 1 inch (25mm). If your door is not the standard 80-inch height, you must adjust the header and split studs accordingly.
Rough Opening Construction
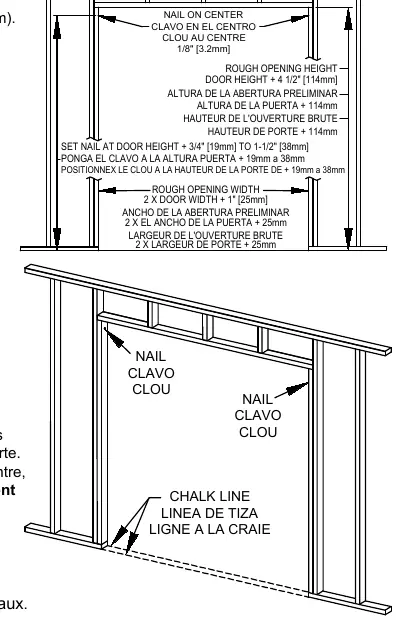
The rough opening must be square, plumb, and level. Construct the header and side jambs to the required dimensions. Snap a chalk line on the floor to align the side jambs. Measure up from the finished floor (80-3/4 inches) or sub-floor (81-12 inches) to mark the stud locations for the header end brackets. Drive a flat head nail into each stud, leaving 1/8 inch protruding to support the header.
Header Installation
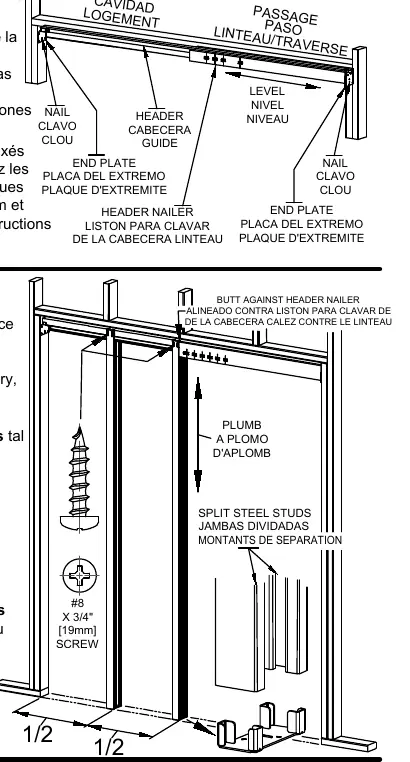
Slide the slots in the frame header end plates over the nails installed in the rough studs. Level the header, then secure it by driving nails through the remaining holes in the end plates. Ensure the header is properly aligned before finalizing the attachment.

Split Steel Stud Installation
Insert the fingers of the floor plate into the split steel studs. Butt the studs against the header nailer and secure them with two #8 x 3/4 inch pan head screws. Position the remaining split steel studs midway in the pocket opening. Ensure they are plumb between the chalk lines and nail them to the floor. For masonry floors, use industrial adhesive or Tapcon fasteners.
Door Hanging
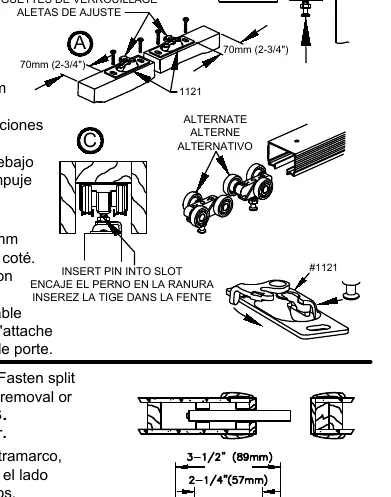
Attach the 1121 door plate to the top of the door, 2-3/4 inches from each edge, with the lock tab facing the same side. Insert the 1125 hangers into the track, alternating wheel positions for weight distribution. Mount the door by locating the door plate under the adjusting bolt of the hanger, lifting the door, and pushing the bolt into the door plate. Repeat for the second hanger. Fasten the 1550 guides to the finished split jambs at the bottom to keep the door centered.
Finishing and Adjustments
Apply wall material using 1 inch #6 self-drilling drywall screws, using seven screws per split steel stud. Seal all edges and the face of the door panel with paint or sealing stain. Fasten the 1513 bumper on the back edge of the door, 40 inches from the bottom edge.
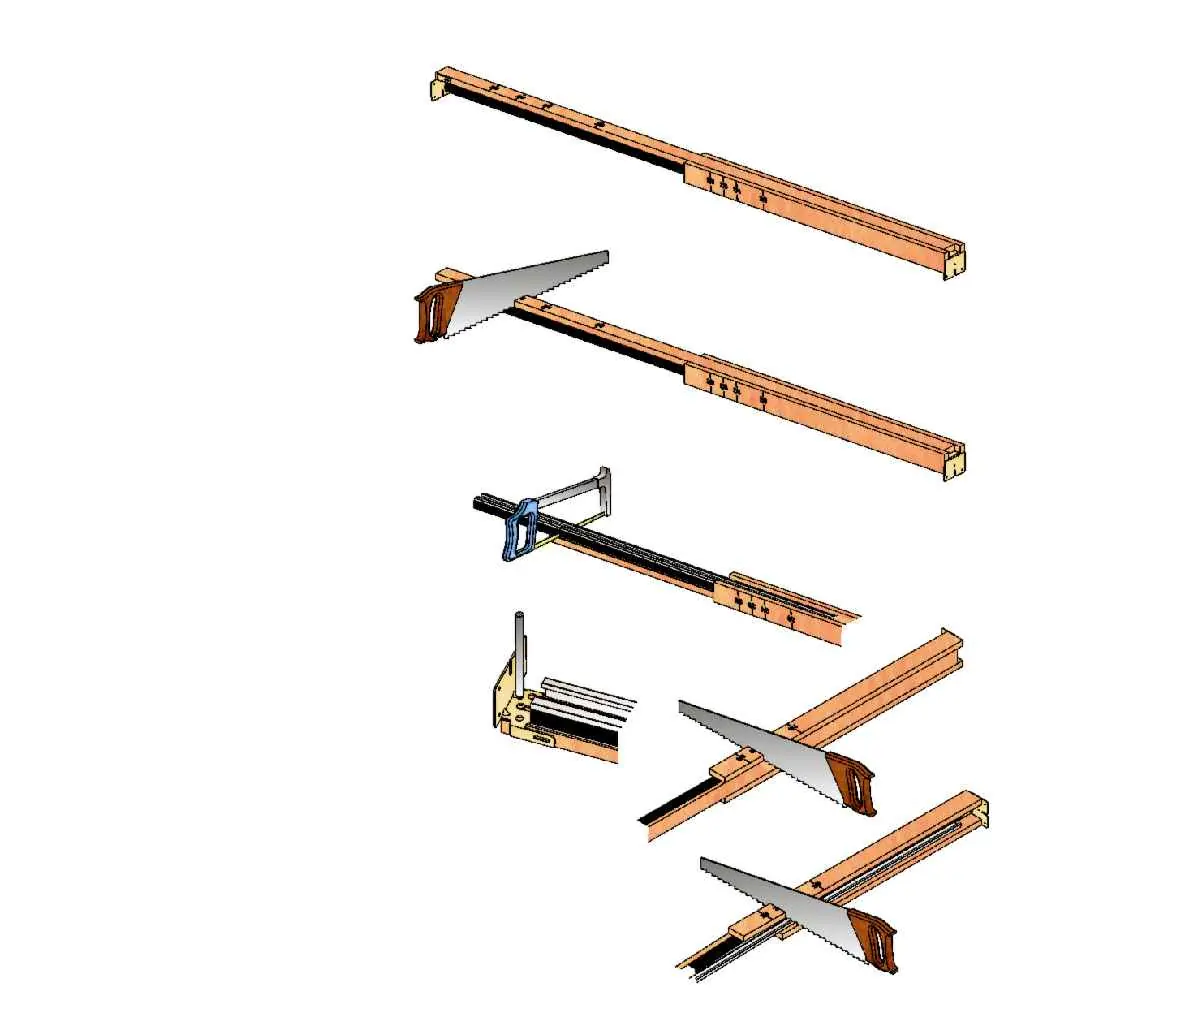
Cutting Instructions for Non-Standard Sizes
If your door width is not standard, you can cut the frame to fit. Remove the adjustable end bracket, cut the wood header to the desired size, and turn the header over to cut the track 1-3/8 inches shorter than the wood header. Replace the end bracket on the new cut end. Turn the header on its side and cut the header trim board to the appropriate mark. Repeat for the other side.
Practical help
Common problems
Door is taller than 80 inches
Order longer Split Studs and raise the header.
Door is shorter than 80 inches
Lower the header and cut the bottom ends of the Split Studs.
Installing on a masonry floor
Use industrial adhesive or Tapcon fasteners to secure the floor plate.
Before use
- Verify rough opening height is 84 1/2 inches (2.14m).
- Verify rough opening width is 2x door width + 1 inch (25mm).
- Ensure header is square, plumb, and level.
- Check door thickness is between 1 inch and 1-3/4 inches.
- Clear all debris from the track and wheels before hanging the door.
Specs in practice
- Weight Capacity
- Supports doors up to 200 lbs (90 kg).
- Jamb Clearance
- Minimum 3/16 inch (5mm) clearance required between the jamb and the door.
- Wall Compatibility
- Designed specifically for 2x4 stud walls.
Images and diagrams
- Rough Opening: Shows header placement and chalk line alignment.
- Header Cutting: Illustrates where to cut the header and track for custom widths.
- Door Hanging: Details the 1121 door plate and 1125 hanger installation.
Model compatibility
- Compatible with 1555 Converging Door Kit.
- Compatible with 2041 Bottom Guide Set.

Manual page author
David Miller
Documentation analyst
Organizes user manual content into clear summaries, with attention to model details, product context, and everyday usability.