Electronics / Night Vision
User Manual for Kemimoto 1080P Infrared Digital Night Vision Binoculars
Quick guide for the Kemimoto 1080P Infrared Digital Night Vision Binoculars. Learn how to install batteries, insert memory cards, record video, take photos, and adjust night vision settings.
Table of contents
Manual images
Click an image to enlargeQuick guide from the manual
This device is a digital night vision binocular designed for both day and night use. Before operating, ensure you have installed 8x AA Alkaline batteries and a Class 10 Micro SD card (up to 32GB). The device features 7 levels of infrared brightness for night viewing and supports both photo and video recording modes.
Product Overview
The device features several control buttons and indicators:
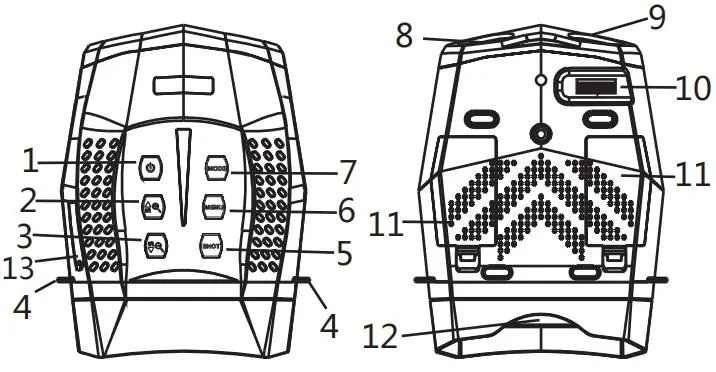
- Power Button: Long press for 3 seconds to turn the device on or off.
- IR Up/Zoom in/Up Button: Activates IR, increases brightness, or zooms in.
- IR Down/Zoom out/Down Button: Decreases IR brightness or zooms out.
- Shot Button: Used to take photos or start/stop video recording.
- Menu Button: Accesses settings and stops video playback.
- Mode Button: Switches between Photo, Video, and Playback modes.
- Focus Wheel: Adjusts the lens focus for image clarity.
Installation
Batteries: Open the battery cover on the back of the device. Insert 8 x 1.5V AA Alkaline batteries, ensuring correct polarity. Close the cover securely.
Memory Card: Prepare a Class 10 Micro SD card (up to 32GB). Open the card slot cover and insert the card. It is recommended to format the card within the device settings to improve compatibility. To remove, press the edge of the card gently to pop it out.
Basic Operation
Turning On/Off: Long press the Power button for 3 seconds.
Focusing: Look through the eyepiece and adjust the focus wheel until the image on the screen is clear.
Night Vision: In low light or darkness, press the IR Up button to activate the IR LED. You can cycle through 7 levels of brightness. Note that the image will appear in black and white when IR is active.
Modes: Press the Mode button to cycle between Photo, Video, and Playback modes. The default mode upon startup is Video mode.
Settings
Press the Menu button while in Photo or Video mode to access settings. You can adjust:
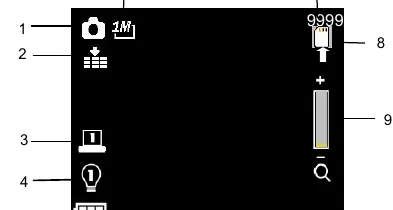
- Photo Resolution: Up to 3M (2048x1536).
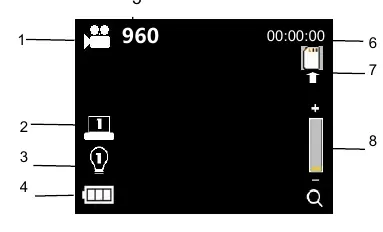
- Video Size: Up to 1080P (1920x1080).
- Night Vision Sensitivity: Low, Middle, or High.
- LCD Brightness: 7 levels.
- Power Save: Auto-off timer (3min/5min/10min/OFF).
- Format: Erases all files on the SD card.
Playback and File Transfer
To view files, switch to Playback mode using the Mode button. Use the Up/Down buttons to navigate files and the Shot button to play/pause videos. To transfer files to a PC, either use a card reader or connect the device via the supplied USB cable. When connected via USB, the device will appear as a removable disk; files are located in the DCIM folder.
Cleaning and Maintenance
Always disconnect from power (remove batteries) before cleaning. Use only a dry, soft, lint-free cloth (e.g., microfibre) to clean the exterior and lenses. Do not use cleaning fluids. Protect the device from dust and moisture. If storing for a long time, remove the batteries.
Practical help
Common problems
Device fails to turn on
Check if batteries are installed correctly, missing, or defective. Use only 8x AA Alkaline batteries.
Poor image quality
If wearing glasses, keep them on. Ensure IR is off during the day. At night, ensure IR is on and adjust the focus wheel.
No card prompt on screen
Ensure the Micro SD card is inserted correctly. If not detected, the SD card icon and recording time will not appear.
Before use
- Install 8x 1.5V AA Alkaline batteries.
- Insert a Class 10 Micro SD card (up to 32GB).
- Format the Micro SD card in the device settings.
- Check that the battery cover is securely closed.
- Adjust the focus wheel for your specific distance.
Specs in practice
- View Distance
- Up to 600 meters in complete darkness.
- Power Source
- Requires 8x AA Alkaline batteries or an external 5V mobile power supply.
Images and diagrams
- Buttons 1-7 control power, zoom, IR, menu, mode, and shooting.
- The focus wheel (10) is used to adjust image clarity based on distance.
- The LCD screen displays mode, resolution, battery status, and IR level.
Model compatibility
- Supports Micro SD cards up to 32GB.
- Video recording is silent.
- IR LED levels are limited by battery power (e.g., max level 3 if power is below 25%).

Manual page author
David Miller
Documentation analyst
Organizes user manual content into clear summaries, with attention to model details, product context, and everyday usability.