User Manual for Led2 RENO LED Spotlight
Quick guide for installing and wiring the Led2 RENO LED spotlight. Includes step-by-step mounting instructions for 3-phase tracks and wiring diagrams for various dimmable configurations.
Table of contents
Manual images
Click an image to enlargeQuick Guide from the Manual
The Led2 RENO is an LED spotlight designed for installation on 3-phase track systems. This document provides essential safety instructions, mounting steps, and wiring diagrams for standard and dimmable versions. Installation must be performed by a qualified technician or professional to ensure safety and proper operation.
Installation on 3-Phase Track
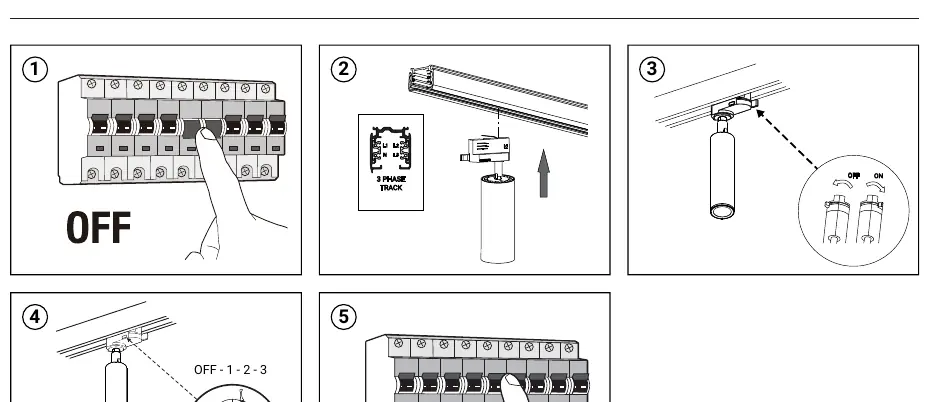
- Power Off: Turn off the main power supply at the circuit breaker before starting the installation to prevent electric shock.
- Insert Adapter: Insert the spotlight adapter into the 3-phase track.
- Secure: Ensure the adapter is properly locked into the track.
- Adjust: Position the spotlight as needed. The unit supports 90° vertical adjustment and 350° rotation.
- Power On: Restore the main power supply.
Wiring for Dimmable Versions
Optional dimmable versions require specific wiring configurations depending on the control method:
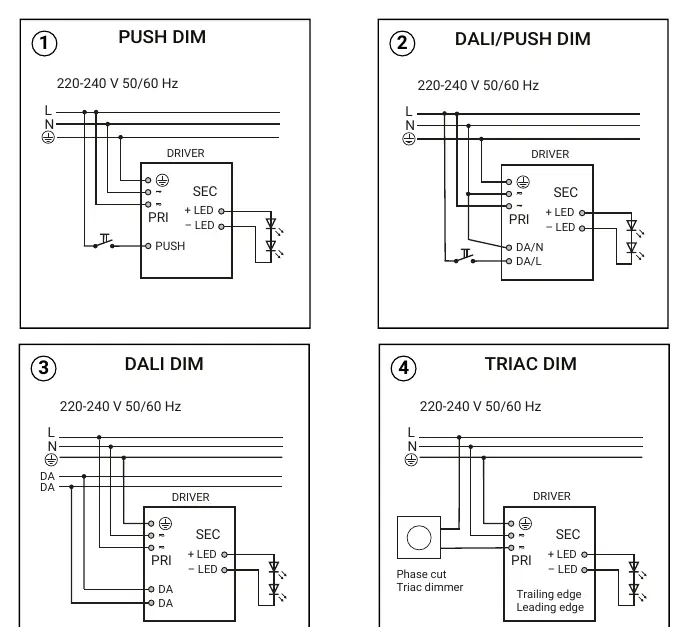
- Push Dim: Connect Line (L), Neutral (N), and the Push signal wire to the driver.
- DALI/Push Dim: Connect Line (L), Neutral (N), and the DALI/Push signal wires.
- DALI Dim: Connect Line (L), Neutral (N), and the DALI signal wires.
- Triac Dim: Connect Line (L), Neutral (N), and the Phase cut/Triac dimmer signal.
Safety Warnings
- Always disconnect the main power before installation.
- Handle the lampshade or diffuser with care, as it is fragile.
- The integrated LED light source is not user-replaceable; replacement must be performed by a qualified technician.
- The manufacturer is not responsible for incorrect use or assembly.
Practical help
Common problems
Verify that the main power is switched on and the adapter is correctly seated and locked into the 3-phase track.
Ensure the wiring matches the specific driver version (Push, DALI, or Triac) and that the dimmer switch is compatible.
Before use
- Ensure main power is switched off at the breaker
- Verify the 3-phase track system is compatible
- Identify if the unit is a standard or dimmable version
- Ensure a qualified technician is available for installation
Specs in practice
- 3-Phase Track
- A standard lighting rail system used for mounting and powering the spotlight.
Images and diagrams
- The installation diagram illustrates the 5-step process from power-off to final adjustment.
- Wiring diagrams show the specific connection points for L (Line), N (Neutral), and control signals.
Model compatibility
- Compatible with standard 3-phase track systems.
- Dimmable versions are optional and require specific wiring configurations.

Manual page author
David Miller
Documentation analyst
Organizes user manual content into clear summaries, with attention to model details, product context, and everyday usability.