Health / Light Therapy
User Manual for Mito Red Light MitoMIND 1070nm Intranasal Unit
Quick guide for the Mito Red Light MitoMIND 1070nm Intranasal Unit (RTS-II). Learn how to assemble, operate, adjust modes, and maintain your device for optimal light therapy.
Quick answers from the manual
Quick answer
- This manual provides instructions for operating the MitoMIND 1070nm Intranasal Unit, including assembly, usage modes, intensity settings, and maintenance. p. 6, 7, 10
Key actions
- Assemble the nasal probe by removing the silicone sleeve from the packaging and inserting it into the irradiation probe. p. 6
- Connect the nasal irradiation probe to the control main unit and insert the probe into the nasal cavity. p. 6
- Power on the device by holding the ON/OFF button for two seconds. p. 7
- Charge the device using the provided USB cord and a USB adapter (not provided) when the battery is low. p. 7, 10
First start
- Assemble the probe, connect to the main unit, and insert into the nasal cavity. p. 6
- Power on the unit, select time, select mode (M1 recommended), and adjust intensity. p. 7
Show 4 more answers Show less
Problems and fixes
Cannot see the light from the nasal probe.
The 1070nm light is past the visible spectrum. Use a cell phone camera in a dark environment to take a picture of the probe to confirm a dim glow.
p. 7
Device turns off automatically.
If the ON/OFF button is not pressed after selecting settings, the device turns off after one minute to save power.
p. 7Maintenance and reset
- The device has no serviceable parts; do not attempt to service the battery. p. 10
- Maximize battery life by allowing full charge and full discharge cycles. p. 10
Technical specifications
| Parameter | Value | Meaning | Pages |
|---|---|---|---|
| Led wavelength | 1070nm | Operating wavelength of the light therapy | p. 8 |
| Led output power | 2-5 mw | Power output of the LEDs | p. 8 |
| Timing range | 15-60 minutes | Adjustable session duration | p. 8 |
| Battery capacity | 1600 mAh | Capacity of the internal lithium ion battery | p. 8 |
Where to find it in the PDF
- Introduction p. 3, 4
- What's Included p. 5
- Instructions p. 6, 7
- Specifications p. 8
- Warranty and Maintenance p. 10
Table of contents
Manual images
Click an image to enlargeQuick guide from the manual
The MitoMIND 1070nm Intranasal Unit is a light therapy device designed to deliver near-infrared light to the nasal cavity. To ensure proper usage, always assemble the silicone probes before use, select your desired mode and intensity, and follow the recommended usage schedule of 15-30 minutes once a day. Note that 1070nm light is invisible to the naked eye; do not look directly into the probe to verify it is on.
What is included
- Main control panel
- Probe power line & Nasal Irradiation Probe
- Silicon nasal probes
- Packing case
- Charging cable
Assembly and setup
Before using the device, prepare the nasal irradiation probe:
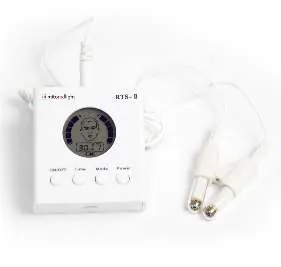
- Remove the silicone sleeve from the packaging box.
- Insert the silicone sleeve onto the irradiation probe.
- Connect one end of the nasal irradiation probe to the control main unit.
- Insert the other end of the probe into the nasal cavity.
Operation and modes
To operate the device, follow these steps:
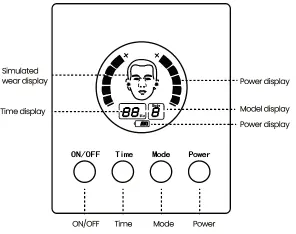
- Power On: Press and hold the ON/OFF button for two seconds.
- Select Time: Use the Time button to set your desired session duration.
- Select Mode: Press the Mode button to cycle through settings:
- M1: Two lights on (recommended for general use).
- M2: Only left light on.
- M3: Only right light on.
- Adjust Intensity: Press the Power button to adjust intensity. Each bar represents a 20% increment (5 bars = 100% intensity).
- Start Session: Press the ON/OFF button again to start. If not pressed, the device will automatically turn off after one minute.
Charging and maintenance
The device features a built-in rechargeable lithium battery. When the battery indicator flashes, the unit requires charging.
- Use the provided USB cord and a universal USB adapter (not included) to charge.
- Do not overcharge the device.
- The battery is not serviceable; do not attempt to disassemble or replace it.
- Keep the device away from liquids, chemicals (solvents, alcohol, insect repellent), and extreme temperatures.
- Clean the nasal probes regularly to prevent irritation.
Safety and specifications
Safety Warnings:
- Do not shine the nasal probe directly into your eyes.
- Avoid subjecting the device to strong shocks.
- Do not use a power supply with higher voltage than specified for charging.
- Consult a qualified health professional before using this product for any condition requiring medical attention.
Technical Specifications:
- Wavelength: 1070nm
- Output: 2 nasal cavity LED beams
- Power: 2-5 mW
- Battery: 1600 mAh Lithium-ion
- Timing Range: 15-60 minutes
Practical help
Common problems
Device turns off automatically after one minute
You must press the ON/OFF button to start the session after selecting your time, mode, and intensity settings.
Cannot see the light from the probe
1070nm light is outside the visible spectrum. To verify it is on, take a picture of the probe with your cell phone in a dark environment; you should see a dim glow.
Low battery indicator flashing
Connect the device to a power source using the provided USB cable and a universal USB adapter.
Before use
- Remove silicone sleeve from packaging
- Insert silicone sleeve onto the irradiation probe
- Connect probe to the main control unit
- Insert probe into the nasal cavity
- Ensure device is charged
Show more Show less
Images and diagrams
- Figure 1: Shows the assembly of the silicone sleeve onto the irradiation probe.
- Figure 2: Shows the correct placement of the nasal probe into the nasal cavity.
Model compatibility
- The device is intended for general wellness and fitness.
- Not intended to diagnose, treat, or cure any disease.
- Requires a universal USB adapter (not included) for charging.

Manual page author
David Miller
Documentation analyst