User Manual for myFirst Insta Lux Instant Print Camera
Quick guide for the myFirst Insta Lux instant print camera. Learn how to charge, insert cartridges, take photos, print, and connect to the myFirst Circle app.
Table of contents
Manual images
Click an image to enlargeQuick Guide
The myFirst Insta Lux is an instant print camera designed for children. This guide provides essential instructions for setup, operation, and maintenance. Always use official myFirst photo cartridges for optimal performance.
Device Overview
The camera features a 2.8-inch IPS screen and various physical buttons:
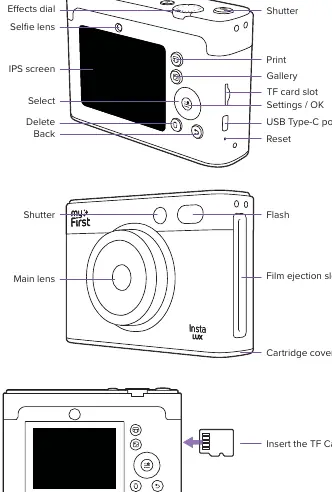
- Top: Power/Lens switch, Effects dial, Shutter button.
- Back: Print, Gallery, Select, Settings/OK, Delete, Back buttons.
- Ports/Slots: TF card slot, USB Type-C port, Reset pinhole.
- Front: Main lens, Selfie lens, Flash, Film ejection slot, Cartridge cover.
Getting Started
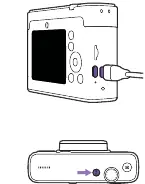
Charging the Battery
- Use the included Type-C charging cable.
- Connect the cable to a 5V charger.
- Connect the other end to the Insta Lux.
- The indicator light remains on while charging and turns off when fully charged. Charging takes approximately 2.5 hours.
Powering On/Off
- Power On: Press and hold the power button until the myFirst logo appears.
- Power Off: Press and hold the power button again.
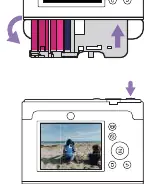
Inserting the Cartridge
- Open the cartridge cover downward.
- Hold the rectangular bar on the cartridge and align it with the slot.
- Push the cartridge in until you hear a click sound.
- Close the cover.
Taking Photos
- Adjust the desired effects and settings using the camera interface.
- Half-press the Shutter button to bring the subject into focus.
- Full-press the Shutter button to capture the photo.
Printing Photos
- Press the Gallery button.
- Use the Select button (left/right) to choose a photo.
- Press the Print button.
- Choose between Bright Print or Standard.
- Press Confirm to start printing.
- Wait until you see "Print Complete" on the screen before removing the photo.
App Connectivity
Connect your camera to the myFirst Circle app to print photos from your phone or sync images.
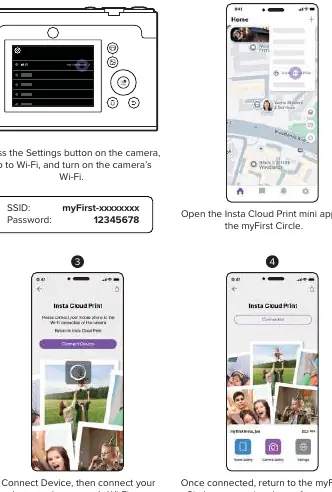
- Press the Settings button on the camera, navigate to Wi-Fi, and turn it on.
- Note the SSID (myFirst-xxxxxxxx) and password (12345678) displayed.
- Open the Insta Cloud Print mini-app within the myFirst Circle app on your phone.
- Tap Connect Device and connect your phone to the camera's Wi-Fi network.
- Once connected, you can print or sync photos.
Specifications
- Display: 2.8" IPS color screen
- Resolution: 4 MP
- Battery: 700mAh, 7.4V
- Charging Time: 2.5 hours
- Storage: Supports TF memory card up to 64GB
- Dimensions: 123 x 87 x 47.5 mm
Safety and Support
Do not attempt to remove or replace the non-user-replaceable battery. If you encounter battery issues, contact customer support. For further assistance, visit https://support.myfirst.tech.
Official resources from the manual
Practical help
Common problems
Ensure you are using an official myFirst photo cartridge.
The battery is non-user-replaceable. Do not attempt to remove it; contact customer support.
Ensure the camera's Wi-Fi is turned on in settings and your phone is connected to the camera's specific Wi-Fi network.
Before use
- Charge the camera fully (approx. 2.5 hours).
- Insert a TF memory card (up to 64GB).
- Install an official photo cartridge.
- Download the myFirst Circle app.
Images and diagrams
- The top of the camera houses the Power/Lens switch, Effects dial, and Shutter button.
- The back panel contains the IPS screen, navigation buttons (Select, Settings/OK, Back), and media buttons (Print, Gallery, Delete).
- The side features the TF card slot, USB Type-C port, and Reset button.
Model compatibility
- Use only official myFirst photo cartridges.
- Requires a 5V charger for battery charging.

Manual page author
Michael Turner
Technical manual editor
Reviews PDF manuals for structure, safety notes, and practical product details so readers can find the right information quickly.