Installation Guide for NEMO Tubes 2 Wall LED
Comprehensive installation and maintenance guide for the NEMO Tubes 2 Wall LED fixture. Includes step-by-step mounting instructions, wiring diagrams, dimmer compatibility requirements, and safety guidelines.
Table of contents
Manual images
Click an image to enlargeQuick guide from the manual
The NEMO Tubes 2 Wall LED is a professional lighting fixture that requires installation by a qualified electrician. Key requirements include using countersunk screws with a maximum head diameter of 7mm and ensuring a switch is installed in the dimmer circuit to guarantee the lamp can reach the OFF state. The fixture is designed for indoor use only.
Installation
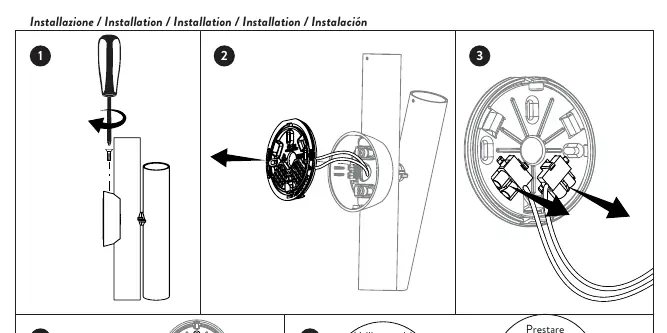
- Preparation: Ensure the power is disconnected before starting any work.
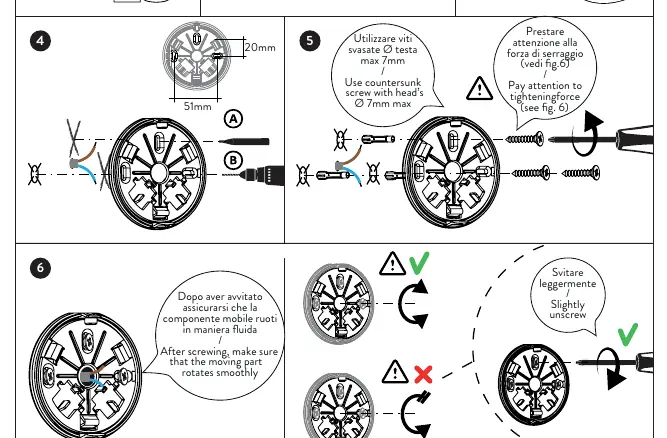
- Mounting: Use the provided base plate to mark and drill holes. Use countersunk screws with a maximum head diameter of 7mm.
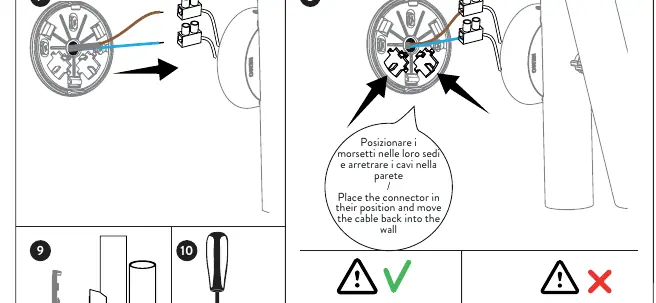
- Wiring: Connect the electrical wires to the terminals. Ensure the connectors are placed correctly in their seats and push the excess cable back into the wall.
- Final Assembly: Secure the fixture to the base. After screwing, ensure the moving component rotates smoothly.
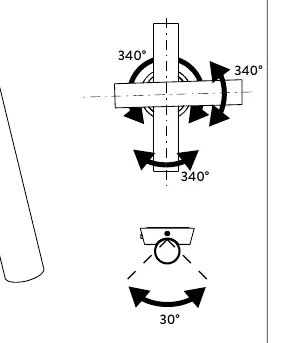
- Adjustment: The fixture allows for rotation. Refer to the diagrams for specific rotation angles (340° and 30°).
Dimmer Compatibility
This product is compatible with TRIAC dimmers. Please consult the official website at www.nemolighting.com for the current list of compatible dimmers. Always include a switch in the wiring schema to ensure the lamp can be completely turned off.
Safety and Warnings
- Professional Installation: Safety is guaranteed only if the installation is carried out by a qualified electrician.
- Environment: Do not install the fixture in environments with chlorine, salt air, or aggressive agents unless expressly mentioned.
- LED Characteristics: The color temperature (CCT) of LED sources may differ from the declared nominal value by ±5%.
- Material Variations: Anodized finishes and hand-polished surfaces may show natural color variations, which are considered aesthetic elements of the product.
Cleaning and Maintenance
To clean the lamp, use only a soft cloth, moistened with soap and water if necessary. Do not use alcohol or solvents.
Technical Specifications
- Model: 072TTB000600
- Power: 8W
- Luminous Flux: 380lm
- Color Temperature: 2700K
- Voltage: 220-240V, 50-60Hz
- Dimmable: TRIAC
- Energy Class: E
Official resources from the manual
Practical help
Common problems
Ensure a physical switch is installed in the dimmer connection to guarantee the lamp can reach the OFF state.
Ensure the moving component rotates smoothly immediately after screwing the fixture to the base.
Anodized finishes and hand-polished surfaces may show natural color variations; these are considered aesthetic elements of the product.
Before use
- Disconnect power before starting installation.
- Ensure the installation is performed by a qualified electrician.
- Verify the wall surface is suitable for mounting.
- Use countersunk screws with a head diameter of max 7mm.
- Check the list of compatible TRIAC dimmers on the manufacturer's website.
- Ensure the fixture is for indoor use only.
Images and diagrams
- Steps 1-3: Mounting the base plate to the wall.
- Steps 4-6: Wiring connections and securing the fixture.
- Steps 7-8: Proper cable management and connector placement.
- Step 11: Rotation angles (340° and 30°).
Model compatibility
- Compatible with TRIAC dimmers; check www.nemolighting.com for the specific list.
- Indoor use only.

Manual page author
David Miller
Documentation analyst
Organizes user manual content into clear summaries, with attention to model details, product context, and everyday usability.