Nilight Rectangular Trailer Light Kit User Guide
Quick guide for the Nilight Rectangular Trailer Light Kit. Includes wiring diagrams, color-coded connection instructions, and a list of included mounting hardware.
Table of contents
Manual images
Click an image to enlargeQuick Guide
This guide provides essential wiring and installation instructions for the Nilight 12V Rectangular Trailer Light Kit. Ensure all connections are secure and properly insulated before operating the trailer lights.
Wiring Instructions
If your trailer has an existing harness, you can connect the lights by matching the wire colors. If you are installing the provided harness, follow these connection steps:

- Green wire: Connect to the trailer's Right Stop & Turn Light (Positive).
- Yellow wire: Connect to the trailer's Left Stop & Turn Light (Positive).
- Brown wire: Connect to the trailer's Running Light (Positive).
- White wire: Connect to the trailer's frame (Negative/Ground).
- Side markers: Connect the yellow wire of the side marker to the brown wire of the harness kit using the provided splice connector.
Hardware Components
The kit includes the following hardware for installation:
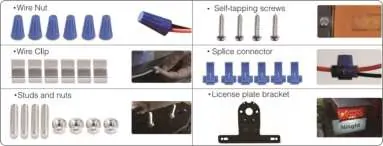
- Wire Nuts
- Wire Clips
- Studs and Nuts
- Self-tapping screws
- Splice connectors
- License plate bracket
Manufacturer information
Nilight
Practical help
Common problems
Check the ground connection (White wire) to ensure it is securely attached to the trailer frame.
Ensure the yellow wire of the side marker is correctly spliced into the brown running light wire using the provided connector.
Before use
- Verify the trailer harness compatibility.
- Ensure the trailer frame is clean for a good ground connection.
- Identify all wires by color before making connections.
- Check that all provided hardware (screws, nuts) is available.

Manual page author
Emily Carter
User documentation editor
Prepares concise manual descriptions and highlights the most useful setup, operation, and maintenance information for readers.