User Guide for Oscal TIGER 12 Series Smartphone
Quick start guide for the Oscal TIGER 12 Series smartphone. Learn how to insert SIM cards, boot the device, send messages, change language settings, and perform basic maintenance.
Table of contents
Manual images
Click an image to enlargeQuick Start Guide
This guide provides essential instructions for setting up and using your Oscal TIGER 12 Series smartphone. Please read all safety and maintenance information carefully to ensure optimal performance and longevity of your device.
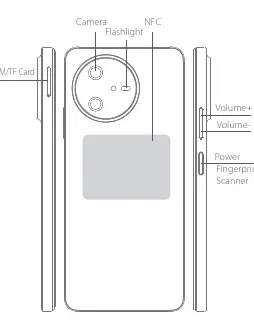
Device Layout
Familiarize yourself with the physical components of your smartphone:
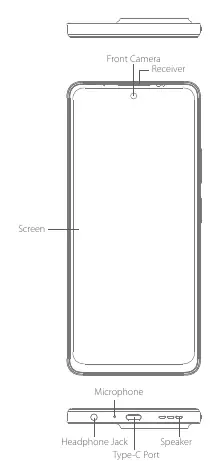
- Front: Screen, Front Camera, Receiver.
- Bottom: Microphone, Headphone Jack, Type-C Port, Speaker.
- Back: Camera, Flashlight, NFC area.
- Sides: SIM/TF Card slot, Volume buttons, Power button/Fingerprint Scanner.
SIM and TF Card Installation
To enable calling and storage expansion, follow these steps to insert your cards:
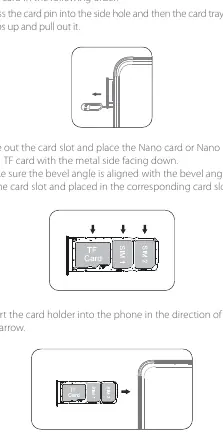
- Use the provided card pin to press into the side hole to eject the card tray.
- Pull out the card tray.
- Place the Nano SIM card(s) and TF card into the tray with the metal side facing down. Ensure the bevel angle of the cards aligns with the tray.
- Insert the card holder back into the phone in the direction of the arrow.
Booting the Device
The device features a non-removable battery. To boot the smartphone, press and hold the power button for 3-5 seconds.
Sending SMS and MMS
SMS: Open the SMS app, select 'New Information', enter the recipient's phone number or select from contacts, type your message, and press send.
MMS: While composing a message, you can select images, videos, or other files to attach. You can also capture new photos or videos directly from the app.
Language Settings
To change the system language:
- Go to Main menu > Settings > System setting > Language and input method.
- Select Language > Language adding.
- Choose your preferred language.
- Drag the selected language icon to the top of the list to apply it.
Safety Precautions
- Keep the phone at least 15 cm away from medical implants or pacemakers.
- Do not expose the device or battery to high temperatures, direct sunlight, or heat-generating equipment.
- Use only approved chargers and power sources to avoid fire or explosion risks.
- Do not disassemble, puncture, or drop the battery.
- Disconnect the charger when not in use.
Maintenance and Troubleshooting
If the device crashes or becomes unresponsive, you can force a restart:
- Force Restart: Press and hold the power button for more than 12 seconds.
- Cleaning: Use a soft, dry cloth to clean the screen and camera lens. Do not use chemical solvents or detergents.
- Battery Care: Avoid overcharging by disconnecting the charger once the battery is full.
Practical help
Common problems
Press and hold the power button for more than 12 seconds to force a restart.
Do not replace the non-removable battery yourself. Use only approved chargers and power sources.
Before use
- Ensure SIM card is inserted correctly
- Charge the device fully before first use
- Check for any physical damage
- Understand the power button function for booting and restarting
Images and diagrams
- Front view: Identifies screen, front camera, receiver, microphone, headphone jack, Type-C port, and speaker.
- Back view: Identifies camera, flashlight, NFC area, SIM/TF card slot, volume buttons, and power/fingerprint scanner.
Model compatibility
- Supports Nano SIM and TF card.
- Non-removable battery.

Manual page author
Michael Turner
Technical manual editor
Reviews PDF manuals for structure, safety notes, and practical product details so readers can find the right information quickly.