Philips 24B2U3601 Business Monitor Quick Start Guide
Quick start guide for the Philips 24B2U3601 Business Monitor. Includes assembly instructions, connectivity diagrams for USB docking and multi-stream transport, and stand adjustment settings.
Quick answers from the manual
Quick answer
- This guide provides assembly instructions, connectivity diagrams for USB docking and multi-stream transport, and stand adjustment ranges for the Philips 24B2U3601 monitor. p. 1
Key actions
- Assemble the stand p. 1
- Connect devices via USB-C p. 1
Technical specifications
| Parameter | Value | Meaning | Pages |
|---|---|---|---|
| Tilt | -5° to 30° | Vertical adjustment range | p. 1 |
| Swivel | -180° to +180° | Horizontal rotation range | p. 1 |
| Height Adjustment | 150mm | Vertical height adjustment range | p. 1 |
Show 1 more answers Show less
Where to find it in the PDF
- Quick Start Guide p. 1
Table of contents
Quick guide from the manual
This document provides essential setup and configuration information for the Philips 24B2U3601 Business Monitor. It covers physical assembly, connectivity options, and ergonomic adjustments.
Assembly and Safety
CAUTION: To prevent damage to the screen, always place the monitor face down on a smooth, soft surface before attaching the stand or performing any maintenance.
- Ensure the stand is securely attached to the monitor base.
- Handle the screen with care to avoid scratches.
Connectivity
The monitor supports various connectivity configurations:
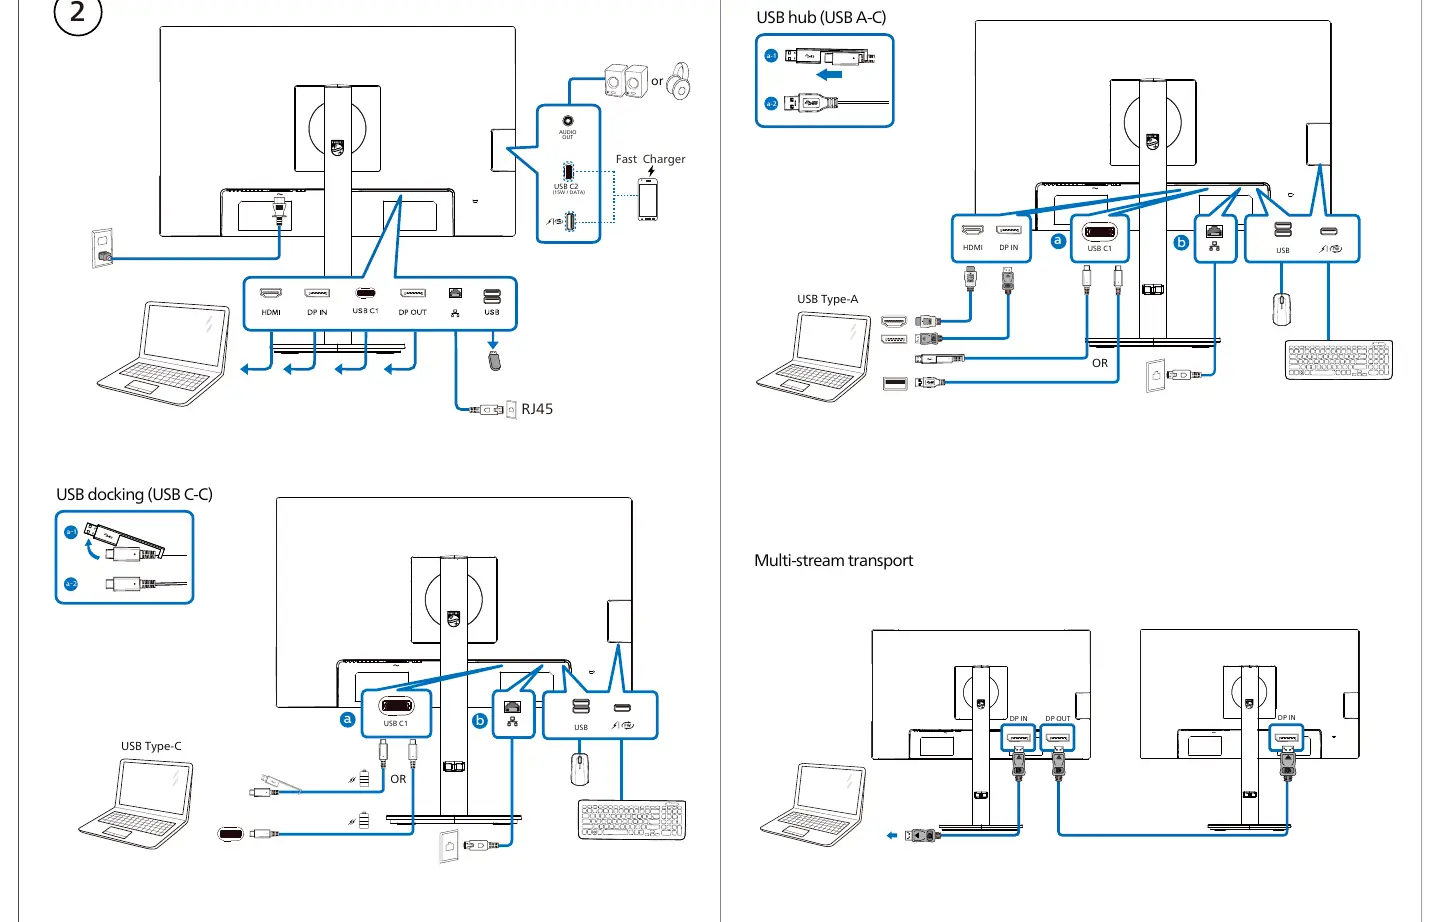
- USB Docking (USB C-C): Connect via USB-C for video, data, and power delivery (Fast Charger).
- USB Hub (USB A-C): Connect peripherals using USB Type-A and Type-C ports.
- Multi-stream transport: Allows for daisy-chaining multiple monitors using DisplayPort (DP) connections.
- Ports available: HDMI, DP IN, DP OUT, USB C1, USB C2, USB Type-A, and RJ45.
Adjustments
The monitor stand allows for the following ergonomic adjustments:
- Tilt: -5° to +30°
- Swivel: -180° to +180°
- Height Adjustment: Up to 150mm
OSD Controls
The monitor features an On-Screen Display (OSD) control panel located on the bottom right of the bezel. Use these buttons to navigate the menu, adjust settings, and power the device on or off.
Manufacturer information
Philips
Practical help
Common problems
Always place the monitor face down on a smooth, soft surface before attaching the stand.
Before use
- Ensure the surface is smooth and clean to prevent screen scratches.
- Identify the correct cables (HDMI, DP, USB-C) for your specific setup.
- Verify the monitor is placed on a stable surface.
- Check that all connections are firmly seated.

Manual page author
Emily Carter
User documentation editor