User Manual for Phrozen Sonic Mighty 16K Revo 3D Printer
Comprehensive user guide for the Phrozen Sonic Mighty 16K Revo 3D printer. Includes initial setup, auto-leveling, Z-axis calibration, file preparation, printing procedures, maintenance, and technical specifications.
Quick answers from the manual
Quick answer
- To set up the Phrozen Sonic Mighty 16K Revo, place it on a stable surface, connect to Wi-Fi, perform the LCD test, and complete the Auto Leveling procedure using a sheet of A4 paper. p. 6, 7
Key actions
- Perform Auto Leveling p. 6
- Calibrate Z-Axis p. 7
- Transfer Print Files p. 10
First start
- Follow the on-screen wizard for language, Wi-Fi, LCD test, and leveling. p. 6
Problems and fixes
Enable Residue Detection in Settings > Hardware Testing.
p. 8Maintenance and reset
- Clean Z-axis ball screw with lint-free wipes and apply lithium-based lubricant. p. 3
Technical specifications
| Parameter | Value | Meaning | Pages |
|---|---|---|---|
| System | Phrozen OS | Operating system | p. 5 |
| XY Resolution | 16.8 x 24.8 µm | Print detail resolution | p. 5 |
| Layer Thickness | 0.01 - 0.30 mm | Print layer height | p. 5 |
Where to find it in the PDF
- Printer Parts p. 4
- Initial Setup p. 6
- Calibration p. 7
Table of contents
Manual images
Click an image to enlargeQuick Guide from the Manual
The Phrozen Sonic Mighty 16K Revo is a high-resolution resin 3D printer. Before starting, ensure the printer is placed on a flat, stable surface in a well-ventilated area away from direct sunlight. Always wear personal protective equipment (gloves, masks, goggles) when handling resin. The printer requires initial setup via the touch panel, including language selection, Wi-Fi connection, LCD testing, and auto-leveling.
Printer Parts
The printer consists of several key components:

- Camera: For monitoring prints.
- Adjustable Interior Light: Automatically turns off after 10 minutes.
- Resin Vat & Building Plate: The core printing area.
- Touch Panel: Main interface for operation.
- Air Purifier USB Port: For connecting the included air purifier.
- Power Switch & Socket: Located at the rear.
- Pump & Fill Port: For resin management.
Initial Setup
Follow these steps on the touch panel to configure your printer:
- Language Selection: Choose your preferred language.
- Printer Naming: Assign a name to your device.
- Wi-Fi Connection: Connect to your local network in Settings > Network.
- LCD Test: The printer will test the LCD screen.
- Auto Leveling: Follow the on-screen prompts to level the building plate.
- Test Print: Run the included test file to verify functionality.
Calibration
Auto Leveling: Navigate to Tools > Z-Axis Control > Auto Leveling. Remove the resin vat, install the building plate, and place a sheet of A4 paper on the LCD. Follow the on-screen instructions to adjust the plate until friction is equal in all four corners.
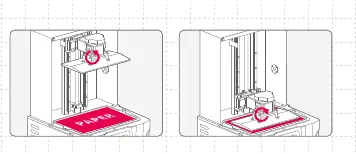
Z-Axis Calibration: If you change the building plate, Z-axis, or LCD panel, perform a full Z-axis calibration via Tools > Z-Axis Control > Z-Axis Calibration. Follow the prompts to tighten the four calibration screws diagonally while pressing gently on the plate.
Printing Process
File Preparation: Use slicer software (e.g., CHITUBOX V1.9.6+) to convert .STL or .OBJ files into .CTB or .PRZ formats. Ensure you set resin parameters correctly.
File Transfer: You can transfer files via USB drive or internal storage. In the Printing menu, select USB, choose your file, and tap Print.
First Test Print: Shake the resin bottle for 1 minute, pour into the vat (do not exceed the maximum mark), and start the print. Keep the lid closed during printing to prevent light exposure.
Maintenance
- Z-Axis: Wipe the ball screw with lint-free wipes and apply a thin layer of lithium-based lubricant for smooth operation.
- Printer Cleaning: Use 95% alcohol and lint-free wipes to clean the printer, resin vat, and building plate.
Technical Specifications
The printer features a 5-inch touch panel, 8GB built-in memory, and supports USB/Wi-Fi connectivity. It uses a Linear Projection LED Module with an XY resolution of 16.8 x 24.8 µm and supports layer thicknesses between 0.01 and 0.30 mm. Power requirement is 100-240V AC, 50-60Hz.
Practical help
Common problems
Ensure the residue detection feature is enabled in Settings > Hardware Testing to monitor for solid residue between the vat and building plate.
Enable Failure Detection in settings to monitor the release status of cured resin; a warning message will appear if errors are detected.
Ensure the building plate is tightened correctly and perform the Auto Leveling procedure again, ensuring equal friction on the A4 paper at all four corners.
Before use
- Place printer on a flat, stable surface.
- Ensure the environment is dry and well-ventilated.
- Wear gloves, mask, and goggles when handling resin.
- Clean the Z-axis ball screw and apply lubricant.
- Ensure the resin vat and building plate are clean and free of debris.
- Shake resin bottle for 1 minute before pouring.
Specs in practice
- XY Resolution
- 16.8 x 24.8 µm; determines the detail level of the print.
- Layer Thickness
- 0.01 - 0.30 mm; adjustable height for each printed layer.
- Power Requirement
- 100-240V AC, 50-60Hz; ensure compatibility with local power grid.
Images and diagrams
- Parts diagram identifies the camera, interior light, resin vat, and ports.
- Calibration diagram shows the thumb screw and calibration screws location.
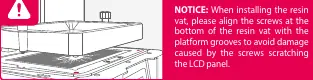
- Resin vat installation warning highlights aligning screws with platform grooves.
Model compatibility
- Compatible with CHITUBOX V1.9.6 and above.
- Supports .CTB and .PRZ file formats.
- Requires 100-240V AC power.

Manual page author
Emily Carter
User documentation editor
Prepares concise manual descriptions and highlights the most useful setup, operation, and maintenance information for readers.