Parts List for Pretul 120A Inverter Welder
Access the official parts list and exploded view diagram for the Pretul 120A inverter welder. Identify components and replacement parts for your device.
Table of contents
Quick guide from the manual
This document provides an official exploded view diagram and a comprehensive parts list for the Pretul 120A Inverter Welder (Model SOIN-512MP). It is designed to assist users and technicians in identifying specific components for maintenance, repair, and ordering replacement parts.
Exploded View and Components
The provided diagram illustrates the internal and external assembly of the welder. Key components identified in the diagram include:
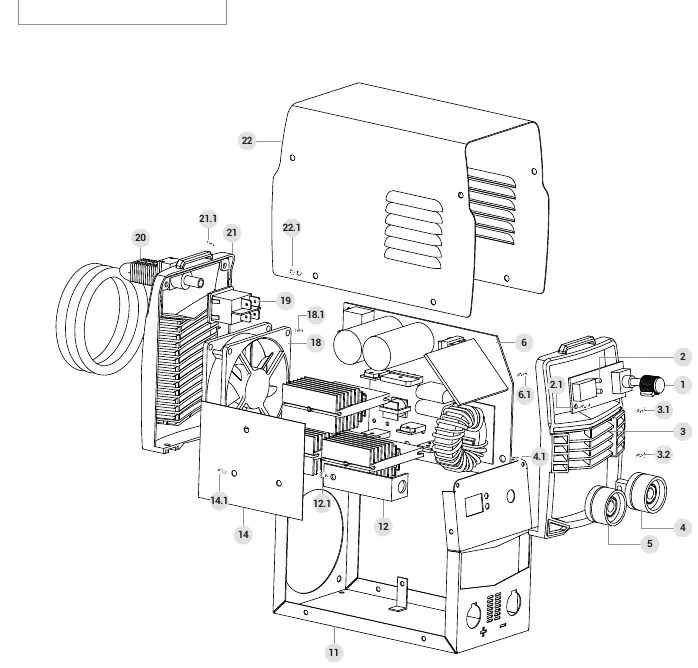
- Front Panel (Panel frontal): Houses the control interface and connectors.
- Control Board Assembly (Ensamble de tarjeta de control): The main electronic component for the inverter.
- Cooling Fan (Ventilador): Essential for thermal management during operation.
- Quick Connectors (Conector rápido): Positive and negative terminals for welding cables.
- Power Cable (Cable de alimentación): The main electrical input connection.
Service and Support
If you require replacement parts or technical assistance, you can acquire them through authorized Truper Service Centers. For support, you may contact them by calling 800-018-7873.
Manufacturer information
Pretul
Practical help
Common problems
Inspect the power cable (Part 20) for damage or loose connections.
Check the cooling fan (Part 18) for obstructions or failure to spin.
Verify the integrity of the positive and negative quick connectors (Parts 4 and 5).
Before use
- Ensure the front panel (Part 3) is securely attached.
- Verify that the quick connectors (Parts 4 and 5) are clean and tightly connected.
- Check that the cooling fan (Part 18) is free of dust and obstructions.
- Inspect the power cable (Part 20) for any signs of wear or damage.

Manual page author
Emily Carter
User documentation editor
Prepares concise manual descriptions and highlights the most useful setup, operation, and maintenance information for readers.