General / Accessories
QSFPTEK Mux Demux & OADM Quick Start Guide
Comprehensive installation and configuration guide for QSFPTEK CWDM/DWDM Mux Demux and OADM modules, covering rack mounting, port identification, and safety procedures.
Table of contents
Manual images
Jump to the sectionProduct Overview
The QSFPTEK CWDM and DWDM Mux Demux devices are high-performance networking solutions designed for efficient signal multiplexing and demultiplexing. These products are available in both FMU Plug-in Module and 1U Rack-mount form factors. They support various configurations, including single-fiber and dual-fiber line types, with channel capacities ranging from 4 to 64 channels depending on the specific model. The devices also feature optional Monitor, Expansion, and 1310nm ports to enhance network capacity and facilitate signal monitoring.
Safety and Installation Requirements
Proper installation is critical for maintaining network integrity and device longevity. Before beginning, ensure you have the necessary tools, including a screwdriver, a static-proof wristband, and appropriate bolts. Maintain a clean, dust-free environment and ensure the installation site is well-ventilated to allow for effective heat dissipation. Always follow electrostatic discharge (ESD) prevention procedures to avoid damaging sensitive components. Wear protective glasses if the environment poses a risk to your eyes and ensure that all clothing is secure to prevent accidental snagging on equipment.
Installation Procedures
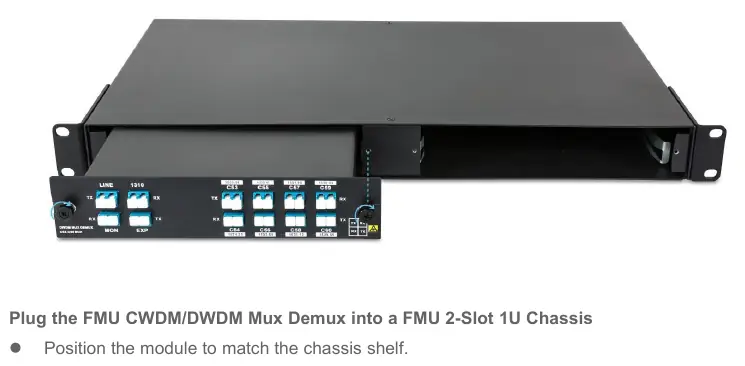
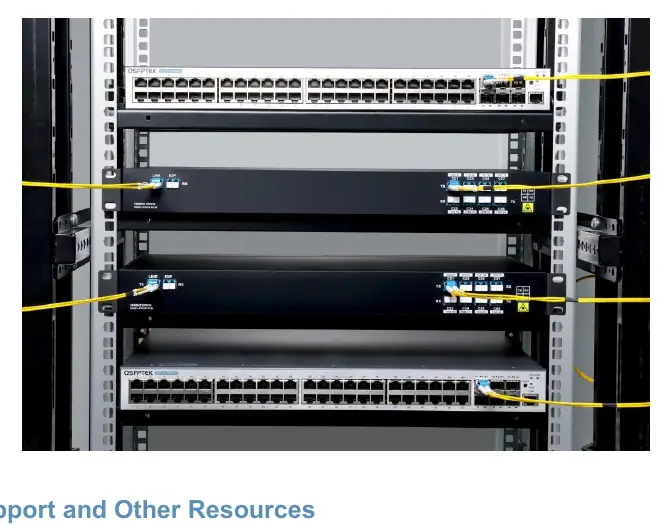
For FMU Plug-in Modules, align the module carefully with the chassis shelf, insert it into the designated space, and secure it by tightening the M3 captive screws on both sides. When mounting a 1U chassis into a rack, first install the mounting brackets on both the left and right sides of the unit. Carefully position the chassis within the rack and secure it using M6x12mm screws and M6 nuts. Ensure the unit is level and firmly attached to the rack rails to prevent vibration or misalignment.
Port Configuration and Maintenance
Each device includes specific functional ports for network integration. The Line port connects to the main network, while the EXP (Expansion) port allows for capacity enhancement by connecting additional Mux units. The Monitor port is designed to extract 1% of the signal, enabling real-time monitoring of channel power levels without interrupting traffic. When connecting fiber cables, ensure all connectors are clean and properly seated. Regularly inspect the installation site to ensure that ventilation remains unobstructed and that the equipment remains sealed against dust and debris.
Manufacturer information
QSFPTEK
Practical help
Common problems
Poor signal quality or high insertion loss
Ensure all fiber connectors are clean and properly seated; verify that the correct wavelength ports are used.
Overheating of the device
Ensure the rack environment is well-ventilated and that cool air can circulate freely around the chassis.
Before use
- Verify all necessary tools are available (screwdriver, static-proof wristband).
- Ensure the installation site is clean and dust-free.
- Check that the rack environment provides adequate ventilation.
- Confirm the correct Mux/Demux model for your network requirements.
- Prepare M6x12mm screws and M6 nuts for rack mounting.
Specs in practice
- Monitor Port
- Extracts 1% of the signal for monitoring channel power levels.
Images and diagrams
- The front panel displays TX/RX ports for specific wavelengths.
- Line ports are used for the primary network connection.
- Monitor ports are clearly labeled for signal testing.
- Expansion ports are located near the Line ports for easy daisy-chaining.
Model compatibility
- Compatible with FMU 2-Slot 1U Chassis.
- Supports both single-fiber and dual-fiber network architectures.

Manual page author
David Miller
Documentation analyst
Organizes user manual content into clear summaries, with attention to model details, product context, and everyday usability.