Installation Guide for QuickBOLT 17721SS Roof Mount Kit
Quick guide for installing the QuickBOLT 17721SS Low Profile Mount on asphalt shingle roofs. Includes required tools, step-by-step installation procedure, and torque specifications.
Quick answers from the manual
Quick answer
- The 17721SS is a low-profile roof mount for asphalt shingle roofs. Installation involves locating the rafter, pre-drilling, applying sealant, and securing the mount with a minimum torque of 125 lbs/inch. p. 2
Key actions
- Locate the rafter and predrill the hole using a 3/16" drill bit. p. 2
- Apply sealant to the hole and the bottom of the Microflashing washer. p. 2
- Tighten the assembly to a minimum of 125 lbs/inch torque. p. 2
Technical specifications
| Parameter | Value | Meaning | Pages |
|---|---|---|---|
| Minimum Torque | 125 lbs/inch | Required for proper compression of the Microflashing washer. | p. 2 |
Where to find it in the PDF
- Cover Page p. 1
- Installation Instructions p. 2
Table of contents
Quick Guide for Installation
The QuickBOLT 17721SS is designed for mounting on asphalt shingle roofs. The installation process requires specific tools, including a drill and a torque-capable driver. The most critical step is ensuring the Microflashing washer is properly compressed using a minimum torque of 125 lbs/inch to maintain the integrity of the roof seal.
Recommended Materials
- Rafter locator
- Chalk or a crayon
- Drill with a 3/16" drill bit
- MFG approved sealant
- M6 deep socket hex driver
- 1/2" wrench
Installation Instructions
- Locate and Drill: Use a rafter locator to find the rafter, mark it with chalk or a crayon, and predrill the hole using a 3/16" drill bit.
- Seal the Hole: Fill the predrilled hole with an MFG approved sealant.
- Prepare Washer: Place a ring of sealant around the bottom of the Microflashing washer.
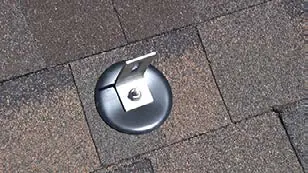
- Install Mount: Place the Microflashing and drive the bolt until it compresses.
- Attach L-Foot: Insert the L-Foot onto the assembly.
- Secure: Insert the nut and tighten until secure.
Technical Specifications
To ensure the Microflashing is compressed properly, use a minimum torque of 125 lbs/inch.
Practical help
Common problems
Ensure a ring of sealant is applied to the bottom of the Microflashing washer and that the bolt is driven to the required torque.
Before use
- Locate the roof rafter
- Have a 3/16" drill bit ready
- Obtain MFG approved sealant
- Have an M6 deep socket hex driver
- Have a 1/2" wrench

Manual page author
David Miller
Documentation analyst
Organizes user manual content into clear summaries, with attention to model details, product context, and everyday usability.