Assembly Instructions for River Of Goods 1-Bulb Pendant Light
Quick assembly guide for the River Of Goods 1-Bulb pendant light. Includes wiring instructions, safety warnings, and bulb installation steps.
Quick answers from the manual
Quick answer
- This document provides instructions for assembling and installing the River of Goods 1-Bulb Pendant Light, including wiring connections and bulb installation. p. 1
Key actions
- Attach the mounting bracket (C) to the outlet box using two mounting screws (E). p. 1
- Connect the wires: White to Neutral, Black to Live, and the fixture grounding wire to the green grounding screw (D). p. 1
- Secure the canopy (F) to the mounting bracket (C) using screws (G). p. 1
- Attach the lamp shade to the lamp holder (A) and secure with the socket ring. p. 1
- Install the bulb (not included). p. 1
First start
- Follow the assembly steps to mount the bracket, connect wiring, secure the canopy, attach the shade, and install the bulb. p. 1
Show 2 more answers Show less
Technical specifications
| Parameter | Value | Meaning | Pages |
|---|---|---|---|
| Bulb Type A | E26 | Maximum 60W | p. 1 |
| Bulb Type CFL | E26 | Maximum 13W | p. 1 |
Where to find it in the PDF
- Assembly Instructions p. 1
Table of contents
Quick Guide
This document provides essential assembly and safety instructions for the River Of Goods 1-Bulb pendant light. Always ensure the power is disconnected before installation or bulb replacement.
Assembly and Installation
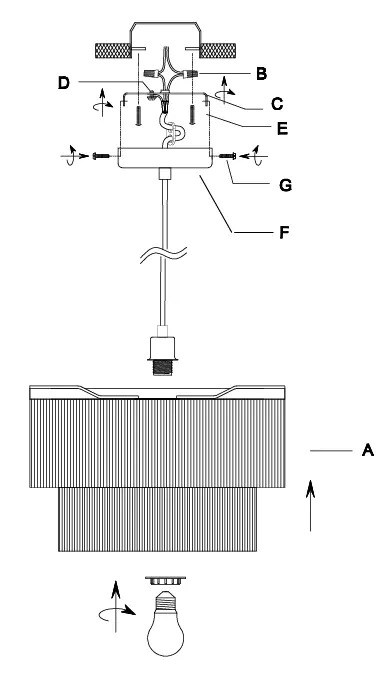
- Attach the mounting bracket (C) to the outlet box using the two provided mounting screws (E).
- Pull out the outlet wires and housing grounding wire from the outlet box.
- Connect the wires using the wire nuts (B): connect the White wire to the White-Neutral wire and the Black wire to the Black-Live wire.
- Attach the fixture grounding wire to the mounting bracket using the green grounding screw (D). Carefully tuck all wires back into the outlet box.
- Secure the canopy (F) to the metal mounting bracket (C) using the provided screws (G).
- Attach the lamp shade to the lamp holder (A) and secure it with the socket ring.
- Install the appropriate bulb (not included).
Care and Maintenance
Use only a soft cloth for cleaning. Do not use any chemicals or abrasive cleaners.
Technical Specifications
- Bulb Type A: E26, Max 60W (Not included)
- Bulb Type CFL: E26, Max 13W (Not included)
- Safety: UL Listed
Practical help
Common problems
Bulb replacement safety
Do not attempt to replace the bulb(s) while the lamp is plugged into a wall receptacle.
Exceeding maximum wattage
Refer to the wattage caution label located near the lamp holder and ensure the bulb used does not exceed the specified maximum wattage.
Before use
- Ensure the power supply is turned off at the circuit breaker.
- Verify the outlet box is compatible with the mounting bracket.
- Check the wattage caution label on the lamp holder.
- Ensure you have the necessary tools for installation.

Manual page author
Michael Turner
Technical manual editor