Rovsun 110LBS Commercial Ice Maker User Guide
Comprehensive user guide for the Rovsun 110LBS commercial ice maker, covering troubleshooting, maintenance, and operational error codes.
Table of contents
Manual images
Jump to the sectionProduct Overview
The Rovsun 110LBS commercial ice maker is designed for high-volume ice production. This unit requires a stable water supply and proper ventilation to function efficiently. It features an automated control system that monitors ice production cycles, water levels, and component performance.
Operational Safety and Setup
Ensure the unit is placed on a level surface with adequate clearance for airflow. The machine must be connected to a reliable water source. If the water pressure is too high, the internal float valve may fail to operate correctly, requiring a pressure adjustment or regulator. Always ensure the water tank is properly plugged and the spray pipe is clear of obstructions to maintain consistent ice production.
Troubleshooting and Error Codes
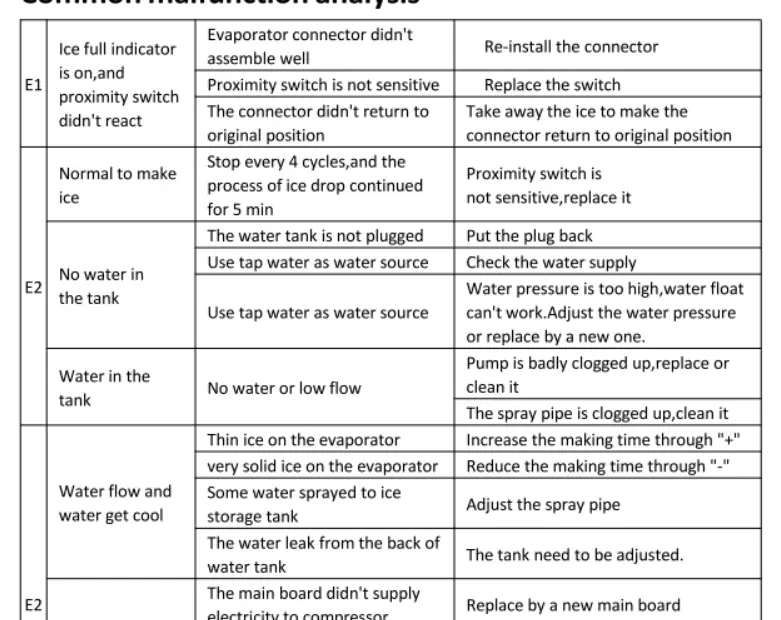
The machine uses a diagnostic system to indicate malfunctions through error codes:
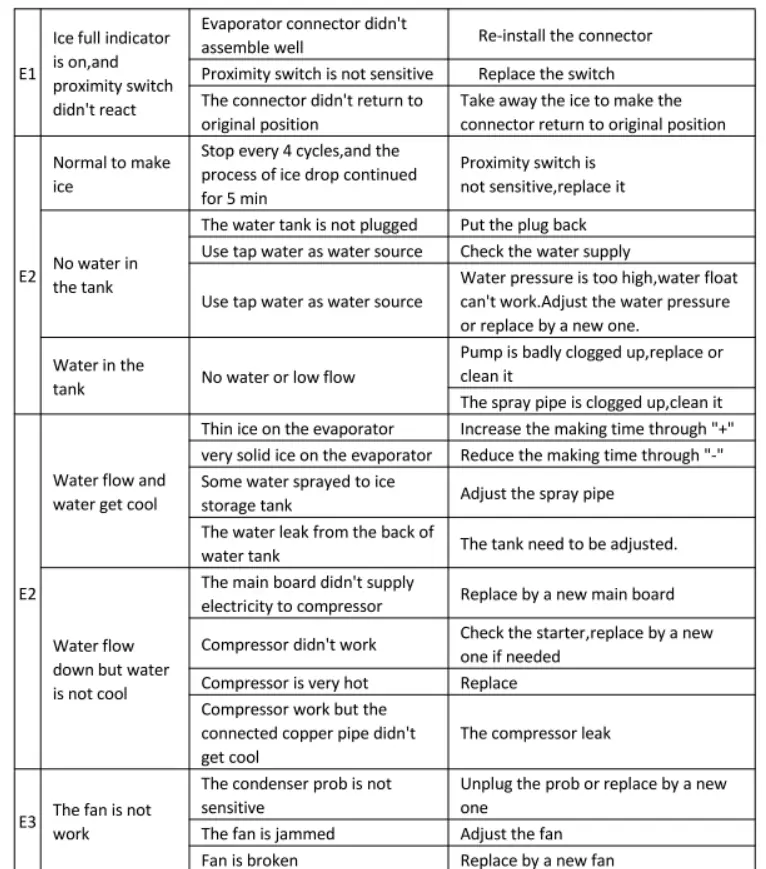
- E1: Indicates issues with the ice-full sensor or proximity switch. Check if the connector is properly seated or if the ice bin is overfilled, preventing the switch from returning to its original position.
- E2: Relates to water supply and cooling cycles. This may indicate no water in the tank, a clogged pump, or issues with the spray pipe. It can also signal that the compressor is not receiving power or is overheating.
- E3: Indicates a fan malfunction. Check if the condenser probe is sensitive, the fan is physically jammed, or the fan motor has failed.
- E4: Signals an ice-full condition where the sensor connector has not returned to its neutral position. Clear excess ice from the sensor area.
Maintenance
Regular maintenance is essential for longevity. If ice production is inconsistent, adjust the cycle time using the control panel (+/- buttons). If the ice is too thin, increase the cycle time; if it is too solid or thick, decrease it. Periodically inspect the spray pipe for mineral buildup and clean the pump if water flow appears restricted.
Practical help
Common problems
Check the proximity switch and sensor connector. Ensure the ice bin is not overfilled, allowing the connector to return to its original position.
Verify water supply, check for clogged pump or spray pipe, and ensure the water tank is properly plugged.
Inspect the condenser probe, check for physical obstructions in the fan, or replace the fan if it is broken.
Adjust the ice-making cycle time using the '+' or '-' buttons on the control panel.
Before use
- Ensure the unit is on a level surface.
- Verify water supply pressure is within operational limits.
- Check that the water tank is securely plugged.
- Ensure the area around the condenser is free of obstructions for proper airflow.
- Clear any ice buildup from the sensor area before starting.
Specs in practice
- Cycle Time Adjustment
- Allows the user to increase or decrease the duration of the ice-making process to control ice thickness.
- Proximity Switch
- A sensor that detects when the ice storage bin is full to stop production automatically.
- Condenser Probe
- Monitors the temperature of the cooling system to ensure the fan operates when necessary.
Images and diagrams
- The provided diagnostic table maps specific error codes (E1-E4) to their root causes and required corrective actions.
- The table categorizes malfunctions into sensor issues, water supply problems, cooling cycle inefficiencies, and mechanical failures.
Model compatibility
- Requires a standard tap water connection.
- High water pressure may require an external pressure regulator to prevent float valve failure.

Manual page author
Michael Turner
Technical manual editor
Reviews PDF manuals for structure, safety notes, and practical product details so readers can find the right information quickly.