Sensea Perla 110CM Bathroom Cabinet Assembly and Maintenance Manual
Comprehensive assembly, installation, and maintenance guide for the Sensea Perla 110CM bathroom cabinet, including safety warnings and wall-mounting instructions.
Table of contents
Manual images
Jump to the sectionProduct Overview
The Sensea Perla 110CM is a bathroom cabinet designed for wall-mounted installation. It features a 3-door configuration and is built to provide storage solutions for bathroom environments. The product comes with a 5-year guarantee.
Safety Information
Warning: To prevent the risk of tipping, the cabinet must be securely attached to the wall using the provided mounting hardware. Before installation, verify that the wall is suitable and strong enough to support the weight of the cabinet and the forces generated at the mounting points. Improper installation can lead to the cabinet falling, causing serious injury. If you are unsure about the wall's load-bearing capacity, it is mandatory to install additional feet (sold separately).
Installation
The installation process requires careful preparation and the use of appropriate screws, washers, and wall plugs suitable for your specific wall material. These are not included in the package. Ensure the cabinet is mounted level and securely fixed to the wall. The assembly process involves connecting the cabinet panels, installing the hinges, and mounting the doors. Detailed diagrams are provided in the manual to guide you through each step, from preparing the wall to final adjustments.


Maintenance
To maintain the cabinet, clean it regularly using a soft cloth. Avoid using harsh chemicals or abrasive sponges that could damage the surface. The cabinet is designed for long-term use in a bathroom environment, provided it is installed correctly and maintained according to these instructions.
Disposal
This furniture is recyclable. If it is no longer usable, please take it to a local waste recycling center for proper disposal.
Practical help
Common problems
Ensure the cabinet is securely attached to the wall using the provided hardware. If the wall strength is uncertain, install additional feet (sold separately).
Use the adjustment screws on the hinges to align the doors properly (refer to the adjustment diagrams in the manual).
Before use
- Verify the wall is suitable and strong enough to support the cabinet weight.
- Ensure you have the correct screws, washers, and wall plugs for your wall type (not included).
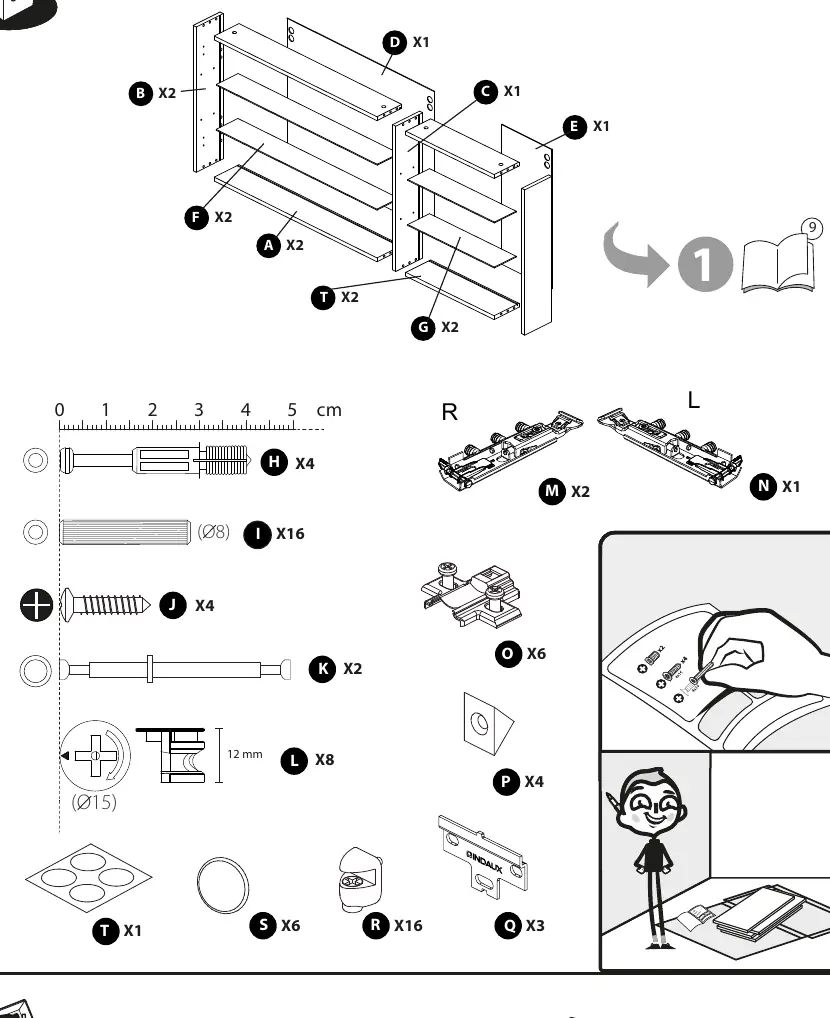
- Check that all components listed in the assembly guide are present.
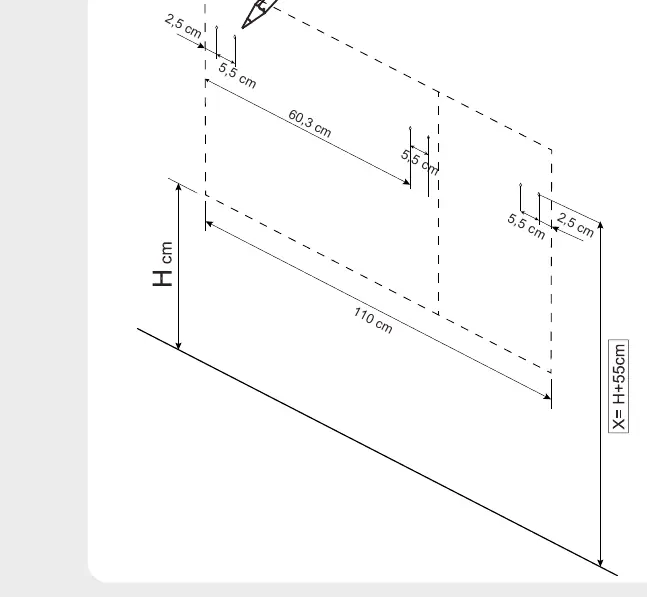
- Use a level to ensure the cabinet is mounted straight.
- Confirm the maximum load capacity (20kg) is not exceeded.
Images and diagrams
- Pages 6-7 list all parts and tools required for assembly.
- Pages 8-18 detail the step-by-step assembly of the cabinet frame.
- Page 19 provides measurements for wall mounting.
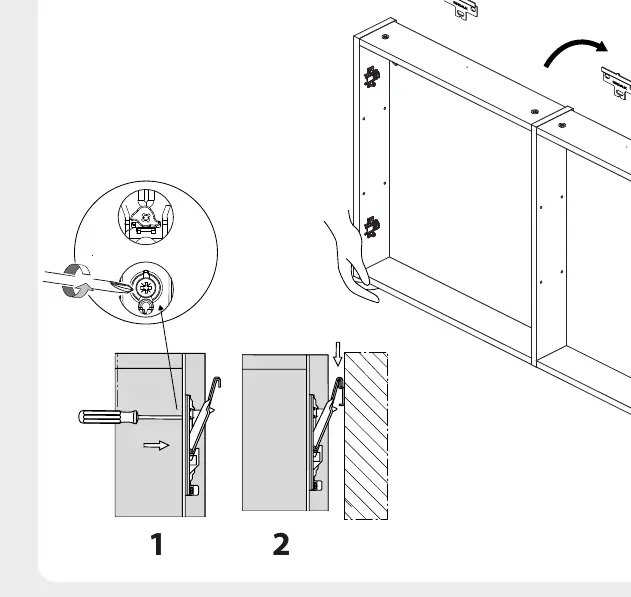
- Pages 20-21 show how to attach the cabinet to the wall and secure it.
- Pages 24-25 illustrate door installation and hinge adjustment.
Model compatibility
- Wall mounting hardware is not included; must be chosen based on wall material.
- Additional feet are required if the wall strength is insufficient for wall-only mounting.

Manual page author
David Miller
Documentation analyst
Organizes user manual content into clear summaries, with attention to model details, product context, and everyday usability.