User Manual for Snow Joe 13-AMP Electric Leaf Mulcher/Shredder SDJ616-RM
Quick guide for the Snow Joe 13-AMP Electric Leaf Mulcher/Shredder SDJ616-RM. Includes assembly instructions, operation, maintenance, and safety guidelines.
Table of contents
Manual images
Click an image to enlargeQuick guide from the manual
The Snow Joe 13-AMP Electric Leaf Mulcher/Shredder is designed for shredding leaves, thatch, grass clippings, and pine needles. It is not intended for branches, sticks, or brush. Always use a UL-rated extension cord suitable for outdoor use. Before starting, ensure the unit is on a solid, level surface and that you are wearing safety glasses and a dust mask.
Assembly
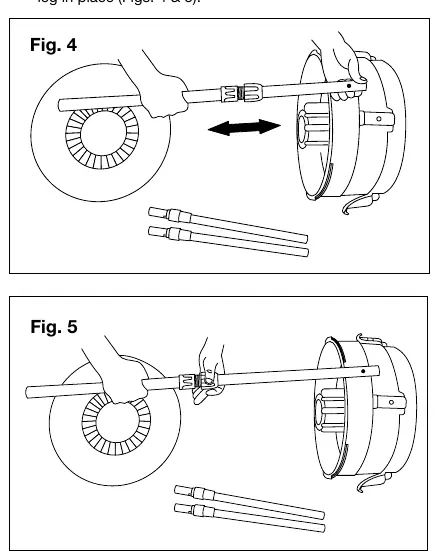
Assembling the Mulcher Stand: Loosen the height adjustment knob on the legs to set the desired height and tighten to secure. Insert the legs into the holes on the motor housing until the pins click into place.
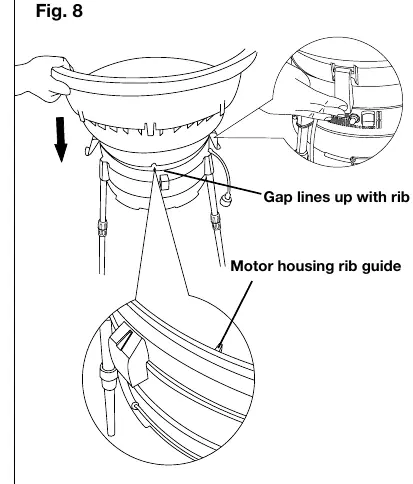
Assembling the Mulching Power Head: Place the motor housing securely on the legs. Fit the funnel onto the motor housing, aligning the funnel gap with the motor housing rib, and secure it using the clamps. Finally, fit the funnel cover onto the funnel using the 8 locking tabs.
Fitting the Collection Bag: The unit does not include a collection bag. You may use a plastic, paper, or cloth bag. Fit the bag around the motor housing and secure it using the elastic strap at the base.
Operation
ON/OFF Switch: The switch is located on the lower side of the motor housing. Push the green button to turn on and the red button to turn off. If the unit stops, wait 1 minute and press the circuit breaker reset button.
Loading: Feed double handfuls of dry leaves or single handfuls of wet leaves into the funnel. Allow the machine to shred the load completely and regain speed before adding more. Do not overload the machine.
Adjusting the Control Dial: The dial regulates particle size and speed. The COARSE position processes material faster with larger particles. The FINE position processes slower with smaller particles (up to 16:1 reduction ratio).
Maintenance
Cleaning: Disconnect the power before cleaning. Clean out built-up residue inside the motor housing area after each use. Use a cloth dampened with clean water for the funnel and funnel cover. Use a dry cloth only for the motor housing to prevent damage.
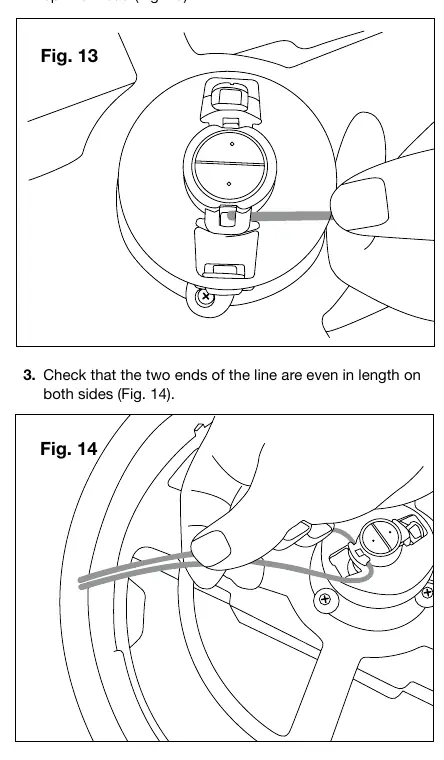
Replacing the Cutting Line: When shredding efficiency decreases, replace the cutting lines. Cut the old lines and pull them out. Feed new 0.1 in. x 12.6 in. (2.5 mm x 320 mm) lines through the holes in the spinner head, thread through the ferrules, and ensure ends are even.
Technical Data
- Rated Voltage: 120 V ~ 60 Hz
- Power: 13 amp
- No Load Speed: 8,000 rpm
- Particle Reduction Ratio: 16:1
- Max. Cutting Diameter: 12 in. (30.4 cm)
- Weight: 13.4 lbs (6.1 kg)
Practical help
Common problems
The unit may be overloaded. Turn off, unplug, clear unshredded material from the funnel, wait 1 minute, press the circuit breaker reset button, and restart.
Make a knot with the appliance cord and the extension cord as shown in the manual to secure the connection.
This appliance has a polarized plug. Ensure you are using a polarized, UL-listed extension cord. If it still does not fit, reverse the plug.
Before use
- Check that the extension cord is in good condition and rated for outdoor use.
- Ensure the unit is on a solid, level surface.
- Wear safety glasses and a dust mask.
- Verify that the funnel and legs are securely assembled.
- Ensure the cutting lines are intact and not worn.
Specs in practice
- 16:1 Particle Reduction Ratio
- The machine reduces the volume of leaves by a factor of 16, turning 16 bags of leaves into 1 bag.
- 12 in. Max Cutting Diameter
- The maximum width of material that can be processed at once.
Images and diagrams
- Table 1 shows how to tie a knot with the extension cord to prevent accidental disconnection.
- Fig 12 illustrates the control dial settings for different material types (Wet leaves, Dry leaves, Pine needles).
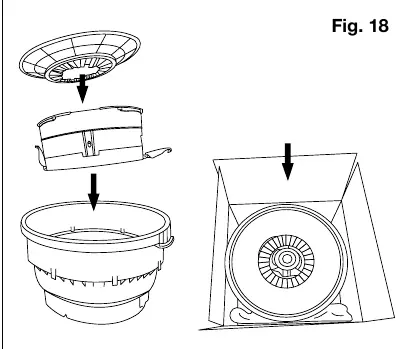
- Fig 18 demonstrates the correct stacking order for storage.
Model compatibility
- Use only replacement cutting lines designed for this model (Model SDJ616L).
- Do not use extension cords over 100 ft (30 m).
- Use only with a polarized, UL-listed extension cord.

Manual page author
Michael Turner
Technical manual editor
Reviews PDF manuals for structure, safety notes, and practical product details so readers can find the right information quickly.