D'Addario DIY Solderless Pedalboard Cable Kit User Guide
Quick guide for the D'Addario DIY Solderless Pedalboard Cable Kit. Learn how to cut, assemble, and secure custom-length cables for your pedalboard or rack gear without soldering.
Table of contents
Manual images
Click an image to enlargeQuick guide from the manual
This guide covers the assembly of the D'Addario DIY Solderless Pedalboard Cable Kit. The system allows for custom cable lengths without the need for soldering or manual wire stripping, providing a reliable connection for pedalboards and rack gear.
Assembly Instructions
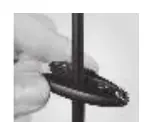
- Cut the cable: Use the included cable cutter to cleanly cut the cable to your desired length. Ensure there are no loose or overhanging strands of shielding.
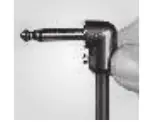
- Insert the cable: Use the included screwdriver to loosen the set screw on the plug. Push the cable into the open plug end using a twisting motion until it is fully seated.
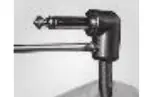
- Secure the connection: Completely tighten the set screw to secure the cable and provide strain relief.
Features and Benefits
- Solderless Design: Connects in seconds, allowing for easy custom lengths.
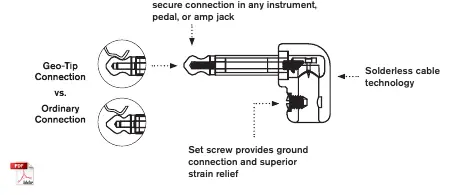
- Geo-Tip Technology: Patented design ensures an improved, secure connection in any instrument, pedal, or amp jack.
- Gold-Plated Tips: 24k gold-plated tips provide improved signal flow and corrosion resistance.
- Low Capacitance: Cable design transmits full harmonic detail with high transparency.
Practical help
Common problems
Ensure no loose strands of shielding are present after cutting the cable.
Use a twisting motion when inserting the cable into the plug barrel to ensure it reaches the bottom.
Before use
- Included cable cutter
- Included screwdriver

Manual page author
Emily Carter
User documentation editor
Prepares concise manual descriptions and highlights the most useful setup, operation, and maintenance information for readers.