Lighting / Decorative Lighting
User Manual for Solight 1D39A Smoke and Carbon Monoxide Detector
Quick guide for the Solight 1D39A combined smoke and carbon monoxide detector. Learn about installation, operation, testing, maintenance, and troubleshooting.
Quick answers from the manual
Quick answer
- The Solight 1D39A is a combined smoke and carbon monoxide detector. It requires 2x AA batteries, should be tested weekly, and has a 10-year service life. p. 1, 3, 4
Key actions
- Test the device weekly p. 3, 4
- Clean the device monthly p. 3, 5
- Replace batteries p. 4, 5
First start
- Insert batteries, wait for the 90s preheat (green LED flashes every 2s), then it enters normal operation (green LED flashes every 40s). p. 4
Problems and fixes
Device does not sound when tested
Check if switched off, in silent mode, or needs cleaning.
p. 5
Yellow indicator flashes once every 40s
Low battery, replace immediately.
p. 5Maintenance and reset
- Clean the alarm cover and vents with a soft brush once a month. p. 5
Technical specifications
| Parameter | Value | Meaning | Pages |
|---|---|---|---|
| Power | 2x 1.5V AA batteries | Battery type required. | p. 1 |
| Alarm volume | >=85 dB at 3m | Loudness of the alarm. | p. 1 |
Where to find it in the PDF
- Technical Parameters p. 1
- Installation Location p. 2
- Installation Steps p. 3
- Troubleshooting p. 5
Table of contents
Manual images
Click an image to enlargeImportant Information
The Solight 1D39A is a combined smoke and carbon monoxide detector designed for residential indoor use. It is not intended for recreational vehicles (RVs) or boats. The device has a service life of approximately 10 years. It is essential to test the device weekly and keep it clean to ensure proper operation. The device is not a substitute for a complete security alarm system or proper ventilation of fuel-burning appliances.
Description of Equipment
The device features a TEST/SILENCE button, a speaker for audible warnings, and a multi-color indicator (green, yellow, red) to show status. It is powered by 2x 1.5V AA batteries.
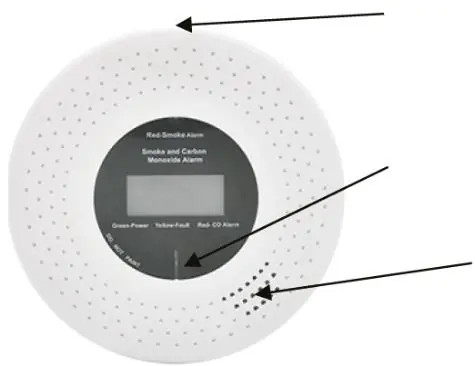
Indicator Meanings
- Green: Flashes every 40 seconds to indicate normal power status.
- Yellow: Indicates a fault or low battery warning.
- Red: Alarm for high smoke or high CO levels.
Installation
Strict adherence to placement is required for safety.
- Placement: Install on every floor, in every bedroom, and in hallways. If installing only one, place it near the bedrooms.
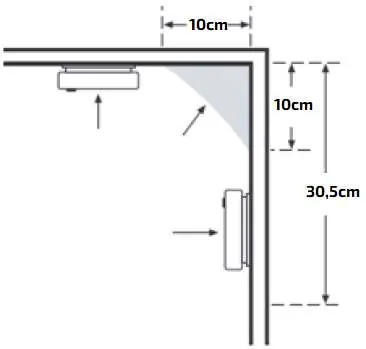
- Ceiling Mounting: Place at least 10 cm from side walls.
- Wall Mounting: Place on an internal wall, with the top edge 10 cm to 30.5 cm below the ceiling.
- Sloping/Pointed Ceilings: Install at the highest point or within 0.9 m of it.
- Proximity: Keep at least 3 m away from combustion devices (stoves, heaters).
Installation Steps:
- Insert 2x 1.5V AA batteries.
- Drill two 5 mm holes in the ceiling using the bracket as a template.
- Insert dowels and screw in the bracket (do not overtighten).
- Rotate the detector clockwise to attach it to the bracket.
- Test the device using the test button.
Operation
Upon battery insertion, the device performs a 90-second preheat (green LED flashes every 2 seconds). Once complete, it enters normal operation (green LED flashes every 40 seconds). If the device detects smoke or CO, it will sound an alarm (4 beeps, 1 second silence, 4 flashes). Press the TEST/SILENCE button to silence the alarm for approximately 10 minutes if the area is safe.
Maintenance
- Weekly: Test the device using the TEST/SILENCE button.
- Monthly: Remove the unit and clean the cover and vents with a soft brush to remove dust.
- Restrictions: Do not use detergents, solvents, or paint on the device. Do not spray aerosols (hairspray, air freshener) near the unit.
Troubleshooting
If the device does not sound during testing, ensure it is in "Normal Operation" mode and not in a silent or fault mode. If the yellow indicator flashes once every 40 seconds, replace the batteries. If it flashes twice every 40 seconds, clean the device; if the fault persists, replace the unit.
Practical help
Common problems
Device does not sound when TEST/SILENCE button is pressed
Ensure the device is in 'Normal Operation' mode, not in a silent or fault mode. Clean the device or replace if out of warranty.
Yellow indicator flashes once every 40 seconds
Low battery signal. Replace the batteries immediately.
Yellow indicator flashes twice every 40 seconds
Fault signal. Clean the device. If the fault persists, replace the unit.
Unwanted alarm signals during cooking or showering
Press the TEST/SILENCE button to pause the alarm and wait for the area to clear.
Before use
- Insert 2x 1.5V AA batteries.
- Test the device using the TEST/SILENCE button.
- Ensure installation is at least 3m away from combustion devices.
- Check that the alarm can be heard in all sleeping areas.
- Verify the device is not installed in a garage or near ventilation vents.
Specs in practice
- Alarm volume
- >=85 dB at 3m.
- Detection range
- Max 40m2 room.
Images and diagrams
- Installation diagram shows 10cm distance from walls and 30.5cm from ceiling for wall mounting.
- Ceiling mounting requires 10cm distance from side walls.
- Sloped ceiling installation requires placement within 0.9m of the highest point.
Model compatibility
- Not for use in recreational vehicles (RVs) or boats.
- Not designed to detect flammable gases like methane, natural gas, or propane.
- Not designed to warn people with hearing impairment.

Manual page author
David Miller
Documentation analyst
Organizes user manual content into clear summaries, with attention to model details, product context, and everyday usability.