Lighting / Decorative Lighting
User Manual for Solight 1V11-W and 1V11-WW Christmas Lights
Quick guide for Solight 1V11-W and 1V11-WW Christmas lights. Learn how to operate the timer, use the remote control, and safely install your lighting.
Quick answers from the manual
Quick answer
- The Solight 1V11-W/WW Christmas lights are controlled via a button on the power adapter or the included remote. The timer function (6h on, 18h off) is activated by holding the adapter button for 5 seconds. p. 1
Key actions
- Activate timer p. 1
- Clean the lights p. 1
First start
- Unpack and unwind p. 1
Maintenance and reset
- Cleaning p. 1
Technical specifications
| Parameter | Value | Meaning | Pages |
|---|---|---|---|
| Power supply | AC 230V/50Hz / 31V DC max. 6W | Input and output power requirements | p. 1 |
| Remote battery | 1x CR2025 3V | Battery type for remote | p. 1 |
Where to find it in the PDF
- English User Guide p. 1
Table of contents
Quick guide from the manual
The Solight 1V11-W and 1V11-WW Christmas lights are designed for both indoor and outdoor use. The system can be controlled via a button on the power adapter or the included remote control. The timer function allows for automatic operation (6 hours on, 18 hours off).
Safety instructions
- Unpack fully: Always unpack the lights from the box and unwind them completely before plugging them into a power outlet to prevent overheating.
- Placement: Do not place the lights near heat sources and do not cover them during use.
- Damage: Do not use the lights if the cable or any part of the device is damaged.
- Power: Use only the supplied power adapter. Never connect the lights directly to the mains or other products.
- Environment: The product is IP44 rated, making it suitable for outdoor use.
- Disposal: Dispose of the product at designated collection points; do not discard with household waste.
Operation and controls
You can control the lighting modes using the button on the power adapter or the remote control.
Timer function
To activate the timer (6 hours on, 18 hours off), hold down the button on the power adapter for approximately 5 seconds. The button will light up when the timer is active. To deactivate, repeat the same process.
Remote control functions
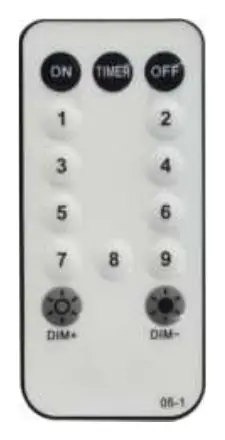
- ON: Turn the lights on.
- OFF: Turn the lights off.
- TIMER: Activates the 6h on / 18h off cycle.
- 1–8: Select between 8 different light modes.
- Dim+/Dim-: Increase or decrease the brightness of the lights.
Maintenance
Always disconnect the lights from the electricity mains before cleaning. Use a damp cloth to clean the lights and ensure they are completely dry before reconnecting them to power.
Practical help
Common problems
Lights do not turn on
Ensure the power adapter is securely connected to the mains and the lights are switched on via the remote or the adapter button.
Timer is not working
Hold the button on the power adapter for 5 seconds until it lights up to activate the timer mode.
Before use
- Unpack the lights completely from the box.
- Unwind the cable fully to prevent overheating.
- Check the cable and lights for any signs of damage.
- Ensure the power source is 230V/50Hz.
- Verify the environment is suitable for IP44 rated equipment.
Specs in practice
- Power supply
- AC 230V/50Hz / 31V DC max. 6W
- Remote battery
- 1x CR2025 3V
- Operating temperature
- -20°C to +50°C
- Protection class
- IP44 (suitable for outdoor use)
Images and diagrams
- The remote control includes buttons for ON/OFF, TIMER, light modes (1-8), and brightness adjustment (Dim+/Dim-).
- The power adapter features a single button used for both mode switching and timer activation.
Model compatibility
- Suitable for both indoor and outdoor use (IP44).
- Use only the supplied power adapter.

Manual page author
Michael Turner
Technical manual editor
Reviews PDF manuals for structure, safety notes, and practical product details so readers can find the right information quickly.