Lighting / Decorative Lighting
Solight 1L71 Wireless Doorbell with Electrical Socket
Quick guide for the Solight 1L71 wireless doorbell with electrical socket. Learn how to install the transmitter, pair devices, replace the battery, and adjust settings.
Quick answers from the manual
Quick answer
- The Solight 1L71 is a wireless doorbell with an integrated electrical socket. It operates on 433.92 MHz, supports up to 8 transmitters per receiver, and offers 58 melodies with adjustable volume. p. 1
Key actions
- Pairing transmitters p. 1
- Canceling pairing p. 1
First start
- Plug the receiver into a 230V AC socket and mount the transmitter using the provided adhesive tape or screws. p. 1
Problems and fixes
Receiver does not ring
Check distance and signal interference (metal objects, wireless networks).
p. 2Maintenance and reset
- Clean with a dry soft cloth; do not immerse in water. p. 1
Technical specifications
| Parameter | Value | Meaning | Pages |
|---|---|---|---|
| Volume | 4 modes, 20-80 dB | Adjustable sound level | p. 1 |
| Working frequency | 433.92 MHz | Radio transmission frequency | p. 1 |
Where to find it in the PDF
- Product overview and installation p. 1
- Troubleshooting and compliance p. 2
Table of contents
Quick guide from the manual
The Solight 1L71 is a wireless doorbell system consisting of a transmitter (button) and a receiver (doorbell with an integrated electrical socket). It is designed for permanent connection to a 230V AC power supply. The system uses radio waves at 433.92 MHz with a range of up to 250 meters in open space. It features a learning code function, allowing for the expansion of the system with multiple transmitters and receivers.
Installation
The transmitter can be mounted using the included double-sided adhesive tape or screws:
- Adhesive tape: Clean the surface, peel off one side of the tape, stick it to the underside of the button, then peel the other side and stick the button to the desired location.
- Screws: For a stronger fix, open the button cover, drill holes in the marked circular slots on the inside, and screw the base to the wall. Reassemble the button.
- Receiver: Simply connect the receiver to a standard electrical socket.
Battery Replacement
To replace the battery in the transmitter:
- Use a flathead screwdriver to push into the groove on the short side of the button.
- Open the cover.
- Insert a new CR2032 battery, ensuring correct polarity.
- Close the cover securely.
Code Learning
The device is paired at the factory. If you need to re-pair or add new devices:
- Pairing: Press and hold the 'Setting the light/sound signalization' button on the receiver until it emits a bird whistle sound. Within 30 seconds, press the button on the transmitter. If the bell rings, pairing is successful.
- Cancel pairing: Press and hold the 'Setting the light/sound signalization' button for about 10 seconds until the chime (ding dong) sounds twice.
A maximum of 8 buttons can be paired to one doorbell, and one button can be paired with up to 20 bells.
Settings
The receiver features buttons to adjust:
- Volume: 4 modes, 20-80 dB.
- Melody: 58 available melodies.
- Signalization: Choose between ringing + light, ringing only, light only, or continuous light + ringing.
Troubleshooting
If the receiver does not ring repeatedly after pressing the transmitter button, check the following:
- Ensure the distance between the transmitter and receiver is not too large.
- Check for strong sources of signal interference, such as large metal objects, reinforced concrete walls, or other wireless networks.
Safety and Maintenance
- Do not disassemble or repair the equipment yourself.
- Disconnect the receiver from the mains before cleaning.
- Use only a dry, soft cloth for cleaning. Do not use aggressive cleaning agents.
- Do not immerse the product in water.
- Protect the product from high temperatures and direct contact with fluxes.
Practical help
Common problems
Receiver does not ring
Check the distance between the transmitter and receiver. Ensure there are no strong signal interference sources like large metal objects or wireless networks between them.
Before use
- Ensure the receiver is plugged into a 230V AC socket.
- Verify the CR2032 battery is installed in the transmitter.
- Check that the transmitter and receiver are within range (up to 250m in open space).
- Confirm the pairing status if the device was reset or if adding new components.
Specs in practice
- Working frequency
- 433.92 MHz (radio transmission frequency)
- Transmitter Coverage
- IP55 (protected against dust and water jets)
- Continuous electric socket
- Max. AC 250V/16A, 3680W/230V~
Images and diagrams
- The transmitter is a small button unit powered by a CR2032 battery.
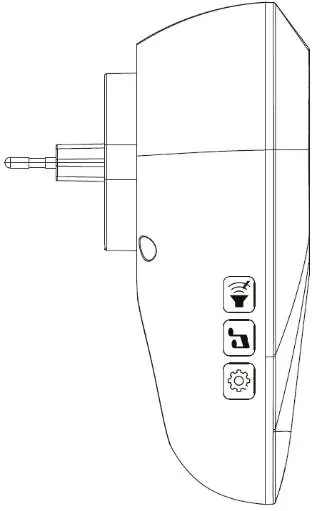
- The receiver is a plug-in unit with an integrated electrical socket and side buttons for volume, melody, and signalization settings.
Model compatibility
- Maximum of 8 buttons can be paired to one doorbell.
- One button can be paired with a maximum of 20 bells.

Manual page author
Emily Carter
User documentation editor
Prepares concise manual descriptions and highlights the most useful setup, operation, and maintenance information for readers.