TAP 19-INCH Rack Mount Outlet (Slim Type) Instruction Manual
Quick guide for the TAP 19-INCH Slim Type Rack Mount Outlet. Includes installation steps, wiring instructions, usage guidelines, and technical specifications for safe operation.
Table of contents
Quick guide from the manual
This document provides essential installation and operational instructions for the TAP 19-INCH Slim Type Rack Mount Outlet. It is intended for professional installation to ensure safety and prevent fire or electrical hazards. Always ensure the total load does not exceed 15A.
Installation and Wiring
Installation must be performed by qualified personnel. Ensure the mounting surface can support the weight and force applied during plug insertion and removal.
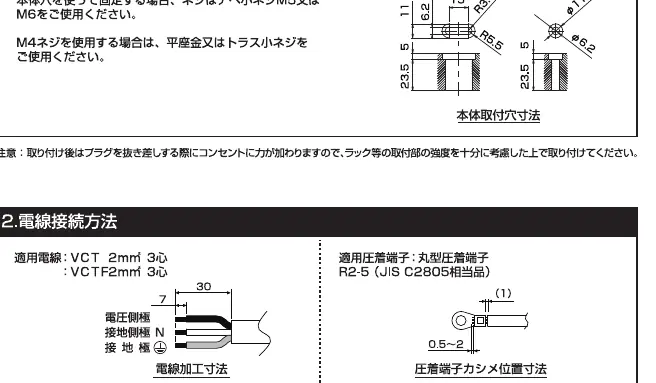
- Mounting: Use M5 or M6 pan-head screws for the main body. If using M4 screws, use flat-head or truss-head screws.
- Wiring: Use VCT 2mm² (3-core) cable. Use R2-5 crimp terminals.
- Connection Steps: Remove the terminal cover, loosen the cord clamp screws, connect wires to the correct terminals (Live, Neutral, Ground), tighten terminal screws to 1.8–2.0 N·m, and reattach the cord clamp and terminal cover.
Usage Instructions
To use the outlet, insert the plug into the socket and rotate it to the locked position. To remove, rotate the plug to the release position and pull it straight out. Do not insert plugs at an angle, as this can damage the internal structure and cause unstable connections.
Safety Precautions
- Do not exceed the 15A total load capacity.
- Do not disassemble or modify the unit.
- Avoid installation in areas with high humidity, high temperature, dust, or corrosive gases.
- Do not use if the power cord is bent, pinched, or damaged.
- Ensure the unit is properly grounded.
Technical Specifications
- Rating: 15A 125V.
- Cable: VCT 2mm² (3-core).
- Terminal Screw: M5 x P0.8.
- Operating Temperature: -5°C to 40°C (average 35°C over 24 hours).
- Operating Humidity: 85% or less (no condensation).
- Altitude: Up to 2,000m.
Practical help
Common problems
Ensure the plug is rotated to the correct 'release' position before pulling it straight out. Do not force it at an angle.
Check that the plug was not inserted at an angle, which can damage the internal locking mechanism.
Before use
- Verify total load does not exceed 15A.
- Ensure the mounting surface is strong enough for plug insertion/removal force.
- Check that the environment is free from corrosive gases, excessive dust, or high humidity.
- Confirm the use of VCT 2mm² (3-core) cable.
- Ensure the unit is properly grounded.
Specs in practice
- Terminal Torque 1.8–2.0 N·m
- Required tightness for terminal screws to ensure secure electrical contact.
- Operating Temperature -5°C to 40°C
- Safe ambient temperature range for the device.
Images and diagrams
- The manual provides a mounting hole dimension diagram for secure installation.
- Wiring diagrams show the correct stripping length (30mm) and crimp terminal positioning.
- Usage diagrams illustrate the 'lock' and 'release' rotation positions for plugs.
Model compatibility
- Designed for 19-inch rack mounting.
- Compatible with standard 2-pin and grounded 2-pin plugs.

Manual page author
Michael Turner
Technical manual editor
Reviews PDF manuals for structure, safety notes, and practical product details so readers can find the right information quickly.