Installation Guide for Terma MOP/MOS Mounting Bracket
Step-by-step installation guide for the Terma MOP/MOS mounting bracket system. Includes instructions for wall preparation, drilling, and radiator attachment.
Table of contents
Manual images
Click an image to enlargeQuick Installation Guide
This guide provides instructions for installing the Terma MOP/MOS mounting bracket system. Ensure you have all necessary components and tools before beginning the installation process.
Tools Required
- Drill with 10mm bit
- PZ1 and PZ3 screwdrivers
- 4mm hex key
- 14mm or 22mm wrench (for specific versions)
Installation Procedure

Wall Preparation (Steps 1-3)
- Measure the required distances (D, E) on the wall based on your radiator model.
- Drill holes with a 10mm diameter and 60mm depth.
- Insert the wall plugs into the drilled holes.
- Secure the bracket bases to the wall using the provided screws.
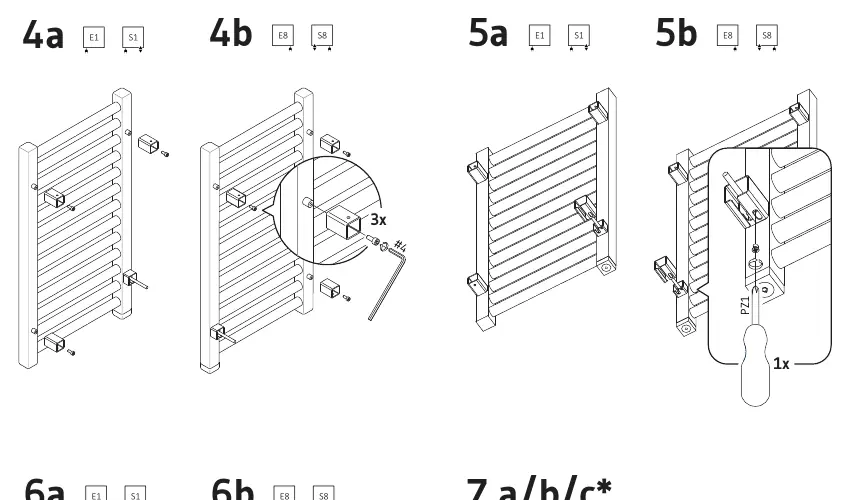
Radiator Mounting (Steps 4-7)
- Position the radiator onto the installed wall brackets.
- Use the provided screws and hex key to secure the radiator to the brackets.
- Adjust the radiator position as necessary to ensure it is level.
- Tighten all mounting screws firmly to ensure stability.
Dual Fuel Version
Steps marked with an asterisk (*) in the diagrams apply specifically to the dual fuel version of the radiator. Ensure you follow these specific instructions if your unit is a dual fuel model.
Practical help
Common problems
Adjust the bracket position using the mounting screws before final tightening.
Ensure the hole is drilled to a diameter of 10mm and a depth of 60mm.
Before use
- Verify all 3 mounting brackets are included in the package
- Ensure you have a 10mm drill bit
- Check wall type for appropriate drilling method
- Have PZ1 and PZ3 screwdrivers ready
- Identify if your radiator is a dual fuel version

Manual page author
Michael Turner
Technical manual editor
Reviews PDF manuals for structure, safety notes, and practical product details so readers can find the right information quickly.