Installation Guide for The Home Depot 2.7m Birdcage Garden Arbor Iron Arch
Step-by-step installation guide for the 2.7m Birdcage Garden Arbor Iron Arch. Learn how to assemble the frame, attach the dome, and secure the structure for your garden.
Quick answers from the manual
Quick answer
- This guide provides visual instructions for assembling the 2.7m Birdcage Garden Arbor Iron Arch, covering the process from base assembly to final structural tightening. p. 1
Key actions
- Follow the 9-step visual assembly sequence provided in the manual. p. 1
First start
- Lay out all parts and use the included tools to assemble the base, dome, and side panels in the specified 9-step sequence. p. 1
Problems and fixes
Ensure all screws are tightened securely during the final step.
p. 1Technical specifications
| Parameter | Value | Meaning | Pages |
|---|---|---|---|
| Height | 2.7m | Total height of the arbor | p. 1 |
Where to find it in the PDF
- Installation Guide p. 1
Quick guide from the manual
This document provides a visual assembly guide for the 2.7m Birdcage Garden Arbor Iron Arch. Ensure you have all parts and the included tools before beginning the installation. The assembly process consists of 9 steps, moving from base preparation to final structural tightening.
Assembly Instructions
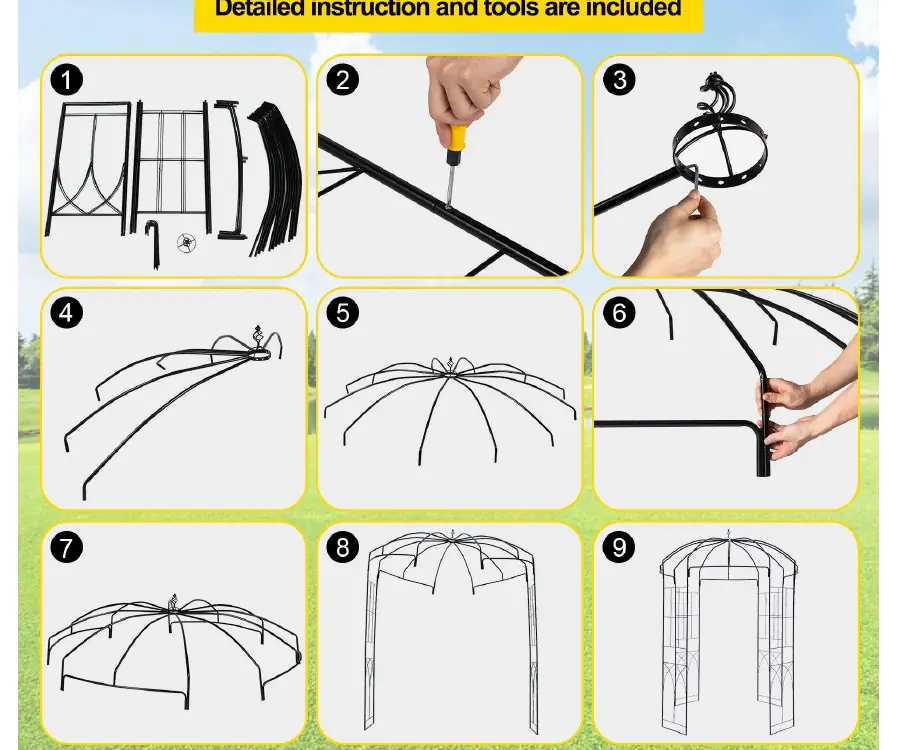
- Parts Layout: Lay out all parts to ensure everything is present before starting.
- Base Assembly: Use the provided screwdriver to connect the base frame components.
- Top Finial: Attach the top finial/ring to the central hub.
- Rib Attachment: Connect the curved ribs to the central hub.
- Dome Assembly: Assemble the dome structure by securing the ribs.
- Side Panels: Attach the side panels and legs to the dome structure.
- Structure Completion: Complete the dome/arch structure assembly.
- Positioning: Stand the structure upright on the desired location.
- Final Tightening: Perform final tightening of all connections to ensure stability.
Manufacturer information
The Home Depot
Practical help
Common problems
Ensure all screws are tightened securely during the final step of assembly.
Do not fully tighten screws until the entire section is assembled to allow for minor adjustments.
Before use
- Verify all parts are present according to the parts list
- Ensure you have a flat, level surface for installation
- Have the included tools ready
- Clear the installation area of debris

Manual page author
Emily Carter
User documentation editor
Prepares concise manual descriptions and highlights the most useful setup, operation, and maintenance information for readers.