User Guide for BLACK+DECKER 12-CUP Thermal Programmable Coffee Maker CM2035B
Quick start guide for the BLACK+DECKER 12-CUP Thermal Programmable Coffee Maker (CM2035B). Includes setup, programming, brewing tips, cleaning, and troubleshooting.
Table of contents
Manual images
Jump to the sectionQuick guide from the manual
This document provides essential instructions for the operation and maintenance of the BLACK+DECKER 12-CUP Thermal Programmable Coffee Maker (CM2035B). Before first use, it is required to clean the unit by running two full brewing cycles with water only. Always ensure the carafe is placed correctly on the carafe plate and the lid is properly locked to prevent overflow.
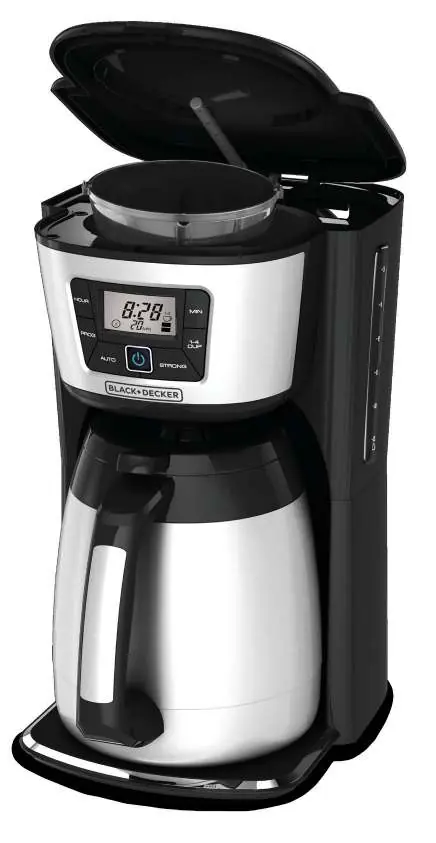
Getting to know your Coffee Maker
The unit features a lid, Evenstream showerhead, water reservoir, washable brew basket, easy-view water window, control panel, and a 12-cup stainless steel thermal carafe.
Programming your Coffee Maker
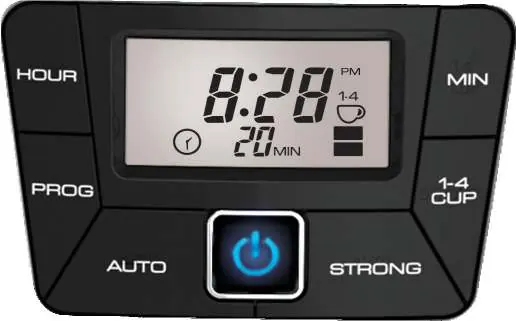
Setting the Digital Clock: Plug in the unit, press the HR button to set the hour (note the PM indicator), and the MIN button to set the minutes.
Setting the Auto Brew Delay Start: After setting the clock, press the PROG button. Use the HR and MIN buttons to select the desired start time. Press the AUTO button to activate; the timer icon will remain solid when enabled.
Brewing Coffee
- Fill the water reservoir with cold tap water (do not exceed the 12-cup MAX line).
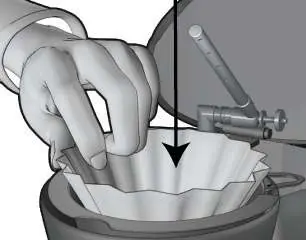
- Place a basket-shaped paper filter in the brew basket and add ground coffee (suggested: 1 tablespoon per cup).
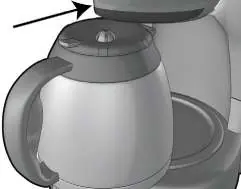
- Secure the carafe lid by aligning the arrow with the unlocked symbol and turning clockwise to the locked position.
- Place the carafe on the plate and press the ON/OFF button to start.
The Sneak-A-Cup feature allows you to pause brewing for up to 20 seconds to pour a cup. The 1-4 Cup setting optimizes the cycle for smaller batches, and the Brew Strength Selector allows you to choose between regular, strong, or bold settings.
Care and Cleaning
Clean the brew basket and carafe after every use in warm, soapy water or the top rack of the dishwasher. Wipe the housing and carafe plate with a damp cloth. Descale the unit once a month by running a mixture of white vinegar and water through a full cycle, followed by a cycle with fresh water to rinse.
Safety
Always unplug the appliance when not in use. Do not immerse the cord, plug, or unit in water. Keep the lid on the carafe during use to prevent scalding. This appliance is for household use only.
Practical help
Common problems
Ensure the appliance is plugged into a working electrical outlet.
Check that the water reservoir is not overfilled, the cover is correctly placed on the carafe, and the carafe is properly positioned on the plate.
Ensure the carafe is replaced within 20 seconds when using the Sneak-A-Cup feature and do not use excessive amounts of coffee.
Verify that the paper filter and brew basket are correctly placed.
The unit likely needs descaling; follow the instructions in the 'Descaling with Vinegar' section.
Before use
- Register the product at www.prodprotect.com/applica
- Remove all packaging materials and labels
- Remove the plastic band around the power plug
- Wash the thermal carafe and brew basket in warm, soapy water
- Run two full brewing cycles with water only to clean the internal system
Specs in practice
- 1-4 Cup Setting
- Optimizes the brewing cycle for smaller batches without sacrificing flavor.
- Brew Strength Selector
- Adjusts flavor intensity: No bars (regular), 1 bar (strong), 2 bars (bold).
- Fresh Brew Timer
- Displays the time elapsed since the brew cycle finished (up to 120 minutes).
Images and diagrams
- The control panel includes buttons for HOUR, MIN, PROG, AUTO, 1-4 CUP, and STRONG settings.
- The carafe lid must be locked by aligning the arrow with the locked symbol before brewing.
- The water window provides a clear guide for filling the reservoir up to the 12-cup MAX line.
Model compatibility
- Use only basket-shaped paper filters.
- The thermal carafe is double-walled and vacuum-sealed.
- The unit is designed for 120V electrical outlets.

Manual page author
David Miller
Documentation analyst
Organizes user manual content into clear summaries, with attention to model details, product context, and everyday usability.