Assembly Instructions for Tribesigns 2-Drawer Nightstand
A comprehensive assembly guide for the Tribesigns 2-Drawer Nightstand. Includes a complete parts list, hardware identification, and step-by-step installation instructions to ensure correct setup.
Quick answers from the manual
Quick answer
- This document provides step-by-step assembly instructions for the Tribesigns 2-Drawer Nightstand, including a parts list and hardware guide. p. 1, 2
Key actions
- Assemble the frame first p. 1
- Assemble the drawers p. 2
Problems and fixes
Loosen screws, adjust, and re-tighten only after full assembly.
p. 1Where to find it in the PDF
- Parts and Initial Assembly p. 1
- Main Body and Drawer Assembly p. 2
Table of contents
Manual images
Click an image to enlargeImportant Assembly Tips
Before beginning assembly, please note the following crucial advice to ensure a smooth process:
- Do not tighten screws completely at first. This allows for adjustments if parts are misaligned or assembled incorrectly.
- Tighten all screws fully only after all parts are put together.
Parts and Hardware
Ensure all components are present before starting. The kit includes numbered panels (1-13) and various hardware pieces (W-1 to W-8).
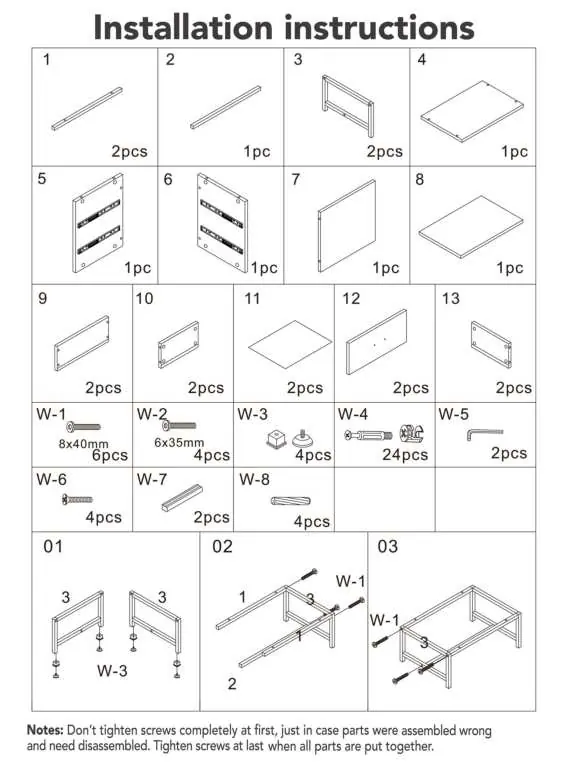
Assembly Steps
Frame Assembly (Steps 01-03)
Begin by assembling the base frame using parts 1, 2, 3, and hardware W-1 and W-3.
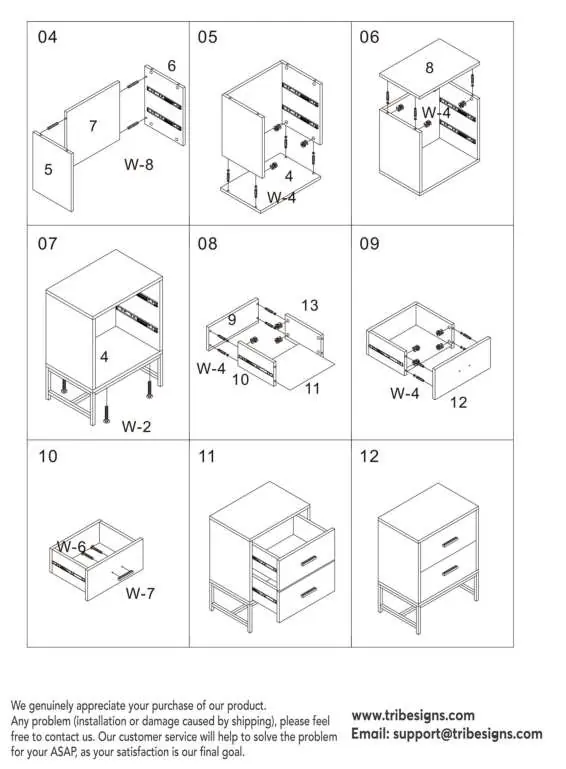
Main Body Assembly (Steps 04-07)
Attach the side panels (5, 6, 7) and the top/bottom panels (4, 8) using hardware W-4 and W-8. Secure the structure.
Drawer Assembly (Steps 08-10)
Assemble the drawer boxes using panels 9, 10, 11, 12, 13 and hardware W-4, W-6, and W-7.
Final Assembly (Steps 11-12)
Insert the assembled drawers into the main body frame to complete the nightstand.
Customer Support
If you encounter any issues during installation or due to shipping, please contact customer service at [email protected] or visit www.tribesigns.com.
Official resources from the manual
Practical help
Common problems
Ensure screws are not fully tightened until the entire unit is assembled to allow for adjustments.
Contact customer support at [email protected] for assistance.
Before use
- Verify all parts are present according to the parts list (1-13)
- Ensure you have a clear workspace
- Do not fully tighten screws during initial assembly
- Identify all hardware (W-1 to W-8)

Manual page author
David Miller
Documentation analyst
Organizes user manual content into clear summaries, with attention to model details, product context, and everyday usability.