Installation Instructions for TRIO Phoenix LED Ceiling Light 6740945XX
Quick installation guide for the TRIO Phoenix LED Ceiling Light 6740945XX. Includes wiring diagrams, safety warnings, and technical specifications.
Quick answers from the manual
Quick answer
- This manual provides installation and safety instructions for the TRIO Phoenix LED Ceiling Light (6740945XX). It includes a wiring diagram and technical specifications. p. 1, 2
Key actions
- Install the mounting bracket to the ceiling. p. 2
- Connect the electrical wires to the terminal block. p. 2
Technical specifications
| Parameter | Value | Meaning | Pages |
|---|---|---|---|
| Voltage | 230V~50Hz | Operating voltage | p. 2 |
| Power | 26W | Power consumption | p. 2 |
Where to find it in the PDF
- Safety Warnings p. 1
- Installation Diagram p. 2
- Energy Efficiency p. 3
Table of contents
Quick Guide from the Manual
This document provides essential safety warnings and installation instructions for the TRIO Phoenix LED Ceiling Light (model 6740945XX). Before beginning any installation work, ensure the power supply is disconnected at the circuit breaker.
Installation Steps
Follow these steps to install your ceiling light:
- Preparation: Drill the necessary holes in the ceiling and insert the provided wall plugs.
- Mounting: Secure the mounting bracket to the ceiling using the provided screws.
- Wiring: Connect the electrical wires from the ceiling to the terminal block on the fixture. Ensure the Live (L), Neutral (N), and Ground wires are connected correctly according to the diagram.
- Final Assembly: Secure the light fixture to the mounting bracket.
Technical Specifications
- Voltage: 230V~50Hz
- Power: 1xLED 26W
- Protection Class: IP20 (Indoor use only)
- Energy Efficiency: Class F
Safety Information
Read all safety instructions carefully before starting the assembly. This product contains a light source of energy efficiency class F. Ensure the fixture is installed by a qualified person if you are unsure about the electrical connections.
Practical help
Before use
- Ensure the power is turned off at the main circuit breaker before starting.
- Verify that the ceiling structure can support the weight of the light fixture.
- Check that you have all necessary tools (drill, screwdriver) for installation.
- Confirm the wiring (Live, Neutral, Ground) is available at the installation point.
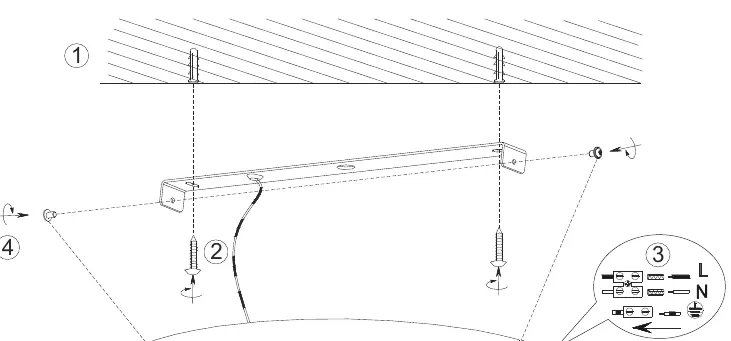
Images and diagrams
- Step 1: Drill holes and insert anchors into the ceiling.
- Step 2: Screw the mounting bracket into the ceiling.
- Step 3: Connect the power supply wires to the terminal block (L, N, Ground).
- Step 4: Attach the fixture to the bracket.

Manual page author
Michael Turner
Technical manual editor
Reviews PDF manuals for structure, safety notes, and practical product details so readers can find the right information quickly.