Installation Guide for Ubiquiti AC Adapter 210W
Quick installation guide for the Ubiquiti AC Adapter 210W. Learn how to mount the adapter and connect it to your device.
Quick answers from the manual
Quick answer
- The Ubiquiti AC Adapter 210W is installed by mounting a bracket to the wall using 6mm anchors and screws, then sliding the adapter onto the bracket and connecting the power cable to the device. p. 2, 3, 4
Key actions
- Mounting the bracket p. 2, 3
- Connecting the adapter p. 4
Technical specifications
| Parameter | Value | Meaning | Pages |
|---|---|---|---|
| Power | 210W | Maximum power output | p. 1 |
Show 1 more answers Show less
Where to find it in the PDF
- Parts List p. 2
- Installation Steps p. 3
- Connection p. 4
Table of contents
Manual images
Click an image to enlargeQuick guide from the manual
This document provides instructions for mounting and connecting the Ubiquiti AC Adapter 210W. Ensure you have the necessary tools, including a drill with a 6mm (1/4") bit, a hammer, and a screwdriver, before beginning the installation.
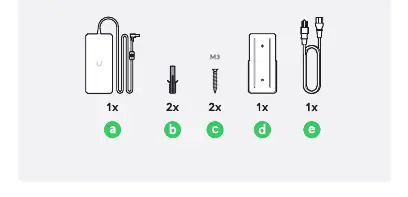
Installation
Follow these steps to mount the adapter:
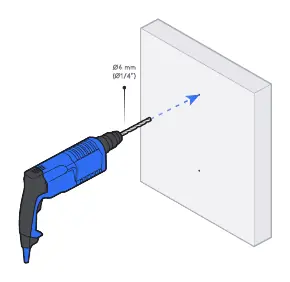
- Use the mounting bracket (d) to mark the hole locations on the wall.
- Drill the holes using a 6mm (1/4") drill bit.
- Insert the wall anchors (b) into the holes using a hammer.
- Secure the mounting bracket (d) to the wall using the screws (c).
- Slide the AC adapter (a) onto the mounted bracket until it is securely in place.
Connection
Once the adapter is mounted:
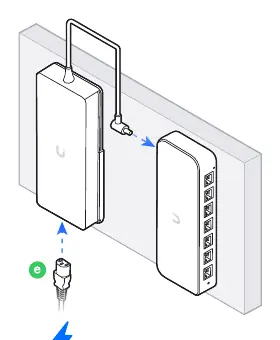
- Connect the power cable (e) to the AC adapter.
- Connect the other end of the cable to your compatible device (e.g., Ultra/Ultra 60W).
Practical help
Common problems
Adapter does not fit on the bracket
Ensure the mounting bracket is screwed flush against the wall and that the adapter is aligned correctly before sliding it down.
Before use
- Drill with 6mm (1/4") bit
- Verify wall surface is suitable for mounting

Manual page author
Michael Turner
Technical manual editor