UNBRANDED 16GS-29257 Ultra Slim Integrated LED Recessed Light Kit
Comprehensive installation and safety guide for the 16GS-29257 Ultra Slim Integrated LED Recessed Light, covering hole cutting, wiring, and mounting procedures.
Table of contents
Product Overview
The 16GS-29257 is an ultra-slim, integrated LED recessed light kit designed for remodel applications. This fixture provides efficient lighting and is designed for easy installation into various ceiling types. Before beginning, ensure that the supply voltage matches the rated product voltage of 120V 60Hz.
Safety Information
Installation must be performed by a qualified electrician in accordance with the National Electrical Code and local building regulations. Failure to follow these instructions may result in serious injury, electrical shock, or fire hazards. Always wear appropriate safety equipment during handling and installation. Do not attempt to install the product if it appears damaged. Ensure that the branch circuit conductor is rated for at least 90°C (194°F) to remain code compliant.
Installation Preparation
Before installing the fixture, you must prepare the ceiling by cutting a hole of the appropriate size. The required hole dimensions depend on the specific model size:
- 4-inch round hole: 108mm (4 1/4 inches)
- 6-inch round hole: 157mm (6 3/16 inches)
- 8-inch round hole: 187mm (7 3/8 inches)
- 4-inch square hole: 108mm x 108mm (4 1/4 inches)
- 6-inch square hole: 157mm x 157mm (6 3/16 inches)
- 8-inch square hole: 187mm x 187mm (7 3/8 inches)
Installation Steps
Follow these steps to ensure a safe and secure installation:
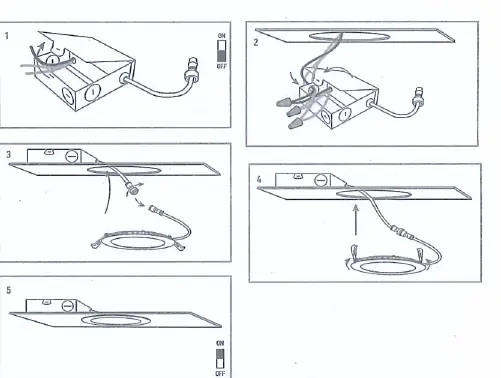
- Disconnect Power: Ensure the fixture is completely disconnected from the J-Box before starting.
- Wiring: Open the J-Box and connect the wires securely using wire nuts. Ensure all connections are tight and properly insulated. Close the J-Box once wiring is complete.
- J-Box Placement: Insert the J-Box into the prepared hole, ensuring the connection cable remains outside.
- Fixture Connection: Connect the fixture to the J-Box by inserting the cable and securing it with the provided cap.
- Mounting: Push the spring-loaded clips upwards and insert the fixture base into the mounting hole. Release the clips to allow the fixture to be pulled securely into place against the ceiling.
- Final Check: Once assembly is complete, restore power to the circuit to verify that the fixture is operating correctly.

Manual page author
Michael Turner
Technical manual editor
Reviews PDF manuals for structure, safety notes, and practical product details so readers can find the right information quickly.