User Manual for Wharfedale Diamond 12i Series Loudspeakers
Comprehensive user manual for the Wharfedale Diamond 12i Series. Includes setup, positioning, wiring, spike installation, home theatre configuration, and troubleshooting.
Table of contents
Manual images
Click an image to enlargeQuick guide from the manual
The Wharfedale Diamond 12i Series includes various models ranging from bookshelf speakers to floorstanders and centre channels. Before installation, ensure all system components are switched off. For floorstanding models (D12.3i, D12.4i), install the provided spikes for stability. Ensure proper wiring by stripping 10mm of insulation from speaker cables and securing them in the screw terminals. Position speakers according to the guidelines for optimal sound, and configure your A/V processor settings (size, delay, LFE) to match your specific setup.
Important Safety Information
- Do not use your amplifier at full volume.
- Ensure all loudspeakers are correctly wired.
- Do not subject loudspeakers to excessive cold, heat, humidity, or sunlight.
- Do not place heavy objects on top of loudspeakers.
- Do not connect speaker terminals to the mains supply.
- Do not dismantle the loudspeaker; there are no user-serviceable parts inside.
Unpacking and Installation
Diamond 12i loudspeakers come in different shapes and sizes. If you are unpacking a floorstanding model, please note these units are heavy and may require assistance. Lift the loudspeaker carefully out of the packing; do not lift using the protective bag.
Attaching the Spikes (D12.3i, D12.4i)
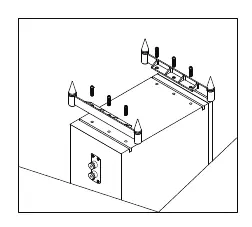
- Ensure you have plenty of unobstructed working space.
- Place a soft cloth on the floor to protect the loudspeaker.
- Invert the loudspeaker onto the cloth.
- Thread a locknut onto each spike and loosely rub it up the thread.
- Thread the spikes into the spike inserts and tighten finger-tight.
- Invert the loudspeaker carefully.
- Once upright, adjust the spikes until the speaker is level and does not wobble, then tighten the locknuts securely.
Cables and Connections
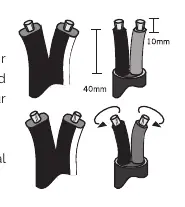
Specialist audio cable is recommended. When preparing the cable, split the twin cores to a depth of about 40mm and strip 10mm of insulation from each end. If the cable is stranded, lightly twist the strands.
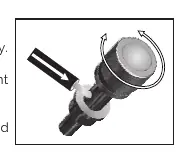
Connecting Screw Terminals: Unscrew the terminal, insert the bare end of the cable into the hole in the base of the terminal, and tighten securely. Ensure no loose strands of bare wire can short across to adjacent terminals.
Positioning Your Loudspeakers
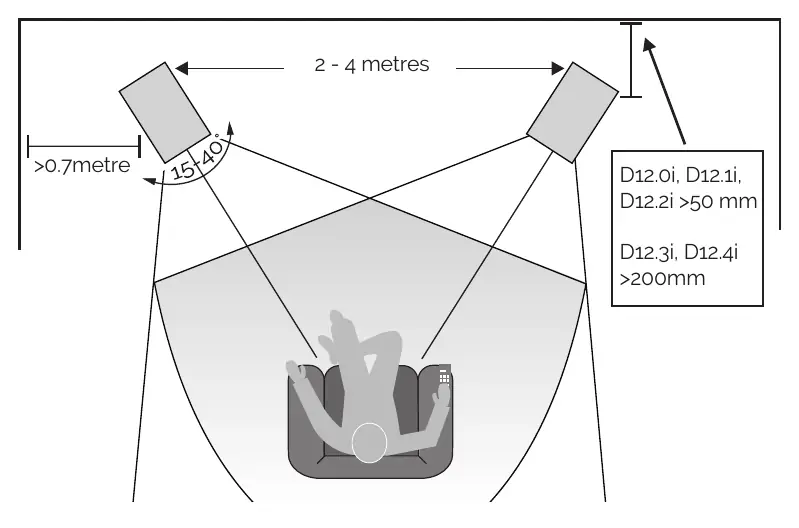
Front Loudspeakers
D12.3i and D12.4i should be positioned at least 200mm from rear walls and 700mm from side walls, facing slightly inwards. D12.0i, D12.1i, and D12.2i are designed for stand or wall mounting. Ideally, treble units should be at ear level to a seated listener.
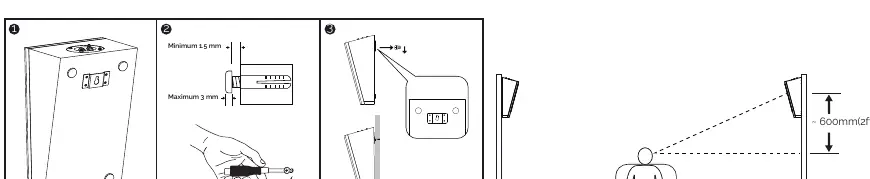
Centre Loudspeaker
Position centrally between the front loudspeakers, close to the television, mounted above or below the screen. Use the provided mounting feet to angle the speaker towards the listening position if necessary.
3Di Surround Speakers
Designed for elevation/height channels. They can be placed on top of flat-top loudspeakers or wall-mounted using the included bracket.
Home Theatre Setup
For 6.1 and 7.1 systems, ensure the listening seat is not too close to the rear wall. Optimise time delay settings on your A/V processor so sound from all speakers arrives at the listening seat coherently. If using a subwoofer, set the front speakers to 'Small' or 'Large' based on your preference and processor capabilities.
Settings and Adjustments
- LFE: If you hear popping or thumping, lower the LFE level on your A/V processor.
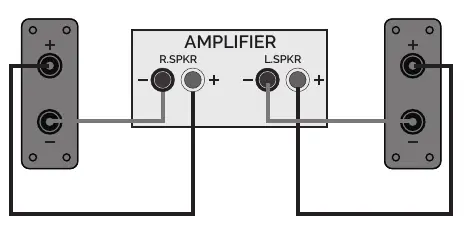
- Phase: Ensure speakers are connected in phase (red to red, black to black).
- Subwoofer: Volume control should typically be between 12 o'clock and 3 o'clock.
Troubleshooting
- No Sound: Check if the system is switched on, check for shorted speaker cables, and verify the correct source is selected.
- Sound lacks bass: Ensure the subwoofer is switched on.
- Excessive bass distortion: Lower the subwoofer level, check LFE level, or ensure the subwoofer is not too close to room corners.
- Distorted/rattling sound: Lower system volume or check for objects near the subwoofer.
Maintenance
- Clean with a dry or barely moist cloth. Do not use wax or spray polishes.
- Remove grilles occasionally and brush gently with a soft brush. Do not use a vacuum cleaner.
- Never touch the drive units.
Practical help
Common problems
Check if the system is switched on, ensure speaker cables are not shorting terminals, and verify the correct source is selected.
Ensure the subwoofer is switched on.
Lower the subwoofer level, reduce LFE level, or check if the subwoofer is incorrectly wired.
Lower the system volume, reduce subwoofer/LFE levels, or move objects away from the subwoofer.
Before use
- Switch off all units before making connections.
- Ensure you have assistance for heavy floorstanding models.
- Prepare speaker cables by stripping 10mm of insulation.
- Ensure you have unobstructed working space for spike installation.
- Check that the amplifier volume is at minimum before switching on.
Specs in practice
- Nominal Impedance
- The standard electrical resistance (8Ω Compatible).
- Frequency Response
- The range of frequencies the speaker can reproduce.
- Crossover Frequency
- The frequency at which the signal is split between drivers.
Images and diagrams
- Spike installation for floorstanding models (D12.3i, D12.4i).
- Cable preparation showing 40mm split and 10mm stripping.
- Connecting screw terminals with bare wire.
- Positioning diagram for front and centre speakers.
- Wall mounting option for 3Di speakers.
Model compatibility
- D12.3i and D12.4i are floorstanding models.
- D12.0i, D12.1i, and D12.2i are bookshelf/stand-mount models.
- 3Di Surround is designed for elevation/height channels.

Manual page author
David Miller
Documentation analyst
Organizes user manual content into clear summaries, with attention to model details, product context, and everyday usability.