xmartO 10X Light Bulb Security Camera System User Guide
Quick setup guide for the xmartO 10X Light Bulb Security Camera System, covering NVR installation, camera pairing, mobile app configuration, and system troubleshooting.
Table of contents
Manual images
Jump to the sectionProduct Overview
The xmartO 10X Light Bulb Security System is a wireless surveillance solution designed for home and business use. The system consists of an NVR (Network Video Recorder) and multiple light bulb-style cameras that connect wirelessly to the NVR. The NVR acts as the central hub for video processing and storage.
System Setup
Before permanent installation, it is essential to test all components locally. Connect the NVR to a monitor or TV using the provided HDMI cable and plug in the USB mouse to navigate the interface. Connect the NVR to your router via Ethernet if remote internet access is required. Power on the NVR and follow the on-screen Startup Wizard to configure network settings and create an admin password.
Camera Installation
Once the NVR is configured, install the light bulb cameras into standard E27 sockets or use the included plug-in adapters. Ensure the cameras are within the signal range of the NVR. For optimal performance, mount cameras 2-3 meters above the ground and angle them for better motion detection. Dome cameras should be installed upside down to maintain waterproof integrity.
Remote Access
To view your system remotely, download the WallPixel mobile app. Create an account, then add your NVR by scanning the local network or using the QR code found on the NVR unit. Note that the NVR admin password is required to add the device to the app, which is distinct from your WallPixel account password.
Maintenance and Troubleshooting
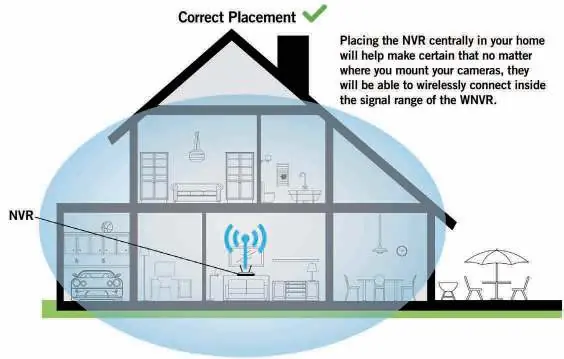
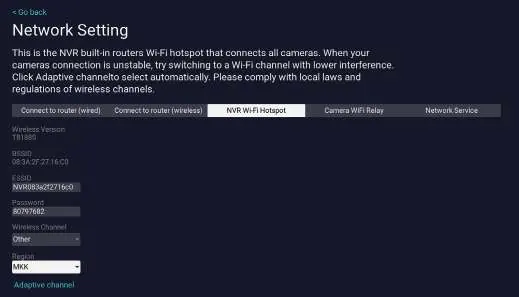
If camera streams are unstable, ensure the NVR is placed centrally to maximize signal coverage and avoid sources of electrical interference. You can use the 'Adaptive Channel' feature in the NVR network settings to select the best Wi-Fi channel. If you need to add additional cameras, they must be paired locally to the NVR. For further support, visit www.xmarto.com or contact [email protected].
Official resources from the manual
Practical help
Common problems
This indicates a weak Wi-Fi signal. Mount the camera closer to the NVR or use an Ethernet cable for a wired connection.
Ensure you are entering the NVR's admin password, not your WallPixel account password. The admin password is case-sensitive.
Check for obstacles between the camera and NVR. Use the 'Adaptive Channel' setting in the NVR menu to reduce Wi-Fi interference.
Before use
- Connect NVR to a monitor/TV via HDMI for initial setup.
- Connect the included USB mouse to the NVR.
- Ensure the NVR is powered using the provided 12V 2A power adapter.
- Test all cameras locally before mounting them permanently.
- Create a secure admin password during the Startup Wizard.
Specs in practice
- Mounting Height
- 2-3 meters (7-10 ft) is recommended for optimal motion sensor detection range.
- Wireless Range
- Up to 1300 ft in open space, or 300 ft through walls.
- NVR Power Input
- Requires the specific 12V 2A power adapter included in the box.
Images and diagrams
- The NVR features a DC12V power input, USB port for mouse/storage, HDMI output for display, WAN port for internet, and a Micro SD card slot for local storage.
- Cameras feature an E27 base, microphone, speaker, and infrared/spotlight LEDs.
Model compatibility
- NVR requires a monitor/TV for initial setup only.
- Third-party accessories may not work properly; use included components.
- System supports remote viewing via WallPixel App on smartphones/tablets and CMS software on PC/Mac.

Manual page author
David Miller
Documentation analyst
Organizes user manual content into clear summaries, with attention to model details, product context, and everyday usability.