ZWO ASI120MM-S Camera Quick Guide
A quick setup and troubleshooting guide for the ZWO ASI120MM-S astronomy camera. Learn how to install drivers, connect the camera to a telescope, and resolve common issues like FPS drops, connection errors, and exposure problems.
Table of contents
Manual images
Click an image to enlargeQuick guide from the manual
This guide provides a brief summary of the installation procedure for ZWO ASI cameras to help you get started. It covers driver installation, telescope connection, and troubleshooting common technical issues. For more complete instructions, please refer to the full user manual available on the ZWO website.
Driver and software installation
To set up your camera on a Windows computer, follow these steps:

- Download and install the ASI Cameras driver from the official ZWO website.
- Plug in the camera. Open the Device Manager on your computer and verify that the camera is listed under the Imaging devices category.
- Download and install the ASICAP image or video capture software.
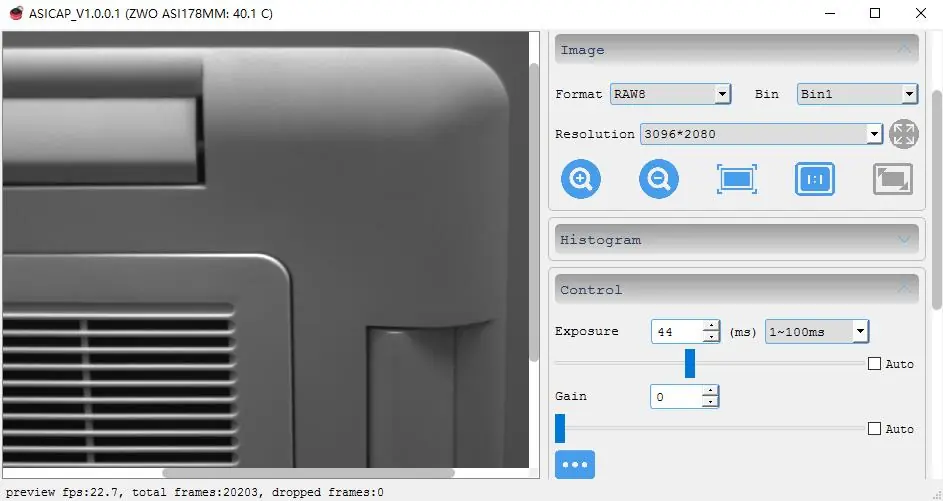
- Launch ASICAP, select your camera model, and click the Connect icon to view the preview video. Note that without a lens or telescope, you will only see brightness in the preview.
Connecting the camera to the telescope
Many ZWO cameras include an all-sky lens. Follow these steps to attach the camera to a telescope:
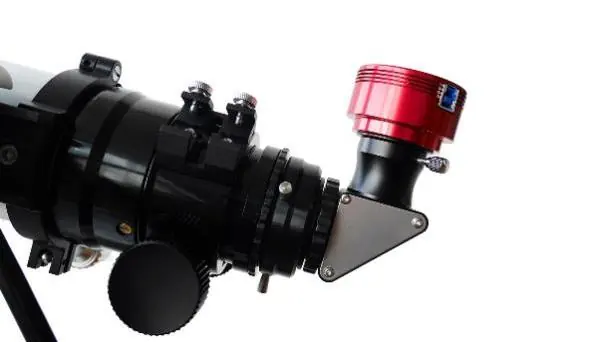
- Remove the lens and the CS adapter from the camera.
- Screw the 1.25-inch nose-piece onto the camera.
- Focus your telescope using a standard eyepiece.
- Replace the eyepiece with the camera.
- Plug in the USB 2.0/3.0 cable to connect the camera to your PC.
- Adjust the telescope focus until the preview image on your PC is sharp.
Troubleshooting
If you encounter issues, try the following solutions:

- Preview image is white: The camera is overexposed. Reduce the exposure and/or gain settings in the software.
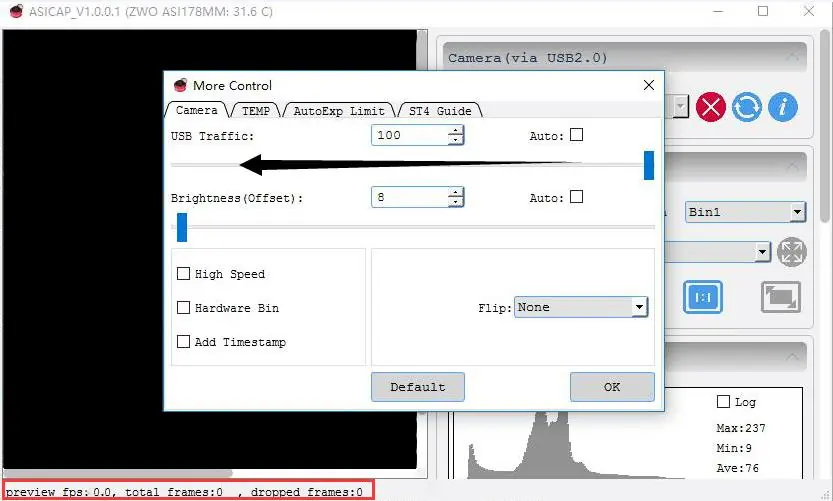
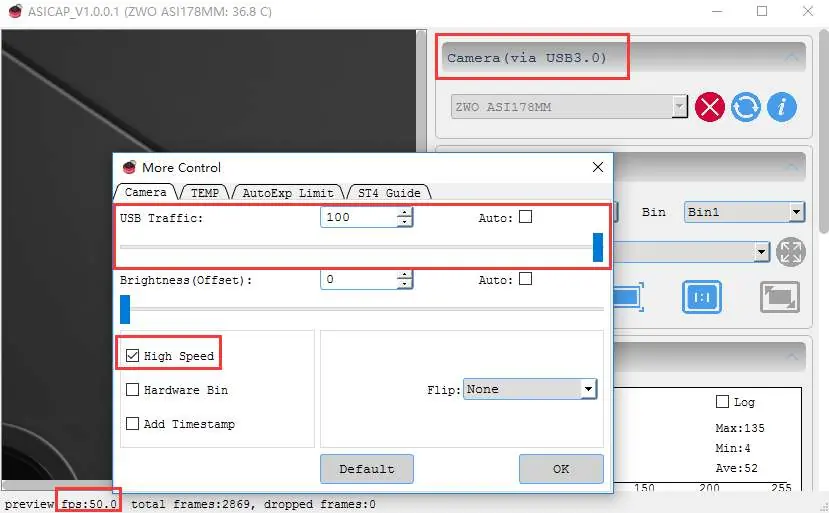
- Preview screen is black and FPS is 0: Reduce the USB Traffic setting in the software. Try connecting the camera directly to the PC without using a USB hub or extender.
- FPS drops during recording: This is often due to slow hard drive speeds. Use an SSD and record in RAW format instead of RGB24.
- Camera won't run on a laptop: Disable the power-saving mode for the USB port in your laptop's power settings.
- Error Code 10: Try a different USB port or computer. If the issue persists, update the camera firmware using the firmware tool available on the ZWO website.
- Unknown device in Device Manager: The driver may not be installed correctly. Close anti-virus software and reinstall the driver. If that fails, update the driver manually by pointing to the installation directory (typically C:\Program Files (x86)\ZWO Design\ZWO_USB_Cameras_driver).
Practical help
Common problems
The camera is overexposed. Reduce the exposure and/or gain settings in the ASICAP software.
Reduce 'USB Traffic' in the software settings. Connect the camera directly to the PC, bypassing any USB hubs.
Your hard drive may be too slow. Use an SSD and record in RAW format instead of RGB24.
Try a different USB port or PC. Update the camera firmware using the ZWO firmware tool.
Disable USB power saving mode in your laptop's power settings.
Before use
- Download and install the latest ASI Cameras driver.
- Install the ASICAP capture software.
- Remove the lens and CS adapter if attaching to a telescope.
- Attach the 1.25-inch nose-piece.
- Ensure the camera is connected to a USB 3.0 port if it is a USB 3.0 model.
- Verify the camera appears in the Windows Device Manager.
Images and diagrams
- The guide includes visual steps for connecting the camera to a telescope, including removing the lens, attaching the nose-piece, and focusing.
- Screenshots illustrate how to adjust resolution, exposure, and gain within the ASICAP software.
- Images show how to configure Windows Power Options to prevent USB power saving.
Model compatibility
- Compatible with various ZWO ASI models including ASI120, ASI178, ASI290, ASI185, ASI385, and ASI224 series.
- Driver installation process is specific to Windows.

Manual page author
Emily Carter
User documentation editor
Prepares concise manual descriptions and highlights the most useful setup, operation, and maintenance information for readers.