Furniture / Home Furnishing
ADC 181B Air Duct and Air Connector Installation Guide
Quick installation guide for ADC 181B nonmetallic air ducts and connectors, covering connection and splicing procedures using tape, fasteners, and mastic.
Table of contents
Manual images
Jump to the sectionQuick guide from the manual
This document provides standardized installation procedures for ADC 181B nonmetallic air ducts and air connectors with plain ends. It covers two primary methods for creating connections and splices: using tape and fasteners, or using mastic and fasteners. Always ensure compliance with local building codes and use materials labeled in accordance with Standard UL 181B.
Connections and splices using tape and fasteners
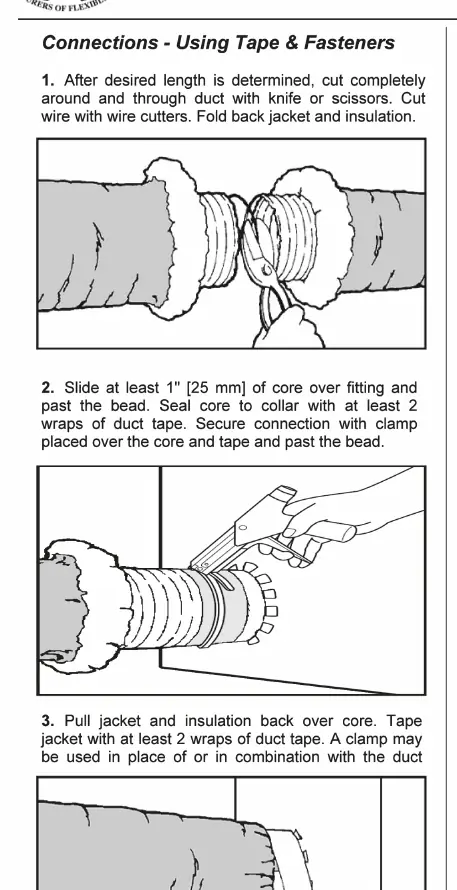
- Determine the desired length and cut completely through the duct using a knife or scissors. Cut the wire with wire cutters and fold back the jacket and insulation.
- Slide at least 1 inch (25 mm) of the core over the fitting, ensuring it passes the bead.
- Seal the core to the collar with at least 2 wraps of duct tape.
- Secure the connection with a clamp placed over the core and tape, past the bead.
- Pull the jacket and insulation back over the core and tape the jacket with at least 2 wraps of duct tape.
- For splices, butt two cores together on a minimum 4-inch (100 mm) metal sleeve, tape the cores together with at least 2 wraps of duct tape, and secure with 2 clamps placed over the taped core ends past the beads.
Connections and splices using mastic and fasteners
- Cut the duct to the desired length, cutting through the wire and folding back the jacket and insulation.
- Apply mastic approximately 2 inches (50 mm) wide uniformly around the collar of the metal fitting or over the ends of a 4-inch (100 mm) minimum length metal sleeve.
- Slide at least 2 inches (50 mm) of the core over the fitting or sleeve and past the bead.
- Secure the core to the collar or sleeve with a clamp applied past the bead.
- Pull the jacket and insulation back over the core and tape the jacket with at least 2 wraps of duct tape.
Important notes and limitations
- For uninsulated air ducts and connectors, disregard references to insulation and jacket.
- Use beaded sheet metal fittings and sleeves when using nonmetallic clamps.
- Tapes must be listed and labeled in accordance with Standard UL 181B and marked 181B-FX.
- Nonmetallic clamps must be listed and labeled in accordance with Standard UL 181B and marked 181B-C.
- Nonmetallic clamps are limited to 6 in. w.g. (1500 Pa) positive pressure.
Practical help
Common problems
Using nonmetallic clamps on high-pressure systems
Nonmetallic clamps are limited to a maximum of 6 in. w.g. (1500 Pa) positive pressure.
Incorrect tape or clamp certification
Ensure all tapes are marked 181B-FX and all nonmetallic clamps are marked 181B-C, per UL 181B standards.
Before use
- Verify the duct is nonmetallic with plain ends.
- Ensure you have a sharp knife or scissors and wire cutters.
- Confirm you have UL 181B-FX labeled tape.
- If using clamps, ensure they are UL 181B-C labeled.
- If using mastic, check the container for application rate and cure times.
Specs in practice
- 6 in. w.g. (1500 Pa)
- Maximum positive pressure limit when using nonmetallic clamps.
- 4 inch (100 mm) sleeve
- Minimum length required for metal sleeves used in splicing.
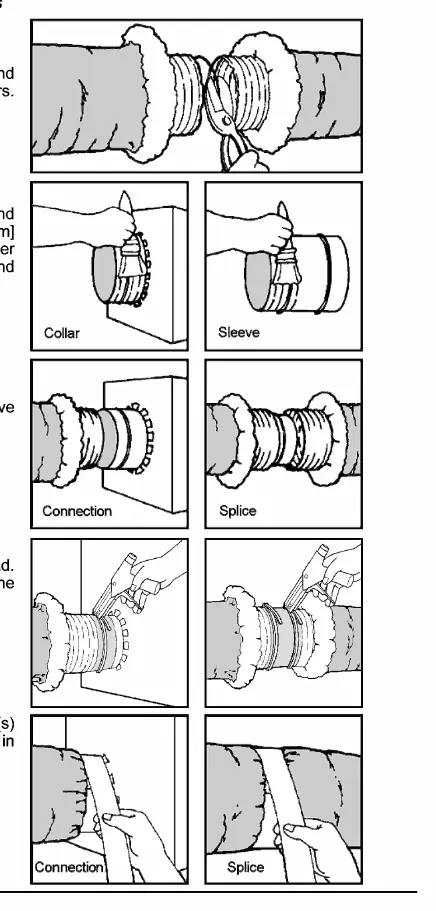
Images and diagrams
- The diagrams illustrate the sequence of cutting the duct, folding back insulation, applying tape or mastic, and securing with clamps.
- Visuals distinguish between connecting a duct to a fitting versus splicing two duct ends together.
Model compatibility
- Use beaded sheet metal fittings and sleeves when using nonmetallic clamps.
- For uninsulated ducts, ignore instructions regarding jacket and insulation.

Manual page author
David Miller
Documentation analyst
Organizes user manual content into clear summaries, with attention to model details, product context, and everyday usability.