Electronics / Routers
Quick Start Guide for Adtran NetVanta 3140 Fixed Port Router
Quick start guide for the Adtran NetVanta 3140 Fixed Port Router. Includes instructions for accessing the GUI and CLI, configuring IP addresses, changing passwords, and interpreting front panel LED indicators.
Quick answers from the manual
Quick answer
- The NetVanta 3140 is a fixed port router. Access the GUI via web browser at 10.10.10.1 or use the CLI via console/Telnet/SSH. Default credentials are admin/password. p. 1, 2, 4
Key actions
- Access GUI p. 1
- Access CLI p. 2
First start
- Connect to GIG 0/1 port, power on, and access via browser or terminal. p. 1, 2
Problems and fixes
STAT LED is solid red
The power is on, but the self-test failed or the boot mode code could not be booted.
p. 3Maintenance and reset
- Restore factory defaults via the online guide. p. 4
Technical specifications
| Parameter | Value | Meaning | Pages |
|---|---|---|---|
| Default IP | 10.10.10.1 | Factory default IP address | p. 1, 4 |
| Console Baud Rate | 9600 | Serial communication speed | p. 2 |
Where to find it in the PDF
- Getting Started and GUI Access p. 1
- CLI Access and Commands p. 2
- Configuration and LEDs p. 3
- Defaults and Support p. 4
Table of contents
Quick Guide
The NetVanta 3140 Fixed Port Router is designed for network connectivity and management via a web-based GUI or an AOS command line interface (CLI). The unit ships with a static IP address of 10.10.10.1 and supports DHCP client mode. Default credentials are admin for the username and password for the password.
Accessing the GUI
You can access the graphical user interface (GUI) using a web browser. There are two methods:
- Static IP: Connect your PC to the GIG 0/1 port. Set your PC's IP address to 10.10.10.2, Subnet Mask to 255.255.255.0, and Default Gateway to 10.10.10.1. Open a browser and navigate to http://10.10.10.1.
- DHCP: Connect the router to a network with a DHCP server using the GIG 0/1 port. Identify the IP address assigned to the router by the DHCP server and enter that address into your web browser.
Accessing the CLI
The AOS CLI can be accessed via the console port or a Telnet/SSH session.
- Console Port: Requires a VT100 terminal emulation application (e.g., PuTTy, SecureCRT) and a straight-through serial cable with a DB-9 connector. Use settings: 9600 baud, 8 data bits, no parity, 1 stop bit, no flow control.
- Telnet/SSH: Connect to the router's IP address (default 10.10.10.1) using a Telnet or SSH client. Log in with the default credentials (admin/password).
Configuration
To manually configure the IP address on the GIG 0/1 port, use the following CLI commands:
- Enter config terminal.
- Enter interface gigabit-eth 0/1.
- Enter ip address 10.10.10.1 255.255.255.0.
- Enter no shutdown to activate the interface.
- Enter do write to save the configuration.
To change login passwords, use the username, enable password, and line telnet commands within the configuration mode.
LED Indicators
The front panel LEDs provide status information:
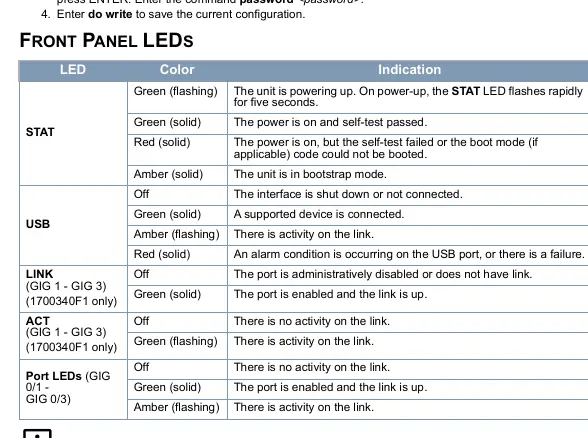
- STAT: Indicates power and self-test status. Flashing green means powering up; solid green means self-test passed; solid red indicates a failure.
- USB: Indicates connection status of supported devices.
- LINK/ACT: Indicates port status and network activity.
Practical help
Common problems
Cannot access the GUI via browser
Ensure your PC is on the same subnet (10.10.10.x) if using a static IP, or verify the IP address assigned by the DHCP server.
STAT LED is solid red
The unit's self-test failed or the boot mode code could not be booted.
USB to serial adapter not working
Ensure the drivers for the USB to serial adapter are installed according to the manufacturer's instructions.
Before use
- Verify power connection to the unit.
- Connect Ethernet cable to the GIG 0/1 port.
- Ensure terminal emulation software (e.g., PuTTy) is installed for console access.
- Have default credentials (admin/password) ready.
- Check if your network requires DHCP or static IP configuration.
Images and diagrams
- The front panel LED table helps identify the status of the unit (power, USB, link, activity).
- The CLI commands section outlines how to manually set the IP address and change passwords.
Model compatibility
- Requires VT100 terminal emulation for console access.
- Supports both static IP and DHCP network configurations.

Manual page author
Emily Carter
User documentation editor
Prepares concise manual descriptions and highlights the most useful setup, operation, and maintenance information for readers.