Industrial / Remote Controls
User Manual for Allmatic B.RO MINI 1CH Radio Receiver
Quick guide for the Allmatic B.RO MINI 1CH programmable radio receiver. Learn how to install, program relay modes, pair transmitters, and perform a system reset.
Quick answers from the manual
Quick answer
- The B.RO MINI 1CH is a programmable radio receiver. It supports up to 1000 transmitters and features three relay output modes: toggle, immediate, and timed. p. 3
Key actions
- Pairing a new transmitter p. 4
- Performing a total reset p. 7
First start
- Power the receiver and wait for the LED to flash twice. Once the LED turns off, it is ready. p. 4
Maintenance and reset
- To reset, power off the receiver, hold the learning button, power on, and release when the LED turns off. p. 7
Technical specifications
| Parameter | Value | Meaning | Pages |
|---|---|---|---|
| Power Supply | 12-24 Vac/Vdc | Operating voltage | p. 3 |
| Frequency | 433.92 MHz | Radio frequency | p. 3 |
Where to find it in the PDF
- Installation and Programming p. 4, 5, 6, 7
Table of contents
Manual images
Click an image to enlargeQuick guide from the manual
The Allmatic B.RO MINI 1CH is a miniaturized Rolling Code radio receiver designed for automation systems. It features a single voltage-free contact relay output and supports up to 1000 transmitters. The device is programmable with three different relay output modes: Toggle, Immediate, and Timed.
Description and technical characteristics
The receiver is equipped with 30 cm long cables for easy connection. Key components include an indicator LED, a learning button, and a radio module.
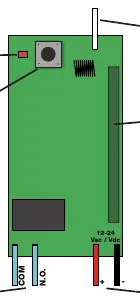
- Power Supply: 12-24 Vac/Vdc
- Radio coding: Rolling Code Allmatic
- Frequency: 433.92 MHz
- Max transmitters: 1000
- Max range (open field): 250 m
- Operating temperature: -10 to +55 °C
- Relay Contact: Normally Open, 1A @ 30Vdc MAX / 0.5A @ 42.4Vac MAX
First installation
Once the device is physically installed and wired:

- Power the receiver.
- Wait for the LED to flash twice.
- Once the LED turns off, the receiver is ready for use.
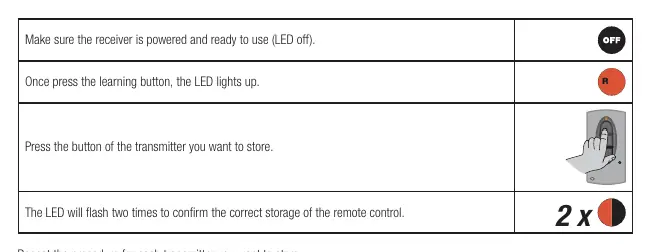
Learning a transmitter
- Ensure the receiver is powered and the LED is off.
- Press the learning button on the receiver; the LED will light up.
- Press the button on the transmitter you wish to store.
- The LED will flash twice to confirm successful storage.
Note: The device exits the programming menu after 10 seconds of inactivity. The receiver stores only one button per transmitter; storing a second key replaces the previous one.
Relay output programming
The relay output can be configured in three modes:
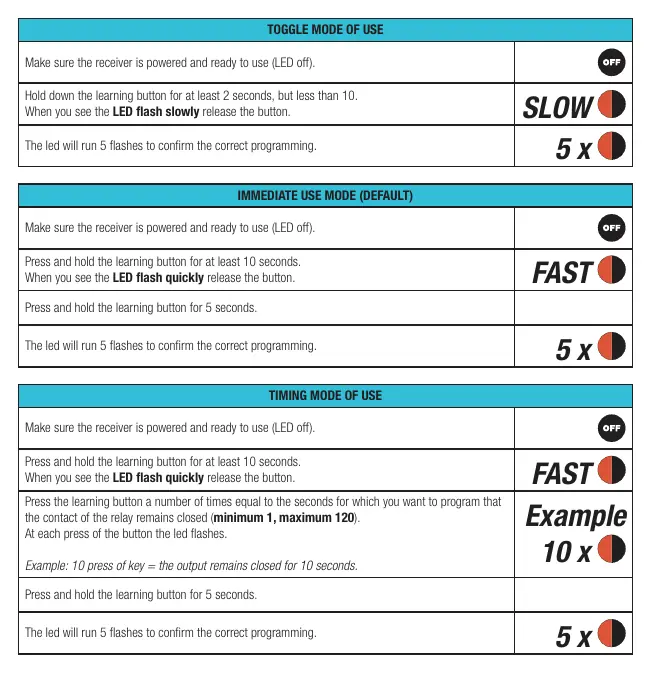
- Toggle mode: Relay changes status each time the transmitter button is pressed. Hold the learning button for 2-10 seconds until the LED flashes slowly, then release.
- Immediate mode (Default): Relay remains closed while the transmitter button is pressed. Hold the learning button for at least 10 seconds until the LED flashes quickly, then release. Hold for 5 seconds to confirm.
- Timed mode: Relay remains closed for a programmable time (1-120 seconds). Hold the learning button for at least 10 seconds until the LED flashes quickly, then release. Press the learning button a number of times equal to the desired seconds (e.g., 10 presses = 10 seconds). Hold for 5 seconds to confirm.
Advanced transmitter management
You can learn a new transmitter using one that is already learned:
- Press the hidden button on an already learned transmitter.
- The LED on the receiver will light up.
- Press the button on the new transmitter to store it.
To cancel a single transmitter, press and hold the hidden button of the transmitter to be deleted, then press the first button of the transmitter. The receiver LED will flash 4 times.
Total reset
To erase all stored transmitters and return to default settings:

- Power off the receiver.
- Press and hold the learning button.
- Power on the receiver while holding the button.
- When the LED turns off, release the button.
- The LED will flash twice to confirm the reset.
Product disposal
This product must be disposed of according to local regulations for electronic waste. Do not throw it into household waste. Dismantling must be carried out by qualified personnel.
Practical help
Common problems
Device does not respond to transmitter
Ensure the transmitter is learned correctly and the receiver is powered. Verify that the transmitter code is compatible (Rolling Code Allmatic).
Range is poor
Check for metal parts, shielding, or other devices operating at the same frequency (433.92 MHz) near the receiver.
Before use
- Ensure power supply is 12-24 Vac/Vdc
- Verify transmitter compatibility (Rolling Code Allmatic)
- Ensure the receiver is installed in a location free from heavy metal shielding
- Wait for the LED to flash twice after powering on
Specs in practice
- Power Supply
- 12-24 Vac/Vdc input voltage
- Radio coding
- Rolling Code Allmatic protocol
- Max transmitters
- Capacity to store up to 1000 unique transmitters
Images and diagrams
- The receiver features a learning button and an indicator LED.
- Wiring terminals include COM and N.O. for the relay output, and + and - for the power supply.
Model compatibility
- Compatible with all Rolling Code Allmatic transmitters.

Manual page author
Michael Turner
Technical manual editor
Reviews PDF manuals for structure, safety notes, and practical product details so readers can find the right information quickly.