Electronics / Cameras
Amcrest SmartHome 1080P Motion-Activated Floodlight Outdoor Wi-Fi Security Camera User Guide
Comprehensive setup and operation guide for the Amcrest ASH26 1080P Motion-Activated Floodlight Outdoor Wi-Fi Security Camera, covering app installation, motion detection, and floodlight settings.
Table of contents
Setting Up the Camera
The Amcrest Smart Home app is the central hub for managing your 1080P Motion-Activated Floodlight Outdoor Wi-Fi Security Camera. To begin, download the Amcrest Smart Home app from the Google Play Store or Apple App Store. Create an account and log in to proceed with the device setup. Ensure you grant all necessary notification and location permissions to the app to facilitate a smooth connection process.
Once logged in, tap Add Device. You can connect your camera by scanning the QR code located on the side of the unit. If scanning is not possible, you may manually enter the serial number. Ensure the camera is powered on and the indicator light on the front is blinking green, which signifies it is ready to be paired. Follow the in-app instructions to complete the configuration. A solid green light indicates the camera is successfully connected and ready for use.
How to Use the Camera
The main interface of the Amcrest Smart Home app is the Devices menu, which lists all your connected cameras. From here, you can access live views, motion events, and account settings. The camera features active deterrents, including a built-in siren and floodlight, which can be manually toggled on or off directly from the live view menu.
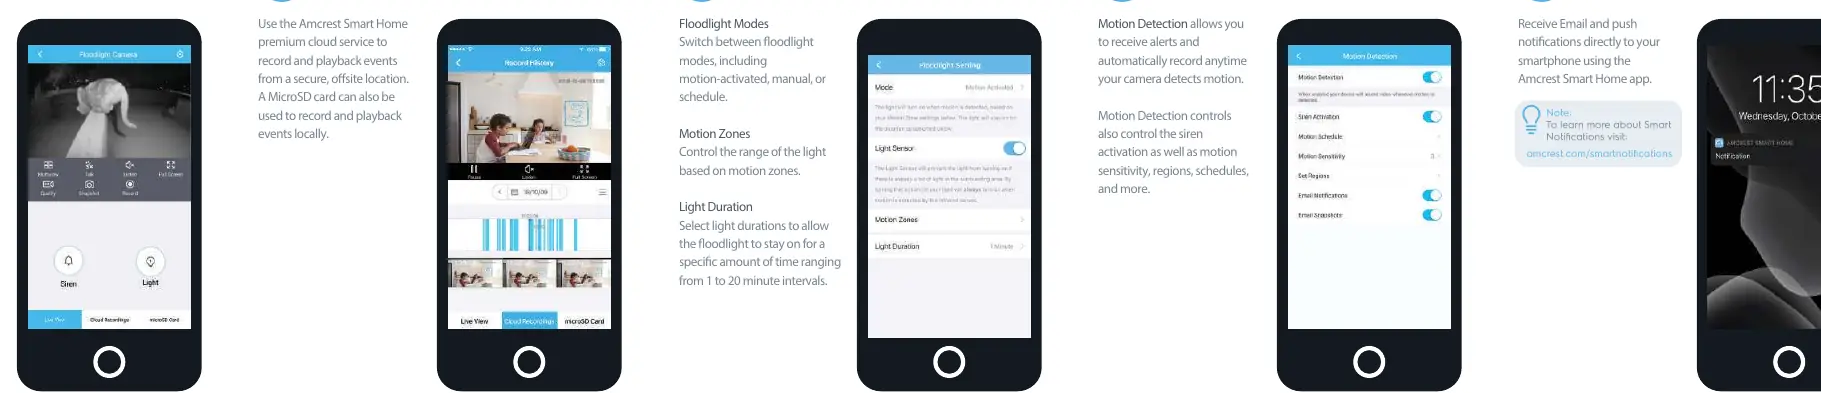
The floodlight settings allow for flexible operation. You can choose between motion-activated, manual, or scheduled modes. Additionally, you can define specific motion zones to control the range of the light and set the light duration for intervals ranging from 1 to 20 minutes.
Motion Detection and Storage
Motion detection is a core feature that triggers alerts and automatic recording whenever activity is detected. You can customize motion sensitivity, detection regions, and schedules to suit your security needs. The system also supports smart notifications, sending push alerts or emails directly to your smartphone.
For storage, the camera supports the Amcrest Smart Home premium cloud service, which provides secure, offsite recording and playback. Alternatively, you can use a MicroSD card for local storage of your recorded events. Always ensure your firmware is up to date and that your network connection is stable for optimal performance.
Manufacturer information
Amcrest
Practical help
Common problems
Unable to scan QR code
Manually enter the serial number (S/N) located on the device by tapping 'Manually enter SN' in the app.
Camera not connecting
Ensure the indicator light is blinking green before starting the setup process. Check that all app permissions are enabled.
Before use
- Download the Amcrest Smart Home app
- Create and log into your account
- Grant notification and location permissions
- Ensure the camera is powered on
- Verify the indicator light is blinking green
Specs in practice
- Floodlight Modes
- Options to trigger the light via motion, manual control, or a set schedule.
- Motion Zones
- Configurable areas that define where the camera detects motion and triggers the floodlight.
- Light Duration
- The length of time the floodlight remains on after being triggered, adjustable from 1 to 20 minutes.
Images and diagrams
- The app interface includes a Devices menu for managing multiple cameras.
- Live view provides quick access to siren and light toggles.
- Record history allows playback of events from cloud or local storage.
Model compatibility
- Requires Amcrest Smart Home app for initial setup.
- To use with Amcrest View Pro, you must complete setup in the Smart Home app first.

Manual page author
David Miller
Documentation analyst
Organizes user manual content into clear summaries, with attention to model details, product context, and everyday usability.